 In This Article
Oil vs. Latex
Paint vs. Stain
Effect of Sun Exposure
Lumber Quality
Application Weather
Primer Application
Topcoat Application
Construction Details
View all EXTERIORS articles
The best way to keep paints and stains on wood siding and trim has been debated since manufactured house paint was first introduced in the late 1800s. Unfortunately, much of what was learned in the past does not apply today as the paints, stains, building techniques, and the wood itself have changed so much over the past few decades.
Some basic lessons that haven’t changed, however, are the importance of using high-quality paint and doing the necessary prep work. On a new house that starts with making sure the wood is dry and clean, and hasn’t sat in the sun too long causing UV damage. When repainting, the prep work often takes more time than the finish coat and is critical to its success. After cleaning, scraping, sanding, and spot-priming, applying the finish coat is the easy part.
OIL VS. LATEX
Back in the day, oil-based paints with lead provided very good performance, although not perfect. Oil-based paints had excellent adhesion and durability, but also provided a good food source for mildew. Lead helped create a durable and flexible finish that resisted cracking. Oil-based paints also blocked water vapor, which was good unless excess moisture got trapped under the paint, causing blistering and peeling.
Lead was banned in U.S. house paints in 1978 because of the extreme health threat it posed, especially to children. Around the same time, manufacturers started reducing or modifying the solvents used in oil-based paints to comply with state and federal air-quality laws. The trend has been to slowly phase out oil-based (alkyd) paints and stains in favor of water-based (latex) finishes, which now dominate the market.
Letex paints. When first introduced, many water-based paints did not perform very well. However, they have continually improved over the years. The consensus now is that, for most applications, high-quality 100% acrylic paints are better overall than comparable oil-based products. Compared to oil/alkyd paints, 100% acrylics are more flexible and breathable, making them less prone to flake or peel. They are less likely to mildew or to fade from sunlight. And because they are more permeable to water vapor, they are less prone to moisture problems.
Oil-based primers. While oil-based paints aren’t widely used today, there are a few places where oil-based finishes may be preferable, especially for primers. On woods such as cedar and redwood with high levels of extractives, oil-based primers can be effective stain blockers, minimizing the “bleed-through” of the tannins that can stain the paint surface.
When repainting difficult surfaces, including degraded wood, an oil-based primer can provide a better bond since it dries more slowly and penetrates the surface more deeply. Oil-based primers can be used over any finish — bare wood, paints or stain, oil or latex. And both oil and latex top coats can be used over an oil-based primer.
This contradicts the customary advice that oil-based finishes should never go over latex finishes. This is generally true, except with primers, which are specially formulated for good adhesion to the substrate below and top coat above. When in doubt, contact the manufacturer for advice with a specific product.
Another place I still prefer oil is deck stains. If you like semi-transparent decking stains, many people prefer oil-based finishes because of the superior penetration and adhesion. Read more on Deck Stains.
PAINT VS. SOLID STAIN
Solid and semi-solid stains did not exist 30 years ago, but have grown in popularity in recent years. Most solid-color stains are latex, but a few oil-based formulations are still available in some areas. To a large extent, solid and semi-solid stains used the same formulations as paint, but with less pigment and a thinner carrier – essentially watered-down paint that allows some wood grain to show through.
Solid latex stains have similar characteristics to latex paint, but create a much thinner film. They penetrate the wood surface a little, but also create a surface film which can peel like paint. Apples-to-apples, solid stains will not last as long as paint or protect the underlying wood as well. On the plus side, solid stains are easier to apply and usually easier to recoat.
Because they lie somewhere between a paint and a penetrating stain, solid stains generate a fair amount of confusion and debate. Should they be primed like paint or applied to bare wood like penetrating stains? Do they need scraping and sanding before recoating like paint, or do you just add another coat as with traditional oil-based stains? Do they last as long as paint?
Solid-color acrylic stains have been around long enough that the answers to these questions are fairly clear. A primer should not be necessary on rough-sawn surfaces, where solid stains perform best. However, a good alkyd primer is recommended for cedar and redwood and will increase the lifespan of the stain on any wood surface. Primer will also change the look of the stain, making it more opaque like paint.
On smooth surfaces, a primer will help with adhesion, but you’re probably better off with paint. With paint, you will get a more consistent finish without lap marks. Paints will also outlast solid stains, but the stains are generally easier to recoat. If applied properly, solid stains may flake a little, but the thinner coat is easier to scrape and sand than paint — you don’t have thick edges and craters to sand as with multiple coats of paint.
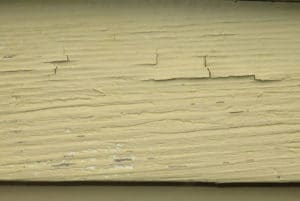
How long will solid stains last? There are many variables that determine the lifespan of a paint or stain. All things being equal, however, paints outlasts stains because of the much thicker coating. Two coats of 100% acrylic stain over a primer might last 7-10 years vs. 15 years or more for high-quality acrylic paint. Solid and semi-solid stains work best when applied to a rough-sawn surface where you can expect a substantially longer service life — but you may use twice as much stain.
AVOID EXPOSING WOOD TO SUNLIGHT
Just about the worst thing you can do to bare exterior wood, is to let it weather before finishing to “open the pores” as some painters believe. This is true whether the wood is new or recently scraped for repainting.
In fact, the longer unpainted wood is left to weather, the shorter the service life of the paint job. Deterioration of the wood surface from UV radiation weakens the bond of paint to wood, even if the wood looks OK to the eye. In effect, you are painting on a very thin layer of rotten wood.
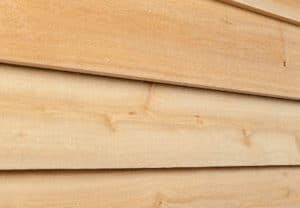
The USDA Forest Products Lab (FPL) has studied the performance of exterior wood finishes since the 1980s and published a number of excellent reports on paints and stains. After extensive real-world testing of painted wood exteriors, they found that exposing wood to sunlight before priming can cut the life of a paint job by 50% or more!
In field tests, the FPL found that a good quality latex paint (applied by engineers under idea conditions) lasted around 30 years if the wood was not exposed to sunlight before painting. If the wood was exposed to direct sun for one week before painting, the same paint job lasted 12 years. With two weeks sun exposure, the wood needed repainting in just 10 years.
The takeaway is clear. Install pre-primed or prefinished siding, or prime it right away – within three days at most after installation. If the unpainted siding is exposed longer, the FPL recommends pressure washing or a light sanding with 80-grit paper to expose fresh wood before priming. However, with pressure washing, you need to be careful not to saturate the wood or drive water behind the siding. Then, by the time you dry things out sufficiently, you’re back where you started – needing to sand. Also pressure washing can do a lot of damage to soft wood, gouging out soft areas and raising the grain, so it’s best to avoid it.
LUMBER QUALITY
In older times, tight-grained quartersawn (vertical-grain) lumber from virgin timber was often used for bevel sidings. This wood was dimensionally stable and held paint well. Today’s plantation grown wood is less dense, less dimensionally stable, and has wider growth rings, all of which make it a poorer substrate for paint, especially when flat-sawn as most sidings are today.
Flat-sawn lumber exposes wide bands of latewood, which does not bond well to paint as it ages and gets more brittle. Thin coats of paints and solid stains may develop cracks over the latewood bands.
Raised grain is another common problem resulting from milling flat-sawn lumber, especially on the pith side of the board – the side that faces into the tree.
The easiest solution to both problems is to install the siding with the rough side out. This is true for paints and solid stains as well as penetrating stains. The rough texture provides thicker coatings, better adhesion, and less exposure to latewood.
If flat-sawn siding must be installed with the smooth side facing out, the FPL and other painting experts recommend hosing down the surface (just enough to wet the surface, not to saturate the wood), letting it dry for 2-3 days, and then lightly sand with 80-grit sandpaper. As soon as the wood surface is dry, prime it and apply two top coats of paint or solid stain.
Mill glaze is a hard, burnished surface sometimes left by milling machines on the smooth face of siding, especially cedar and redwood. Mill glaze has been blamed over the years for numerous paint failures. In response, the USDA Forest Products Lab did extensive testing and concluded that mill glaze appears to be a rare or imaginary problem and that the paint failures were most likely caused by other factors: raised grain, finishing weathered wood, or application when it was too hot, too cold, to wet, or too humid.
The solutions to mill glaze, real or imagined, are the same as the solutions for other wood surface problems – use the rough-side out if possible. If you must paint or stain the smooth face and it appears hard and shiny, first lightly sand it with 80 grit sandpaper to rough up the surface.
Moisture content. Make sure the wood is dry before painting. If the wood is superficially wet on the surface only, one day in the sun should be enough. If the wood is saturated, several days may be required. It’s best to paint wood when it has reached its equilibrium moisture content, that is, the level it will remain at during normal weather conditions. If you have to wait more than a few days, you may need to lightly sand with 80 grit sandpaper to remove any wood fibers damaged by sunlight.
Rough side out. Given the quality of most wood sidings today, painting or staining the unplaned rough side is the simplest way to improve paint and stain performance. You will get a thicker coat and better adhesion or “bite” from the rough surface. You may use twice as much paint or stain, but you may also get twice the service life – all things considered, a good deal as long as you like the more rustic appearance.
APPLICATION WEATHER
When a paint job fails prematurely, it may have nothing to do with the wood or the paint, but with the weather conditions the day the paint was applied. Understandably, commercial painters do not want to sit around and wait for a perfect day to paint. However, if conditions are unfavorable for painting, you may need to raise objections and have the painters come back another day.
Too hot, too cold. In general, you should not apply paint or solid stain when the outdoor temperature is over 90° F – or under 50° F for latex paints or 40° F for oil-based paints. You want the temperature to stay within this range until it has had a chance to dry, ideally for 24 hours after application. Some paints are formulated for wider temperature ranges, which you may see on the side of the can, but don’t push it too far or you may regret it. Even if the paint or stain looks OK after a cold night, it may have a shorter service life.
Rain and dew. If it’s threatening to rain before the paint dries, you should wait for better weather or you can end up with a mess that may require a lot of sanding and repainting to correct. Also it’s great to get an early start, but make sure the morning dew has evaporated before painting.
Spring and fall painting. It is tempting to take advantage of warm daytime temperatures for painting, but if the temperature drops too low at night, you risk paint problems from dew on the paint surface and inadequate curing. This can lead to mildew, surfactant bleed, and poor adhesion, which will shorten the life of the paint job.
Follow the sun. An old painter’s rule-of-thumb is to follow the sun around the house to avoid cooking the paint before it dries, which can cause blistering. The goal is to let the paint surface dry for a few hours before facing direct sun. If the west side of the house gets a lot of sun, then it’s best to hit that early in the morning, as soon as the dew has evaporated. Next do the east side in late morning and the south side at mid-afternoon. The north side can be painted any time. The darker the color, the greater a concern this is since dark colors will heat up quickly in direct sun.
PRIMER APPLICATION
A good prime coat is the foundation of a quality paint job. It seals the surface of the wood and provides good adhesion for the paint, increasing its durability and service life. With knots and wood species with high levels of resins or extractives (like redwood and cedar), priming can also reduce bleed-through and staining of the paint surface.
Stain-blocking primer. In the old days, painters covered knots with shellac (actually made from lac bug secretions) prior to priming the wood. You can still do this or choose one of the many stain-blocking primer/sealers on the market. If you are applying paint or solid stain to redwood or cedar, you should use an oil/alkyd-based stain-blocking primer on the front, back, and all end cuts.
Back priming. This will definitely help keep excess moisture out of the siding, reduce extractive bleed, and improve the appearance and longevity of the siding and finish. It is most important when installing siding over foam sheathing or other surfaces that cannot absorb water. Instead of a primer, you can use a clear water-repellent preservative (WRP) on the back side and get the same benefit.
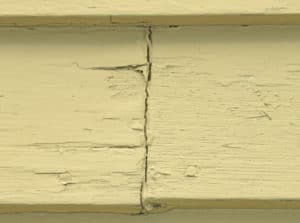
End cuts. End grain sucks up water like a straw through capillary action. As a result, you will often see paint peeling and wood splitting and deterioration at siding butt joints. Using a primer or WRP on all cut ends will help keep these areas dry and prolong the life of both the wood and finish.
Pre-priming. Given the importance of getting new wood primed quickly, using pre-primed or pre-finished siding is a pretty attractive option. The coating is usually uniformly applied in a factory setting. However, some pre-finishers apply a thinner coat than you would in the field.
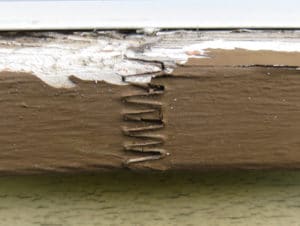
A proper prime coat should be thick enough to hide most of the wood grain. Discuss this with your vendor before ordering. In general, I’ve been happy with pre-primed and prefinished trim and sidings materials. With trim, however, avoid finger-jointed stock, which can look like solid wood when primed. On the exterior, the finger joints will soon make themselves visible.
TOPCOAT APPLICATION
Once you’ve done all the necessary prep work and applied a good primer, applying the top-coats of paint or solid stain is the easy part.
How soon to paint. Once new wood had been primed, it’s best to paint it soon as the primer is fully cured. The usual recommendation is to paint as soon as the primer is fully cured, but to wait no more than two weeks between the primer and first coat, and between the first and second coats.
However, tests at the USDA FPL found no problems with painting wood that had been primed six months ago and sat through a winter. If you have to wait longer than a couple of weeks between coats, make sure the surface is clean, and hose it down if necessary. If it’s been several months between coats, you may need to apply a second prime coat.
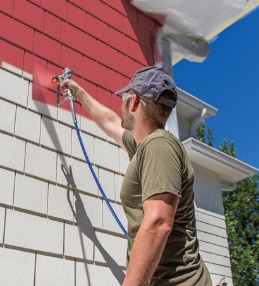
Brush or spray. Brushing is considered by many to be the best application technique because of better contact and adhesion. Spraying, however, is much faster and is fine as long as you “back brush” after spraying to get most of same benefits as a brush application. Also, professional spray equipment can be adjusted to provide a thicker coating than is practical with a brush.
Coverage. If paint or stain is applied too thin, then you will be repainting sooner than planned. To get a sufficiently thick coat, try to roughly follow the coverage guide on the paint can.
The risk of a too thin coat is greatest when applying solid or semi-solid stain to a smooth wood surface. Applying paint or stain to a rough-side-out siding will take at least twice as much paint and may last up to twice as long before recoating. Given all the problems with keeping paint on today’s lower quality woods, using the rough side out is a good option if you like the appearance.
CONSTRUCTION DETAILS
Scientific tests of paint are usually done on “test fences” with no building attached. In the real world, the paint is on a wall with a house behind and a roof overhead. There are flashings, housewraps, indoor moisture levels, and many other factors that affect the moisture content of the wood siding and the longevity of the finish.
Roof overhangs. If you are building new, design generous overhangs on all four sides of your house. These will help keep rainwater off the siding and out of the wall system. No siding system is 100% waterproof and some water will get behind the siding. Some may also penetrate around door and window openings – the number one leakage point in modern wood-frame homes. Overhangs are a perfect low-tech solution. Gutters will help as well where appropriate.
Interior moisture. If you find that paint is peeling near bathrooms or other wet areas of the house, you may have high interior moisture levels in these rooms, causing water vapor to move out through the walls in cold weather. Your first line of defense is an effective exhaust fan that is used when bathing or showering. Applying a vapor-barrier paint to the interior of the problem wall can also help.
Corrosion-resistant nails. Use nails that will not corrode and stain the siding. With redwood or cedar, or in coastal areas, always use stainless steel.
Rain-screen siding. Back in the day, wind blew through uninsulated walls and any liquid water or water vapor in the walls was quickly cleared away. Nowadays, with multiple layers of OSB, vapor retarders, air barriers, fibrous and foam insulations, and housewrap, the moisture dynamics of walls have become much more complex. The moisture flows are harder to understand and predict, giving building science buffs much to argue about endlessly. There are many opinions, but few well-documented facts.
It has been pretty well documented, however, that wood siding installed over foam sheathing has a greater risk of moisture problems – cupping and paint failure in particular. For other wall systems it is less clear. Some people believe that plastic housewraps can lead to similar problems because the wall cannot temporarily absorb and store water that penetrates the siding, as can felt paper and wood sheathing.
Of course, the quality of the wood siding is also an issue. Low-quality siding is likely to cup, crack, and experience finish failures over the best wall system while high-end, vertical-grain cedar might be fine over any wall system. And climate plays a role too. You’re more likely to have problems in a humid coastal climate or harsh northern climate than a dry and moderate climate.
Taking all these variables into account, you may decide that a rain-screen siding installation is worth the extra time and money. There’s no doubt that this single step that can improve the performance and service life of wood siding and finishes.
The basic approach is to create an air gap between the sheathing and siding. This provides enough drainage and ventilation behind the siding to protect it from absorbing excess moisture. Researchers say the gap should be at least ¼ in. to be effective. Larger gaps may be a little better, but create more detailing problems and increase costs.
An even simpler alternative is a draining housewrap. If you go this route, choose a product that provides at least a ¼” gap, such as HomeSlicker (Benjamin Obdyke). Read more about Rain-Screen Siding .
See also Deck Stains & Finishes
K.W. says
Best Filler for Wood Siding Before Paint?
We plan to paint the T-111 siding on Mom’s 31-year old doublewide, but need to patch some holes about 1/4-1//2″ diameter. What should I use?
buildingadvisor says
You can use any good-quality commercial wood filler that’s rated for exterior use.
For a hole this size, one-part fillers should be fine, such as Gorilla or Minwax.
For larger holes, gouges, or deteriorated wood, I would go with a two-part epoxy filler such as Minwax High-Performance Wood Filler or JB Weld, if you only need to fill a few holes.
The two-part fillers require mixing, have short working times, and are more difficult to use and sand, but deliver superior performance.
With either type of filler, use a flexible putting knife to force the filler into the hole or gap and remove any excess. Once the filler it is dry, sand with #80 or #100 sandpaper as needed.
For wood that is deteriorated and pulpy, but dry, first apply wood hardener. Then fill as needed. The hardener essentially turns rotted wood into a solid, waterproof base for filling. I’ve used it successfully on the bottoms of rotting exterior door frames.
Dean Dobbins says
How To Seal the Knots on Pine Siding?
Hello – I am building a house in Rhode Island and am planning to utilize pine clapboards for siding. They are rough sawn and knotty (maybe mid-grade as there aren’t that many knots). I was wondering if you could recommend a treatment process for these boards before installing them? The only thought I currently have is that I’d like to utilize a solid stain so that I don’t have to scrape as much as I maintain the treatment over the years. I have also heard that treating knots with a shellac based primer is an important step to keep the knots from staining through. Do you have any guidance in terms of sequence of treatments and/or product recommendations?
buildingadvisor says
I would use a good primer/sealer on all surfaces before painting.
You will want to spot prime the knots and any resinous areas with a sealer such as BIN shellac-based primer.
The rest of the wood can be primed with any good exterior primer applied to all surface. I still prefer alkyd-based primers for their penetration and grip, if you can still get them in your area. For extra protection, you can put two coats of primer on — never hurts. Also keep a brush handy to seal end cuts during installation — not a necessity — but will give you the best results over time.
Then follow up with two top coats of solid stain or whatever top you prefer.
Always test first on scrap. If you don’t like the look of the stain over a primer, you could use a clear sealer instead. An example is Zinsser Bulls Eye SealCoat. Many clear wood sealers are not intended to take a top coat and do not bond well so make sure you select a clear sealer made to take a topcoat.
If possible, use the same manufacturer for your primer and finish coat. You won’t necessarily get a better job, but you’ll have less finger pointing if you have problems later. Companies love to blame another product when things go wrong — unless the other product is also theirs.
Paul Baumberg says
Re-Stain Weathered Trim or Replace?
We have 30-year-old 1×6 fascia on the outside of our condos. The sun-facing fascia is cupping, it’s dry, and is badly weathered. It’s unlikely it’s been stained since being installed in the early 90’s.
Our condo board wants to re-strain the complex with different colours. I’m strongly encouraging that they replace the fascia, simply because it needs replacing, and also because it will require substantial prep-work and I’m not sure how dried-out, 30-year-old wood will look with a new coat of solid colour stain? I’m getting a lot of pushback from the board suggesting my ideas will add substantially to the cost of the project.
buildingadvisor says
You are correct that paint or solid stain will not bond well to badly weathered wood without substantial prep work. Depending on conditions, this will probably include cleaning, sanding, and priming. Beyond a certain point, it is nearly impossible to keep any coating on badly deteriorated wood.
Prep work typically accounts for 50% to 75% of the cost to repaint. However, this is an area where painting contractors often skimp to keep down costs.
Without proper prep work, the paint job might look good the day it is completed. But it won’t last very long. With acrylic paints and solid stains (essentially watered down paint) you may get peeling within a few years due to poor adhesion.
Make sure the condo association gets a written guarantee stating that the paint will not peel, crack, bubble or fail due to poor workmanship. While paint manufacturer warranties may last for 10 to 25 years, they do not cover workmanship problems or labor costs. Workmanship warranties from painting contractors typically last only 2 to 3 years and may not include materials.
With weathered wood, I would strongly recommend an oil-based primer as this tends to have better adhesion to difficult surfaces. Then top with two coats of paint or stain. If the finish is sprayed, it needs to be back-brushed (brushed by hand after spraying) to get good bonding.
As you suggest, replacing the fascia is preferable to painting badly deteriorated wood. However, lumber quality today is inferior to the wood used 30 years ago unless you spend a lot of money on premium grades. For that reason, many contractors now prefer synthetic and composite materials for exterior trim.
Some of the synthetics, such as cellular PVC, are considerably more expensive than standard wood trim. But if properly installed, you should get a longer service life with less maintenance than the flat-sawn lumber typically used today for trim boards. Especially avoid finger-jointed lumber, which tends to separate at the joints over time due to uneven expansion and contraction.
Zariah LaFleur Powell says
Latex Stain Over Oil Primer?
Can one use semi sold latex stain over oil-based primer?
buildingadvisor says
In general, there is no problem with applying latex paints and stains over an oil-based primer. This would work fine with a semi-solid or solid-based latex/acrylic stains as these are essentially the same as latex paint with less pigment.
Applying oil-based paints over acrylic, however, is not recommended.
Latex and acrylic paints are more flexible than oil-based paints, which is why the oil needs to be the bottom (primer) coat, not the top coat.
Oil-based primers have exceptional bonding characteristics so are a good choice for new wood, wood with resins that might bleed through, and wood that is not in the best condition. You can even use oil-based primers to spot prime over acrylic stains if they are well scraped and sanded.
Some people recommend lightly sanding the oil-based primer before adding a latex or acrylic topcoat. I have never done that and have never had any problems, but it couldn’t hurt.
Leigh Murdoch says
Surface Prep for New Wood Exteriors
What advice do you give to the importance of wood surface preparation before applying paint or stain? How important is sanding and the removal of mill glaze off of new wood? I have heard that this is very important to get best long-term performance from wood finishes.
buildingadvisor says
How to keep paint on wood siding and trim is a topic of endless debate. My go-to source on these questions has always been the USDA Forest Products Lab (FPL), which has been studying how to finish wood siding since the 1980s and, in my opinion, provides the best unbiased information on this topic. They have done extensive real-life testing to try to separate fact from opinion and rumor.
Stories about mill glaze have been circulating for decades. It was reputed to be a problem mostly with flat-sawn siding made from redwood, cedar, and other woods with high levels of extractives.
The FPL has looked at this issue extensively and didn’t find much evidence that the issue was real. As they put it, despite a lot of effort, they were unable to reproduce the problem in their laboratory. They also investigated numerous paint failures in the field that were at attributed to mill glaze and found other issues at fault – raised grain, poor surface prep, improper application (no primer, etc.), and first and foremost, wood that was exposed to the elements for extended periods before painting.
The good news is that whether the real problem is mill glaze, raised grain, or too much exposure to sunlight, the solution is the same: a light sanding with 80 grit sandpaper or pressure washing. (Pressure washing can do a lot of damage, however, if you are inexperienced). Part of the problem is that most siding today is flat-grained, which does not hold paint as well as vertical-grain siding, commonly used in the past.
In most cases, exposure to sunlight of the unfinished wood is the number one factor affecting paint longevity. The FPL recommends no more than a few days of exposure to direct sunlight before priming. Using pre-primed or prefinished siding is a simple solution to this problem. Once the wood is primed, it should be finished with a topcoat as soon as possible, but as long as the wood stays clean, a delay of a couple of weeks or more is generally not a problem.