In This Article
Guardrail Codes
Attaching Posts
Outside Corners
Railings & Balusters
Cable Railings View all DECKING Articles
Sturdy deck railings are an important safety feature for raised decks and are required by code for any deck 30 in. or more above grade. Building codes define the minimum height and strength of the railing system, as well as the size of gaps in the railing – they must be small enough that a small child cannot slip through.
On many older decks the 4×4 posts were notched and then lagged to the rim joist with 3/8 in. or 1/2 in lag bolts or structural screws such as LedgerLoks. More conscientious builders may have used through bolts. The post-to-joist connections were often strong enough, especially with bolts. The weak link in the system, however, was the rim joist that the post was fastened to. Apply enough force to the top of railing and the rim joist would rotate. This can be addressed by reinforcing the rim joist connection to the floor framing (details, below).
On some decks, it’s possible to use 4×4 or larger posts that run continuously from the railing to the footings, supporting both the deck structure and the railing. As long as the posts are not notched, these easily meet the most stringent deck codes.
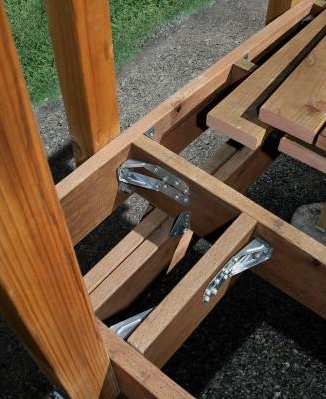
Another approach gaining in popularity is to use steel connectors to reinforce the post attachment. By using special framing connectors engineered for this specific application, you automatically get a rugged railing and a code-approved connection. And installation is pretty straightforward once and efficient once you’ve done a few decks this way.
Whatever approach you use, make sure your lags, bolts, or other hardware are suitable for today’s highly corrosive treated lumber. That means heavy hot-dipped-galvanized or polymer coatings approved for use with pressure-treated lumber.
Deck Guardrail Code
The International Residential Code (IRC), adopted by most US cities and towns, requires 36-in.-high guardrails (called “guards” in the 2015 IRC and later versions) for decks more than 30 in. above the ground. The guardrail system must be strong enough to resist the following loads:
- Uniform Load: 50-pound live load (per linear foot) applied in any direction along the top rail
- Point Load: 200-pound concentrated load applied in any direction at any point along the top rail or top of a post
- Infill Load: 50 pounds of force applied horizontally over one square foot of the balusters or other infill material (area below the top rail)
- Safety Factor: Remember to multiply all these loads by 2.5 for the required safety factor.
With the standard safety factor of 2.5 used by engineers, that means railing and posts must be designed to resist a 125-pound uniform load or a 500-pound point load, and transfer that load through supports to the structure. The infill (details below) must resist 125 pounds over one square foot. The code specifies the load requirements, but does not tell you how to meet it.
The main concern is a push outward from people leaning against the railing. Few older deck railings can meet the code requirement, but building inspectors and professional deck builders are paying more attention to this critical detail. Even if you can squeak by with a weaker railing, do you really want to?
In general, deck posts should be spaced no more than 6 feet apart. Beyond that amount, it becomes very difficult to meet the safety requirements.
Attaching Deck Railing Posts
The problem is that the railing post acts like a lever, exerting a very large force on the connection at the bottom. The weakest link is not the post-to-rim-joist connection, but the rim joist to the floor framing.
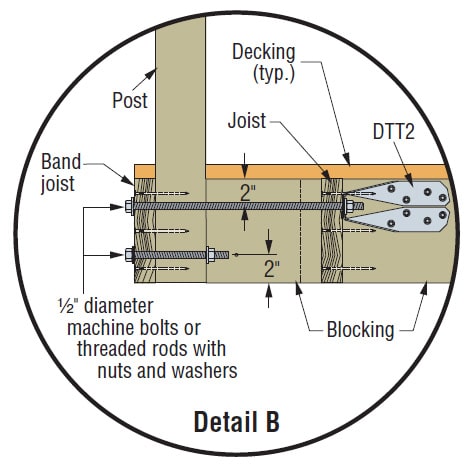
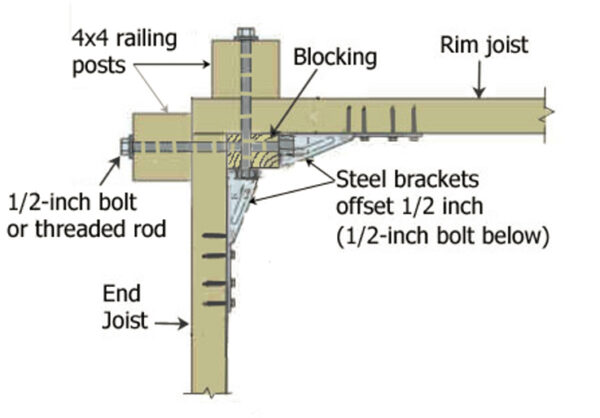
One practical way to resist this force with 4×4 wood posts is to use specialized steel framing connectors. Both Simpson Strong Tie and USP now make steel tension ties designed for this application. The connectors fasten to a deck joist (or joist blocking) with heavy ¼ x 1½-in. wood screws and bolt through the post with a ½-in. diameter through-bolts or threaded rods.
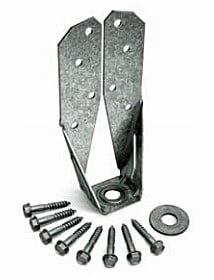
The Simpson connectors (DTT2Z ) can be purchased prepacked with the approved screws and a washer for the bolt head in the post. The USP version (DTB-TZ) installs with the company’s polymer-coated WS15-GC screws. Both companies also sell stainless-steel connectors and screws, designated SS. As an engineered connection, it’s always best to use the fasteners specified by the manufacturer and to stick with the same company for connectors and screws.
While the connectors are moderately expensive at $8 to $10 each (less by the box), they install quickly and provide a rock-solid connection that is virtually impossible to achieve any other way.
The installation details differ somewhat depending on whether the post is installed inside or outside the deck joists. To avoid confusion we’ll refer to the outer joist that runs perpendicular to the deck joists as the rim or band joist. The outer joists that run parallel to the deck joists are called end joists.
The most difficult part of the installation is accurately drilling two 9/16-in. holes in each post for the 1/2-inch bolts or threaded rod. Most installers use a marking jig to locate the holes. A drill press is helpful to keep the holes square to the post. Otherwise a good eye and steady hand are essential.
In general, the steel connector is used with the upper bolt, about 2 inches down from the top of the joist. The lower hole receives a bolt with washers. For longer connections, threaded steel rod is used rather than bolts.
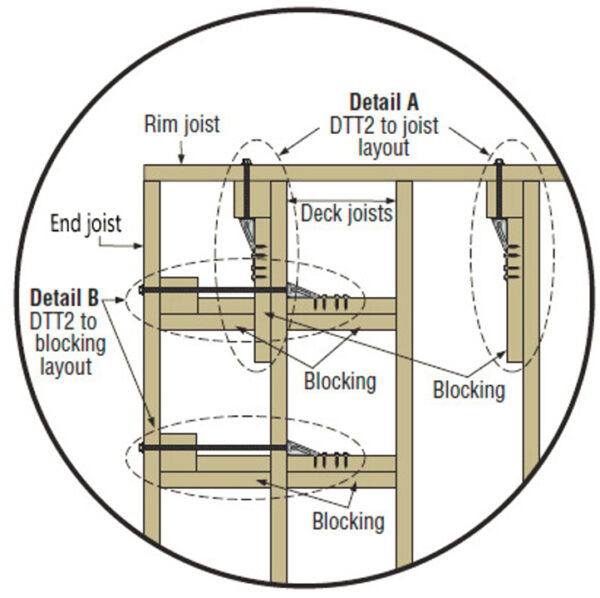
Outside the rim joist. This is the most common installation and the simplest if the post aligns with a floor joist (see Detail A, below). If the post is between two joists, you will need to use two connectors, one on each nearby joist, and bolt the post to the rim joist between the two connectors.
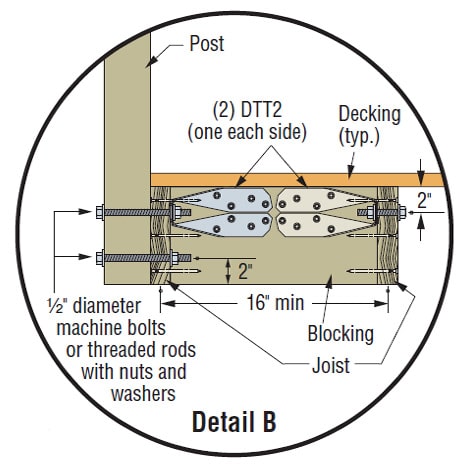
Outside the end joist. Where the post attaches to an end joist (running parallel to the deck joists) blocking must be added to tie into the second joist. This detail requires two connectors as shows (Detail B, below).
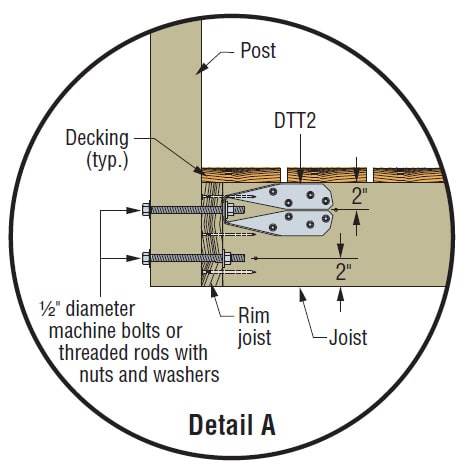
Inside the rim joist. Posts placed inside the rim joist need to align with a perpendicular joist. The connecting joist needs to be reinforced with blocking fastened with 24 10d nails. (Detail A, below).
Inside the end joist. This connection requires double blocking, plus an extra long bolt or threaded rod to transfer the load to the next joist bay (Detail B, below). A single corner post (not shown) can be installed the same way. Remember all hardware must be rated for use with pressure-treated lumber — either hot-dip galvanized or treated with approved coatings.

Connecting a post to an end joist requires blocking in two joist bays plus a long threaded rod. Source: Simpson Strong Tie
ALTERNATIVE METHODS
Many of the commonly used guardrail details are shown in the Prescriptive Residential Wood Deck Construction Guide, which shows accepted industry practices that have been shown to meet the requirements of the code. Deck hardware manufacturers, such as Simpson, also publish details that have been shown to meet the code through independent testing and the issuance of a “code evaluation report.”
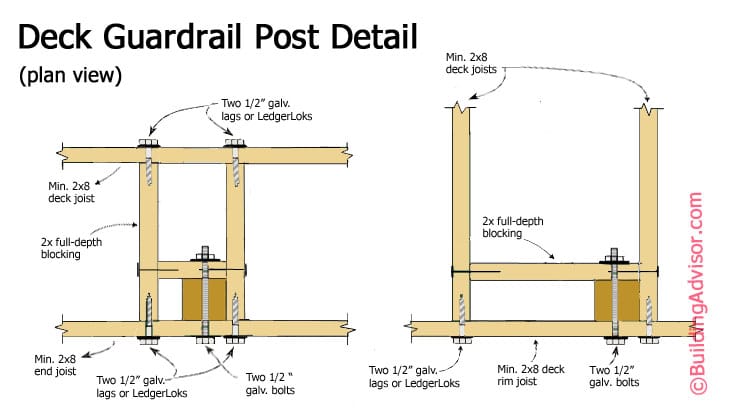
You can use other attachment methods as long as they are approved by the local inspector, who may require an engineers stamp. If using steel tension ties seems like overkill, some inspectors allow simpler methods for attaching guardrail posts. For example, two ½ in. bolts through the rim or end joist can meet the building code as long as the rim joist is adequately braced against rotating.
Depending on the local code and its interpretation by the building inspector (e.g., the safety factor required), the detail shown below should be acceptable in many locales. If in doubt, have an engineer calculate the specific size and number of lag bolts or structural screws to meet the local code.
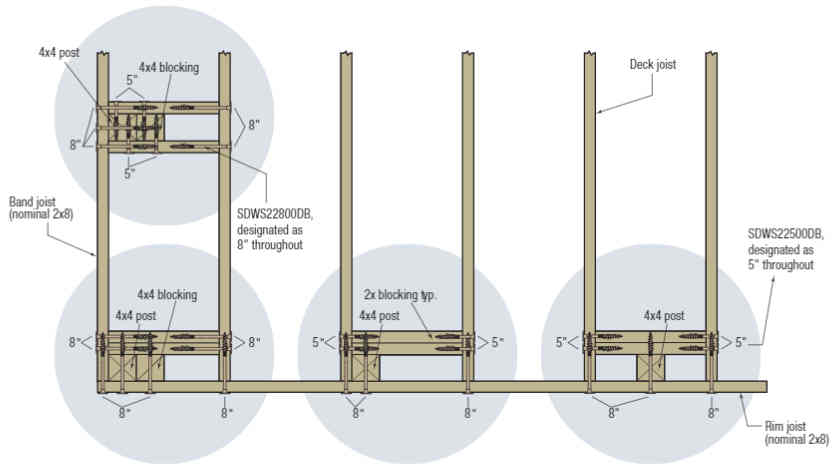
For faster connections, designers have developed post details that use approved timber screws instead of through-bolts. In general timber screws don’t need pre-drilling (except into end grain) and can provide structurally ratings that meet deck codes. The detail below, from Simpson StrongTie, is code-tested with their SDWS Timber Screws, but TimberLok screws or other structurally rated timber screws can work as well, subject to local code approval.
OUTSIDE CORNERS
In an effort to comply with modern codes, many deck builders now use two posts at each outside corner, set several inches back from the corner. While very sturdy, this approach is complex and costly. Newer one-post corner designs that comply with code are discussed below. Outside corners pose special problems with post brackets. To keep the bolts from hitting one another, they need to be offset vertically about 1/2 inch, and additional blocking is often required.
Posts on the inside. With posts on the inside of deck joists , you can use two corner posts, as shown in detail A above. With two corner posts, the top rails extend beyond the posts and meet at the corner.
Posts on the outside (set back from corner). With posts outside the joists, the simplest approach is to use two posts at each corner, held back far enough to line up with the second joist, about 12 to 16 inches from the corner. The top rails extend beyond the posts to meet at the corner (see detail, below left).
Posts on the outside (close to corner). If you prefer the corner posts to be close together, you can use the same steel brackets with blocking on one side to position and support the second bracket (detail, below right). Also, you must offset the top and bottom bolts by 1/2 inch vertically. Note: You can view both both the upper bolt, with bracket, and lower bolt with washers in Detail A and B above.

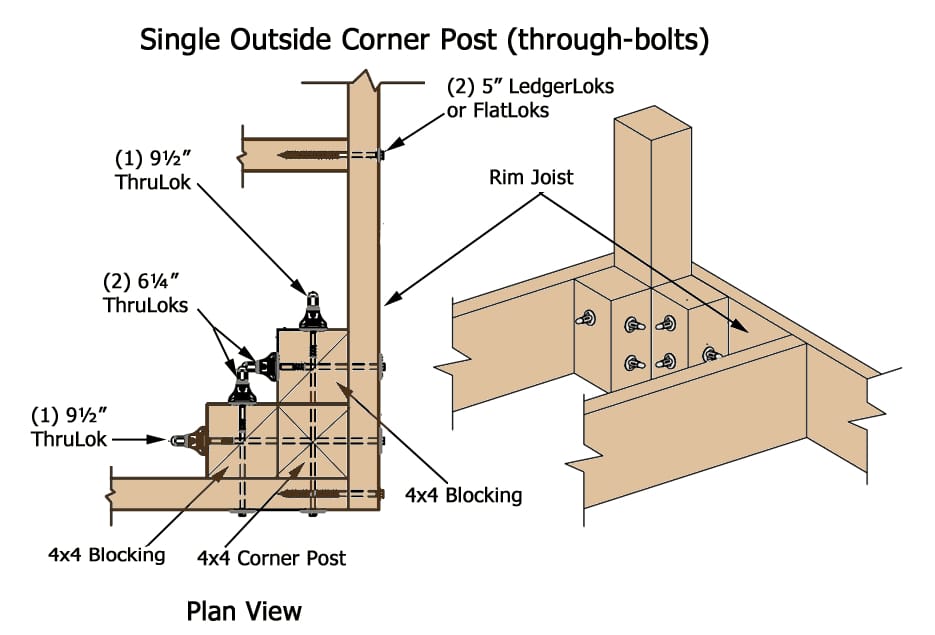
SINGLE-POST OUTSIDE CORNERS
To help deck builders assemble faster and simpler railings, fastener manufacturers have developed and tested one-post corner designs built with no extra hardware and no pre-drilling required. These designs are certified to meet the requirements of the IRC through code Evaluation Reports (ICC-ES), which use third-party independent testing to establish code compliance. [Note: This is the standard approach used by manufacturers to establish code compliance.]
One approach (illustration below) uses Simpson’s SDWS Timber Screws, but other comparable timber screws should work subject to approval by your local inspector. The second approach uses FastenMaster’s proprietary no-drill through-bolts called Thru-Loks. For more detailed information, review the technical guides from Simpson Strong Tie and FastenMaster.

RAILINGS & BALUSTERS
To meet code standards, the top railings that span from post to post should be as sturdy as the posts themselves. To meet code, the top of the guardrail must resist a 200-pound load applied in any direction. To achieve this strength, it’s best to use at least a 2×6 railing, either flat or vertical. Use the longest pieces available, with a continuous length for each side of the deck, if possible. Posts should be no more than 6 to 8 feet apart, depending on local codes.
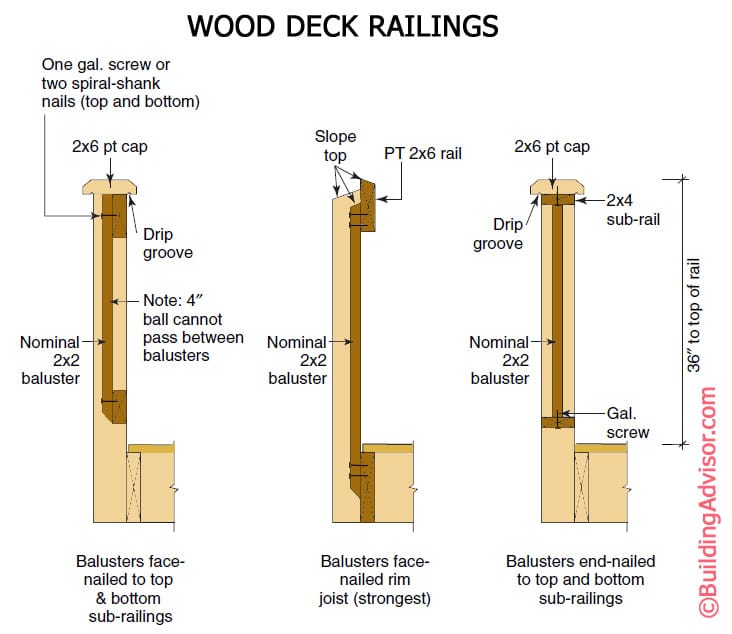
In wet climates, the top railing should be either sloped or chamfered at the edges to shed water. A drip cap below overhanging edges is also recommended (see illustration).
At inside and outside corners where two railings meet, I often use a galvanized steel angle or flat brace to support the joint . This is cheap, but effective, insurance against the corner separating over time. I typically use similar steel hardware to reinforce where the railing connects to the main structure.
Where the guardrail is used at stairways and landings at least 30 in. above grade, you also need to include a code-approved handrail. Since flat 2x4s and 2x6s do not meet the handrail code, a separate handrail is often attached with metal brackets or blocking.
Code requirements for balusters. For child safety, the balusters or other decorative infill must be spaced less than 4 inches apart. In code-speak, a 4-in.-diameter ball should not pass through the spaces. For railings along stairs, the spaces can be a little larger, but less than 4-3/8 in.
The balusters or other infill between the posts should be able to resist a load of 50 pounds applied over one square foot. Using the engineer’s safety factor of 2.5, the test load would be 125 pounds. To comply with code, and for common sense, you don’t want to fill between your sturdy posts and top rails with flimsy infill.
Baluster and infill options. On a site-built wood railing, balusters can be metal, steel cable, or any sturdy material, but the most common are 2×2’s, nailed or screwed directly to the rim joist or attached to the bottom rail. Three common baluster layouts are shown in the illustration above.
With 2x2s, choose good stock and reject any pieces with large knots or other defects that might weaken the baluster. Use stainless steel, coated, or hot-dipped galvanized nails or screws that are rate for use with today’s pressure-treated wood. At a minimum, use either one screw or two spiral-shank nails top and bottom on each baluster.

A common detail has the balusters nailed to top and bottom 2×4 rails, with the ends of the rails toe-nailed to the sides of the vertical posts. Toe-nails tend to split the 2x4s and are not likely to meet the code requirements for the infill area. Steel brackets, like the RailLok, can simplify the connection of the top and bottom railings to the posts.
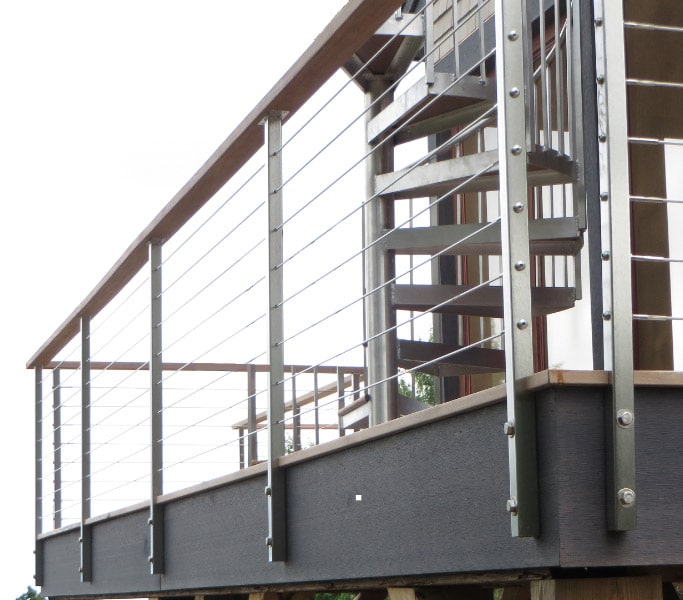
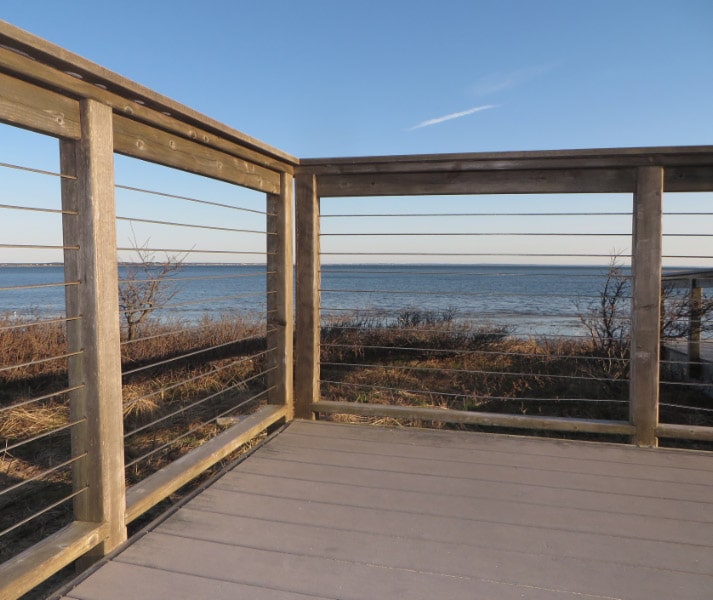
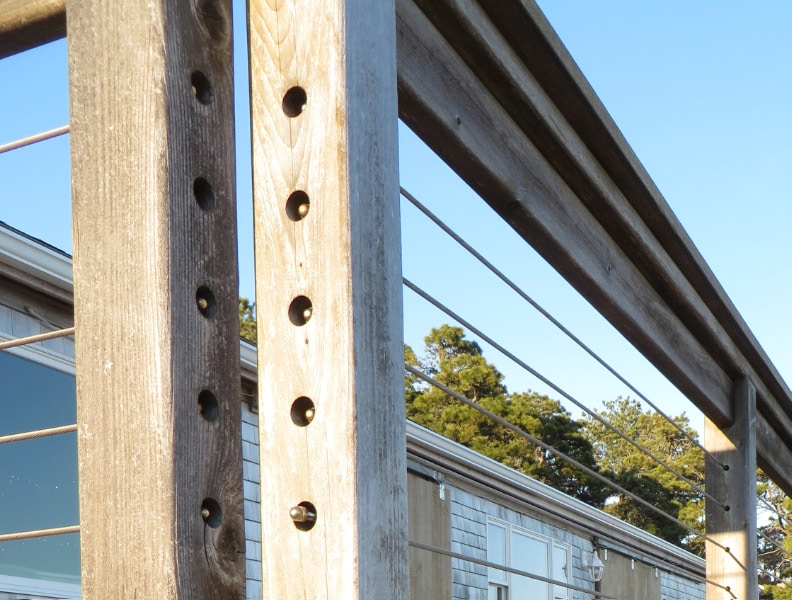
Cable Railings
Horizontal infill made from stainless-steel cable is a popular choice on high-end decks, especially where the owners want unobstructed views. Like all infill options, these need to comply with the 4-inch rule (less than 4 in. between cables) and structural codes. Manufactured systems are available with all the components including steel posts. It is not too difficult to build your own cable railing with components now readily available from specialty manufacturers (photos below). Still plan on some extra time until you learn the particular system – each has its quirks.
Manufactured Railings
Most major manufacturers of composite and plastic decking offer manufactured railing systems that can be used with their decking or as a standalone system. Most prefab systems go together pretty quickly and are engineered to meet the strength requirements of the building code.
They also offer the promise of low maintenance, although this is less of a concern than within decking. Vertical components, such as railing systems, get less sun exposure and less wear and tear than decking, so they tend to hold up well over time. A flat 2×6 used for the top railing that is neither sloped or chamfered is, however, prone to the same type of cupping and checking that affects decking boards.
Read more on Attaching Deck Railings to Posts
tirod says
Sometimes Code-Compliant Is Good Enough
I’m finding the internet sites are frequently conflating “code compliant” with “best recommended practices” and in every case it involves higher expense and proprietary components. The 2.5 factor is also being copy pasted and its not accurate.
Top railing is one example, if 2×4 is code, that’s it. A wider railing may appear more luxurious yet that is the trap, its redundant, requires more expense, more work, and often a higher degree of skill and craftsmanship. If someone wants to pay extra in order to enhance resale of their property, that’s fine, there are those who simply want a functional and affordable deck because they plan to stay in the home 45 years. I know that sounds incomprehensible to many Americans – but its what a lot of us actually do. We have to balance many financial demands and spending money on a ‘best recommended’ upsale isn’t always feasible – code is what we want for basic safety to accomplish the task. Luxury? Its like a mechanic wearing an Omega working under the hood of a Buick. Not. So. Much. Most know a GShock will meet “code” for that requirement.
Im retired, bringing a deck up to code after major damage from limbfall from a mature tree. “Best recommended is not feasible when I’m replacing 80% of the support posts and guard rail posts – which were all inadequate anyway, with the old mortised posts system. I find I have to spend time parsing what is required vs what is pure marketing and its becoming notably common across the internet. I can’t wait for AI data centers to add even more sales language to the culture conflating market sales targets and “code.”
MB says
It is incorrect to multiply the code required loads by a safety factor. Telling people this is misleading and can be very confusing to those who are not a structural engineer. A deck railing or post is not required to withstand the loads which you multiplied by 2.5.
Instead safety factors are applied to the capacity of the materials, or fasteners and are included already in load capacity tables marked as providing the “allowable” capacity. For example, the simpson strongtie catalog already applies safety factors, and in many cases, duration factors to the allowable strength of the brackets, no additional safety factor is needed.
Daniel Hicks says
yep.
CT says
Approved Method to Attach Metal Guardrail to Deck?
We would like to face mount a new wrought iron gaurdrail system to an existing balcony over a living area. The decking was recently re done with Desert Crete after the Dex o Tex system failed due to horrible workmanship. The previous posts were set inside the rim joist and blocked, with cladding over and glass panels between.
Is there any detail or prescriptive method for LAGGING the iron posts through the stuccoed fascia and into solid blocking behind the rim joist? Everything these days is showing all posts being through bolted, which, if a deck is covered up above by DesertCrete and below by drywall, is pretty tough without a lot of extra tradework.
I can’t find a detail for fabricated wrought iron fascia mounted with lags anywhere. Everything I see is about wood posts. t&g as part of the deck diaphragm. The block would rip apart before it could ever move, especially existing adjacent to the rim that has LS50s to the top plates. The joists are 12 ” on center…. the rim can’t move. I know lagging will be strong enough is there any prescriptive method that I can produce for wrought iron that will help me get this done without tearing the drywall out below? Respectfully. Lagger
buildingadvisor says
I don’t believe you are going to find a prescriptive method for attaching a wrought iron railing. The IRC is primarily a performance-based code and the only third-party prescriptive deck guide is for wood structures (and guardrails) See the Prescriptive Residential Wood Deck Construction Guide.
Many providers of manufactured railing systems and other building components have their products evaluated for code compliance by certified third-party testing labs. The labs issue code evaluation reports that are generally accepted by the major building codes. If you install the product as specified in the code evaluation report and the manufacturer’s instructions, then you should have a safe and code-approved installation.
If no such testing or approval is available, then your contractor (with the inspector) is responsible for installing the railing in compliance with the IRC performance-based code. For deck guardrails, that means guardrail posts must be able to resist a 200-pound concentrated load applied in any direction at any point along the top rail or top of a post (with a 2.5 safety factor bringing the tested load up to 500 pounds). See our article on Deck Railings, above, for typical details required to meet that high hurdle.
While through- bolts provide the most reliable connections, in some configurations, the required strength can be achieved with lag bolts or the more commonly used structural screws ((such as Fastenmaster’s LedgerLOK) now widely used by deck builders. The problem is usually not the lag bolt, but the structural component fastened to. If the structure is hidden, you many need to expose a few areas to evaluate the strength of the connection.
If the fascia is 1x material, it is doubtful that you can achieve the necessary strength – unless you bolt or lag through the fascia into the structural framing. If the fascia is 2x material structurally fastened to the balcony decking, then you may be able to bolt directly into the fascia. In that case, the fascia, as well as the railing will need to resist the 500 pound concentrated load.
Paul says
How To Attach Deck Post to LVL Beam
The side mount post information above assumes attachment to a typical 1.5″ thick rim joist with deck planks on top. In my case I’m attaching side mount posts to either the 4.5″ thick lvl beam or the outer edge lvl joists that are 3.5″ thick. And it’s all topped with 3/4″ plywood covered by a fiberglass/epoxy waterproof coating. Is there any code information regarding attaching to this thicker/stronger material? I’d prefer to mount my steel side railing posts using bolts with a large steel plate washer on the back side. The use of Simpson’s DTT2Z in my situation seems ridiculous so I was hoping there is some code details for mounting to thicker material, but I have yet to find it. Thanks for the informative article and hoping you have further info on my particular situation.
buildingadvisor says
The building code specifies the loads that the deck guard (guardrail) must resist, but does not tell you how to achieve that.
As stated in the article, the top rail or top of a post must resist a 200-pound point load applied in any direction. Using an engineering safety factor of 2.5, most connections are tested to resist 500 pounds.
Since building inspectors are not engineers, they rely on product manufacturers to have their products (like Simpson’s DTT2Z) tested by an approved 3rd party lab, and issued a code-evaluation report from the International Code Council (ICC). Sometimes marketers call these products “code-approved”.
In the case of decks, inspectors can also rely on the Prescriptive Residential Deck Construction Guide, written by engineers at the trade association the American Wood Council. The guide is not a code document, but is widely accepted by code officials.
For other details, like yours, you have the option of proposing your own solution. You code official might accept it or may ask for an engineer’s stamp on the plans. An engineer’s stamp gets the code official off the hook if the detail ever fails, so it an easy option for a code official.
FWIW, your solution sounds good to me, but I’m not an engineer.
Tony Midmore says
Is a 3-Foot Guard Adequate for Benches & Planters On Deck?
When a bench seat or planter or other item is installed against a standard height deck guard rail, this allows a person (child) to stand on the bench seat and gain substantial height on that guard. I’m not aware of anything in the code that mentions details such as this and requires raising the guard. Other than common sense and your AHJ inspector, is there any? Thank you.
buildingadvisor says
The short answer is “No”. If a child or adult stands on built-in bench or climbs on a planter, they may only have a 12 to 18-inch-high guard to protect them from falls. While these surfaces are not intended for standing or walking, we all know that children (and many adults) do not always follow the rules or common sense.
The IRC first addressed this issue in the 2009 code Section R312.2 and has included some version in subsequent codes. The 2015 IRC R312.1.2 states:
It is certainly reasonable to take the same precautions with planters and other built-ins that could serve as walking surfaces adjacent to the guard rail. Code officials. It is up to the code official to interpret the regulation, but up to you and the homeowner to apply common sense.
A similar safety issue occurs with cable railings and other easy-to-climb infill patterns. Climbable deck guards present clear hazards to children, but are currently not addressed in the building code.
Angie Pulliam says
Code Requirements for Top Deck Railing
Are top guardrails required on deck railings? Live in Illinois
buildingadvisor says
The IRC building code requires that the top of guardrail (also called a guard) be strong enough to resist a 200 pound point load applied in any direction. The top rail must be 36 in. above the deck walking surface. However, the top of the guardrail does not have to be any particular shape or size. This type of guardrail is required on any deck or deck stairs that are more than 30 in. above grade.
The rules change where the guardrail is also serving as a stair handrail. Here the code requires a graspable railing as you would find along any residential stairway. In that case the handrail needs to follow code requirements for ease of grasping.
Where the code requires both a guardrail and a handrail, many contractors build a sturdy guardrail to meet code and then add a graspable handrail along the decl stairs and landings. The handrail can be help in place by rust-proof metal brackets, wood blocks, or other means that provide a sturdy connection.
Read more on Deck Guardrails vs. Handrails
Ritch says
How To Install Single Post at 135-Degree Corner
I am using the Simpson Strong SDWS Screws as illustrated above. I have corner at a 135 degree angle and cannot get the screws into the side of the last joist that is perpendicular to the rim joist because the end joist angles away from it. And I cant get the screws through the rim joist into the end of that last joist because the center of it is pretty much in like with the mitered rim/end joists. Do you have a recommendation on how to make that corner work with the screws? See photo below.
buildingadvisor says
Image posted for Ritch. How to support single corner post at 135-degree corner and meet code.
Thanks for the pic. I’ve sketched a possible solution below, adapted from the detail above titled “Single Outside Corner Post (Inside rim joist).” Most timber screws and bolts are available up to 10 in. long.
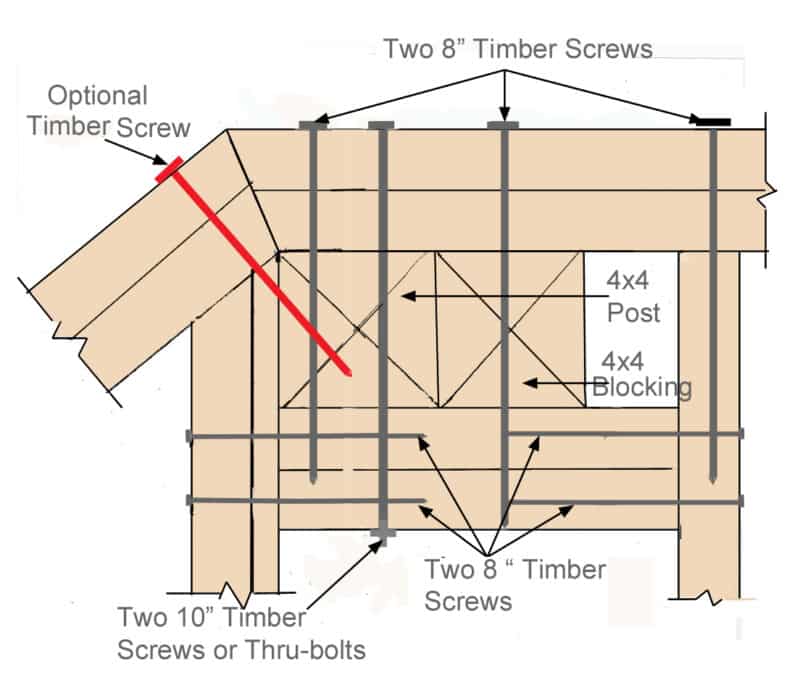
Based on the tested detail shown in the article above, I think this approach would be fine, but I have not built or tested it. It never hurts to run a novel detail by an engineer or at least your building inspector.
As for reinforcing the 135-degree corner framing, I would look for a piece of galvanized steel hardware, such Simpson’s AB Angle Brackets. (and bend it) or use one of their adjustable L brackets. If you don’t have any trim to hide an angle bracket, you could reinforce the top and bottom of the corner joint with flat tie plates.
A small steel bracket along the outside edge of the top rail, running across the miter joint and 4-6 inches along each top rail, is also a good idea and pretty inconspicuous. I put them at every outside rail corner on elevated decks.
Ritch says
Steve,
The thing that hangs me up on your details is the lack of access on the left side for screwing into the blocking. So I am planning to preassemble the two cross pieces to the blocking on the left and then sistering the blocking to the joist on the far left. See attached sketch below.
I like the idea of the added screw (shown in red) on your detail.
buildingadvisor says
Sketch of corner post detail posted by Ritch:
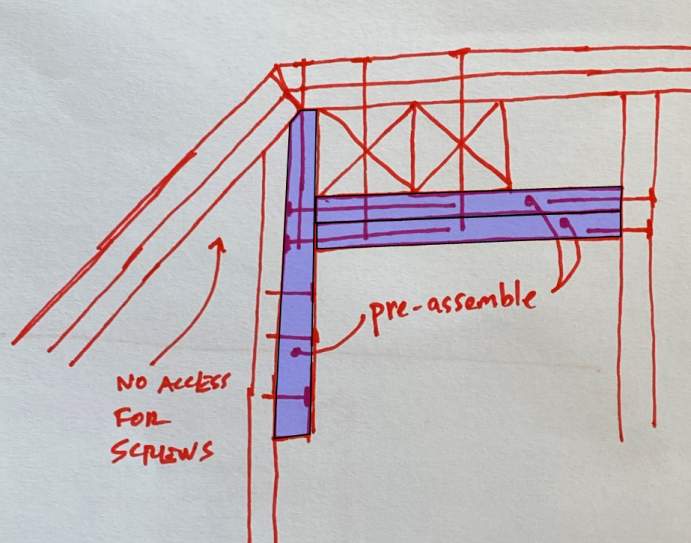
Your idea of pre-assembling makes a lot of sense — and sistering the 2x blocking to the joist.
As for a steel bracket that fits on top of the joists, you would probably have to adapt a rectangular tie plate, which come in many sizes.
Another option is to use a flat strap anchor on the vertical face of the joists (facing outward). You could tuck it up under the overhanging decking so it would be pretty inconspicuous.
As I mentioned earlier, I use a lot of small steel anchors on deck railings to reinforce outside corners and where the railing meets the building. These are hardly visible from the deck as they face away from the usable deck area.
Jc says
Adding Cable Railing To Existing Balcony
I have a small second-floor balcony 32″ in height. It has siding all around and is 108×55. I would like to add horizontal cables onto the existing structure to bring it up to possibly 42/48″ as I find it unsafe and would prefer not using wood. Can I add unto an existing structure?
Thanks.
buildingadvisor says
The minimum height of the railing needs to be 36 in. to meet code, the there is no maximum height, so 42 or 48 in. is fine.
Horizontal cables, like vertical balusters, must be no more than 4 in. apart – that is, a 4-in.-diameter ball should not pass through the gaps. This is a safety feature to prevent small children from falling through.
There’s no reason why you cannot add cable railings to an existing structure. You will need sturdy posts and a suitable cable system, as described above.
ned dominick says
Horizontal Cable Railings Unsafe for Kids
what will prevent a child climbing up these horizontal cables like a ladder and falling over the top? As a home inspector a forty plus years I think that all porch guards should be vertical balusters or sold plex-glass or similar to prevent this issue. Blessings to all.
buildingadvisor says
Point well taken. The space between railings or balusters must be less than four inches to prevent small children from passing through. But the code does not address the concern about using horizonal cables or other infill members as a ladder.
The issue of “climbable guards” has been considered by the IRC. This resulted in the 2000 version of the IRC prohibiting guards with “horizontal rails or other ornamental pattern that results in a ladder effect.”
Unfortunately, this provision was dropped in later versions of the code. Despite the code change, the hazard to children still exists with climbable rails.
Peter Vieth says
I installed cable railing while we still had young kids around. The cable is not so easy to climb. It’s slippery and twists. If you make the top rail wide they can’t really grasp it either (I used 2×8 so it was easier to rest drinks on it!). I found it less scary than the painted pine that preceded it, which kept having sections fail in our wet climate.
Ron W. says
What Is Deflection Limit For Deck Rails?
I understand the codes for height and spacing of posts and rails. I know the horizontal force must meet or exceed 200 pounds, but what is the maximum deflection allowance?
buildingadvisor says
Deck codes based on the IRC require that railings are strong enough to resist:
• A 50 pound uniform load (per linear foot) applied in any direction along the top rail
• A 200 pound point load applied in any direction to the top rail or top of a post
Applying the standard 2.5X safety factor, the tested loads are increased to a 125 pound (uniform) and 500 pound (concentrated) loads.
While the code does not specify the allowable deflection, it does state that the guardrail must be designed “to transfer this load through the supports to the structure.” Excessive deflection would weaken this transfer.
If you dig deep, there is some documentation by the ICC Evaluation Service from 2007 stating that the allowable deflection of the top rail under a 200 pound point load at mid-span should not exceed L/96 or H/24 + L/96, where L is the net length of the rail between posts and H is the height of the post measured to the first fastener at the bottom. For posts, the allowable deflection is H/12.
Evaluation reports are required for code acceptance of manufactured products (such as pre-fab railings) or non-standard details. This document is consistent with an ASTM standard (ASTM E 985) for metal guardrails.
Since the deflection limits are not written into the IRC or other model codes, they may not be enforceable on site-build guardrails, or even known to most code officials. But they do provide a reasonable target for safe practice and full code compliance
Remele says
Deck Railing Design Does Not Comply With Code
We’re building a new house and our contractor built the front porch according to the engineered plans with continuous posts from the footings to the porch roof. The posts are almost 8’ apart and the rim joists are 4×8 in line with the posts. There is a note on the plans saying the railing needs to comply with IRC 312, which only specifies height and baluster spacing.
The county gave us prescriptive requirements for a deck that requires 6’ or less spacing for posts which are attached to the inside or outside of the rim joist and don’t run up to the roof. In our configuration, there is no way to attach intermediate posts in line with the existing posts without rebuilding the deck because posts attached inside or outside the rim joists would not be in line with the existing posts/rim joist.
We believe that because the posts attach to the roof, they are much stronger than shorter posts just connected at the bottom and that an 8’ span would easily withstand the weight load requirements for a guardrail. Do you know if this is acceptable? Is there any reference that shows it is? We are planning to use hog wire.
buildingadvisor says
It sounds like you are running into problems try Prescriptive Residential Wood Deck Construction Guide, published by the American Wood Council and widely used in the decking building industry. Following the prescriptive standard is a “cookbook” method for establishing IRC code compliance, but an engineer can design a custom system that meets the performance standards of the code.
As stated in the article above, residential deck railings and posts must be able to resist a 300-lb uniform load or 500-pound point load exerted in any direction (this include the 2.5 safety factor commonly used by structural engineers). If you follow the prescriptive code, no calculations are required – it is assumed that you have met the code.
If you build outside the prescriptive code, you generally need a licensed engineer to stamp and sign the plan to show that it meets code and safety regulations. In most cases, the building inspector will accept a stamped and signed plan for the railing or other structural components.
I agree that your continuous posts from footing to roof are plenty strong, but you may need to show calculations to confirm this. Also, you’ll need to design horizonal railings that can span 8 ft. and comply with code or find a way to build suitable intermediate posts. Given your design constraints, it sounds like 8 ft. railing lengths would be the easier option.
Since your engineer and/or architect got you into this pickle, I think they should help you get out of it by designing an 8 ft. railing, with suitable connection details, to comply with the code.
I assume the “hog wire” is for the infill instead of balusters, also discussed above. These have their own structural requirements that might also need an engineer’s stamp.
At the end of the day, it’s up to your local inspector as to what he will accept, so it never hurts to check with the building department before getting too far along with a creative solution to a structural problem.
Asa Bender says
Hopefully your project is already complete, but I’m providing this for others. As a structural engineer, you are absolutely right. The response discussing prescriptive code (a recipe) and code acceptable design (engineers “do it yourself special”) is accurate. All you need after you have those capable posts is a capable top beam and capable bottom beam (which is less important in everyone’s opinion, but is still code required). At 8′ between posts, I assure you that a single 2×6 (pressure treated syp2 lumber) top and bottom are more than capable of getting the load to the posts for a 50plf code required load (which governs). You need a connection capable of 200# allowable in any direction at the end. This can be achieved with a joist hanger, but it will be ugly. A nicer hanger such as APLH26 would work. Frequently we use a 2×6 top and bottom with a 2×4 nested interior of it in the rail system (below the top rail and above the bottom rail), which allows us to use a APLH24 on the 2×4 and then require substantial nailing between the 2×6 and 2×4 elements within 12″ of the end (three 10d nails is fine) as well as some normal on center connectors along the length.
Mike says
Hello –
Wondering what the outcome of your deck railing build was. I find myself in the exact same predicament. Any insight you’ve gained from your experience would be greatly appreciated.
Thank you
Gil says
What Gauge Metal For Cable Railing Posts?
I am wanting to build an outdoor cable stair railing using square metal tubing as posts fastened to the concrete stair sides with appropriate anchor bolts. My question: Are metal posts with 13 Gauge or 3/32-in.-thick walls structurally strong enough?
buildingadvisor says
Not sure what post size or material you are using. The most common profile for residential cable systems is a 2×2-inch square post of aluminum or stainless steel, but I’ve seen galvanized steel and other materials and profiles.
Assuming you are using 2×2 aluminum posts, 11 ga. (2.3mm) wall thickness is fairly standard in the industry. Most manufactured railing systems are tested for code compliance, but if you are building your own railing, it’s pretty safe to assume that similarly sized components will also meet code.
If you are using stainless steel, 2×2 posts are usually 16 or 17 ga. (1.4-1.5mm).
Metal gauge numbers correlate with weight, not thickness, so the same gauge refers to different thicknesses for different metals. This can be confusing.
The profile, material, and height of the post will determine the required gauge of the metal. According to the IRC, railing posts need to resist a 500 pound load applied horizontally at the top of the post (this incorporates the standard 2.5 safety factor used by structural engineers).
Both the post and its connection to the deck structure are supposed to meet this standard. How strictly this is enforced varies a lot locally.
If you are combining stainless steel cable and fittings with aluminum posts, it’s best to use isolation grommets to eliminate contact and galvanic action between the two metals. Similarly plastic isolation pads should be used where shimming or mounting hardware brings different metals in contact. This is especially important in coastal areas.
mark says
Horizontal Railing Details Hazard to Children
I know the Ontario building code makes any horizontal railing detail illegal. The reason is that a horizontal railing elements invite children to climb them. So all these cable railings are a no-no. Check with your own province or state.
Karine says
Should Stair Railings On Decks Extend To The Last Step?
Hi! I have a set of stairs that measure 7 feet. I would like to install a set of pre-made wood railing, but I can only find them in 6 foot sections. My question is does the railing have to come all the way down to the last step? Or would using a 6 foot railing on a 7 foot staircase be ok (missing foot of railing left at the bottom)? Thank you!
buildingadvisor says
The Prescriptive Wood Residential Deck Construction Guide, based on the latest version of the IRC (International Residential Code), states that the handrail at stairs “shall run continuously from a point directly over the lowest riser to a point directly over the highest riser and shall return to the guard at each end” (see detail below from the Guide).
“Guard” is deck-speak for the railing on a deck, meaning the stair railing needs to run the entire length of the stairs and tie into the horizontal railing at the top and at the bottom, unless the stair railing terminates on the ground at a post.
So it’s pretty clear that they want the railing to run all the way from the bottom of the stairs (the first riser) to the top of the stairs (the top riser).
The same rule exists for interior stairs, but I often see it violated by a half step and occasionally by a full step, depending on the location of the bottom newel post. This would be a judgement call by the code official who is authorized to interpret and enforce the code.
It does not seem to present a safety hazard to have the bottom step extend a little past the railing, but could be an issue for some people with disabilities. In fact, the ADA recommends that the stair railing extend one full tread (measured horizontally) beyond the bottom riser to meet accessibility standards.
So ultimately its up to you and your code official whether to comply with the letter of the law or bend it a bit
SmashedThumbs says
Does 4-in Baluster Spacing Apply to Horizontal Spaces?
Does the 4-inch max baluster spacing apply to the gap at the bottom of the railing? (I like to blow the leaves off the deck through that gap). And what about at the top (just trying to save a few bucks on lumber)?
I’m not that motivated, but can one mortise the balusters and horizontal top and bottom rails into the posts and let the balusters float’ without and screws or other hardware?
buildingadvisor says
The national building code (IRC) says they you should not be able to pass a 4-in. diameter ball between the balusters, regardless of their direction – vertical, horizonal, diagonal, or whatever. So, yes, you can leave an open horizontal band at the top and/or bottom of the railing. An example would be cable railings which are entirely horizontal.
The other main rule is that the “infill” (balusters, cables, plastic panels, or whatever you use to fill in between the posts) should be able to resist a horizonal load of 50 pounds applied over one square foot – or 125 pounds as tested using the typical 2.5 safety factor used by engineers. Roughly speaking, that means the balusters have to be strong enough to resist a pretty good kick at any point.
As for mortising the balusters into the railing or a horizontal 2×4 mortised into the posts, this should provide a very sturdy connection as long as the tenons are large enough and mortice are not cut too close to the edge of the wood member. This sounds like a labor-intensive approach, but would be much sturdier than the common approach of using a single nail or screw at each end the balusters.
Fred says
Do Manufacture Railing Systems Meet Code>
I have an elevated deck that is at 9 1/2 ft. above grade. I need to install guard rail that is 36 in. high and has posts every 6 ft. Can i use a composite guard rail system like Dekorators or Trex?
buildingadvisor says
The building code (IRC) specifies the minimum strength and height of a railing system, along with the allowable open space between the balusters or other railing infill . You can use any materials that meet those criteria. Since most contractors use wood, there are “prescriptive” guides that show how to build code-approved wood decks and railings. The most widely used is the Prescriptive Residential Wood Deck Construction Guide from the American Wood Council.
You can design your own system with other materials, but it is easier to use a pre-manufactured system that has already been tested for code compliance. Manufacturers submit their products to third-party accredited labs. Based on these tests, standards organizations then publish “evaluation reports “certifying that the product or system meets the code.
The gold standard for code approval is an evaluation report from the International Code Council, which issues ICC-ES reports based on third-party testing. However, there are a number of other established organizations that can issue code-evaluation reports. In most cases, code officials accept these reports as valid, but are not legally obligated to do so.
Evaluation reports for Trex and Dekorators railing system are available from their manufacturers. These reports are produced by Intertek, another organization that works closely with the ICC (International Code Council).
Your best bet is to contact the manufacturer for a code-evaluation report for the specific railing system you are considering. If you still uncertain, then contact your local building code official to make sure that they will approve the system. Be aware that you need to closely follow the manufacturer’s instructions to ensure code compliance.
In the real world, many site-built railing systems get approved that fall short of full code compliance. Since every railing detail is not subjected to engineered testing, a certain amount of commonsense judgement is applied by the building inspector. They have the final say and some are stricter than others. So if you are planning anything out of the ordinary, best to run your plan by the inspector before construction.
Dave says
Remodeled Deck Railing Doesn’t Reach Stair Landing
I had a landscaper add a 3′ x 3′ landing off our existing deck (that serves as the first ‘step’) so that we were able to install stairs lengthwise along the side of the existing deck so that we were able to conserve space. The stairs descend off the landing to the ground 6ft below. Our railing completely enclosed our deck, but needed to be cut in order to open up to the landing and the staircase.
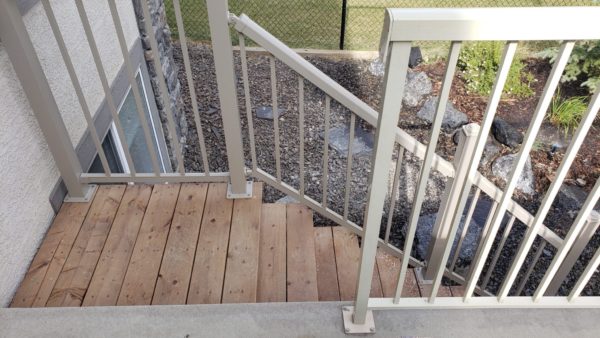
My main question is… the landscaper cut our existing railing so that instead of opening safely to the new landing, it opens up to the new landing and the 1st and part of the 2nd stairs. Anyone in the dark holding the existing railing post and turning to go down the stairs will expect to step onto the landing, but will possibly hit the 1st or 2nd stair and fall. In my opinion, the railing was cut 16 – 18″ too short. Specifically, is there a code and minimum distance a railing must extend beyond the stairs, as I suspect cutting a railing so that is parallel with the first stair is also a little too close? See Photo below:
buildingadvisor says
You are correct that the contractor has created a safety hazard here. The deck railing (at right, in the photo) should run all the way to the beginning of the landing. Finding code support for this is little tricky, however, as he IRC building code does not specifically address this issue – probably because it is governed by common sense.
The reality is that no building code (or other law) can address every possible situation. So building inspectors are left with the responsibility of interpreting the code and applying it to the situation at hand.
The relevant rules, found in IRC Sections R311 and R312, are:
• All decks 30 in. or more above grade must have a guard (handrail) a minimum of 36 in. high.
• All deck stairs must have a handrail on at least one side of the stair, at a height of 34 to 38 in. measured vertically from the nosing of each tread.
Looks like your contractor did a fine job on the railing for the stairs and landing, but cut the main deck railing too short. Common sense would argue that the deck railing should extend to the beginning of the landing. As you point out, someone could easily take a turn there, expecting to step onto a landing or tread about 7 in. below. Instead, they would either land on a step 14 in. or 21 in. below, and likely stumble.
From a code standpoint, I would view these drop-offs, unprotected by either stain railings or deck guardrails, as violations of the rule limiting stair risers to 7-3/4 in. These unexpected steps downward are two to three times the allowable riser height. A would hope a code official would agree with this interpretation.
Rules governing stairs are very strict because any unexpected variation in a set of stairs can lead to a fall. We tend to go up and down stairs on auto-pilot and don’t like surprises like the one created here. Best of luck in getting this corrected.
Jen says
Hi Dan,
We’re running into a similar issue here, except that our contractor didn’t install guardrails on the right side of the stairs (which are exposed). You seem to have a similar set-up to ours in that we also have stairs going length-wise down the side of the deck. I’m curious if you wouldn’t mind sharing what the view from the other side of the stairs is. Trying to figure out a solution to our issue here, as the stairs aren’t wide enough to install a second set of guardrails down the right side.
Daniel Miles says
Should I Offset Bolts in Railing Post?
Should the through bolts in the railing post be offset from the centerline of the post? For example on 4×4 post should the bottom bolt be 1 1/2 inch from the left side and the top bolt be 1 1/2 from the right side of the post? Which, if my brain is functioning, would make the bolts about 1/2 inch off center and 1 inch apart.
Thanks,
Dan
buildingadvisor says
Yes, the bolts would be offset about ½ inch if you drill the holes 1½ inches in from each edge of the 4×4.
Most people do not offset the bolts this way and simply place them on the centerline of the post. In fact, if you use specialized hardware, like the Simpson DTT2Z, that bolt needs to go on the centerline unless you use blocking to offset the connector.
The model deck codes and the testing of the post connections (that the code is based on) all place the bolts on the centerline – one 2 in. from the top of the joist and one 2 in. from the bottom of the joist.
That said, it never hurts to offset fasteners in this way to reduce the tendency of wood to split along the grain line. Most steel connectors have offset holes for this reason. However, it is not necessary with two bolts in a 4×4 post.
Jackie Stonebraker says
Alternatives to Cable Railings?
I’m in the initial planning phase of having a 18 x16 screened in deck built. I wanted to have a finished wall but just found out that the knee wall has to be 36″ which is not the look I was going for. I would be happy with an 18″ knee wall with a cable railing system on top to equal the distance of 36″. I don’t want to go with baluster as the fill in. I’m looking for some other option suggestions if you have any. The look I am going with is more industrial which is why the cable is appealing to me. I am finishing the knee wall in galvanized tin. Thanks!
buildingadvisor says
A cable system would be a good choice. The cables are nearly invisible and do not obstruct views the way vertical balusters do. Most people use stainless steel, which is the strongest and most corrosion-resistant material, but you can also use less expensive aluminum cables which are fine as long as you not near salt water. As with any railing system, the spacing between the cables (or baluster) must be less than 4 inches to meet code.
The only type of railing I know of that is less obtrusive than cable is clear acrylic or tempered-glass panels. Acrylic are less expensive, but prone to scratching over time. However, they should stay clear and are not subject to yellowing like polycarbonate and other plastics.
Clear panels might go well with your industrial look. Pre-manufactured systems are usually the best way to go with either cable or glass/acrylic railings. Cobbling a system together from standard hardware often results in a job with some rough edges and long-term performance problems.
You can see one example of a glass railing at this link or just Google “plexiglass railing system” or “glass railing system”.
Best of luck with your deck project!
See also Cable Railing Systems
Wes says
Railings for Screened Porches
What are the options for a porch railing when you plan to add screen?
buildingadvisor says
The building code (IRC) for decks applies whether the deck or porch is open or screened.
That is, you still need a 36-inch high code-approved railing if the deck surface is more than 30 in. above grade. Typically the railing is built inside the screening as in this photo (from my book Best Practices for Residential Construction):
Another option is to build a 36-in.-high knee-wall along the edges of the porch and add screening only to the top portion of the wall. That gives you a bit more privacy and you still get plenty of ventilation.
Best of luck with your new porch!
Chris says
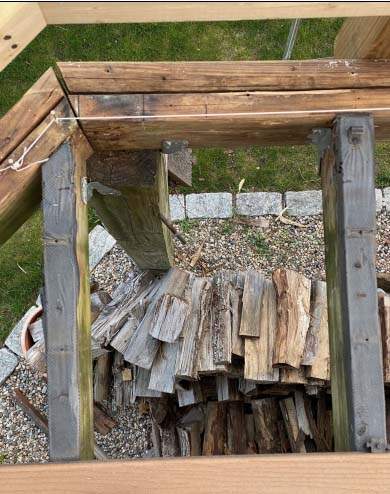
Notched Railing Posts Are Shaky and Cracking
We recently had our old 800 sq ft deck replaced the total charge being about $37,000 for removal and reconstruction using treated lumber. The only change to the old deck’s footprint was to the rail design which is now a cable rail. The rail posts were notched and shake too much for my liking in some locations as well as splitting occurring at the notch. We are thinking of having them redone and mounted to the outside of the deck framing. Since the cables wouldn’t be over the deck would an additional board along the bottom be required to keep feet from getting caught between the end of the deck and bottom cable?
buildingadvisor says
Building codes are pretty strict regarding attachment of deck railing posts. It is very difficult to meet code standards with notched posts. Also, as you have observed, notched posts are prone to splitting at the stress point at the inside corner of the notch.
One thing that not spelled out in the code is the vertical alignment of the vertical balusters (or horizontal cables) with the outside edge of the deck. Generally, the inside edge of the balusters or cables aligns with the outside edge of the decking – or is inboard of the decking edge. You don’t want the railing system hanging out in space.
The relevant code requirement is that the gaps between the balusters, and the gap at the bottom of the railing system, is less than 4 inches. In other words, the measurement from your bottom cable to the decking should be less than 4 inches. To meet this requirement, you may need to add an extra piece of decking or adjust the location of the bottom cable.
Regardless of the code, if you find the gap at the bottom of your railing system is causing problems, then you should extend the decking outward. You can support the extra piece of decking with a 2×4 nailed to the band or rim joist, shimmed out as needed.
Railing posts on a deck should not be shaky or splitting. You paid a lot of money for your new deck and the job should be done correctly. It is reasonable to ask the contractor to replace the railing posts at no charge. To bolster your case, you may want to have your local code official inspect the new deck. It is unlikely that the railing posts meet the current building code.