The best way to protect the structure, siding, and paint or stain from moisture damage is to design the outer layer of the house as a decorative “rain screen”. A rain screen should be sturdy enough to block most of the wind and rain, but porous enough to dry to the exterior when wet.
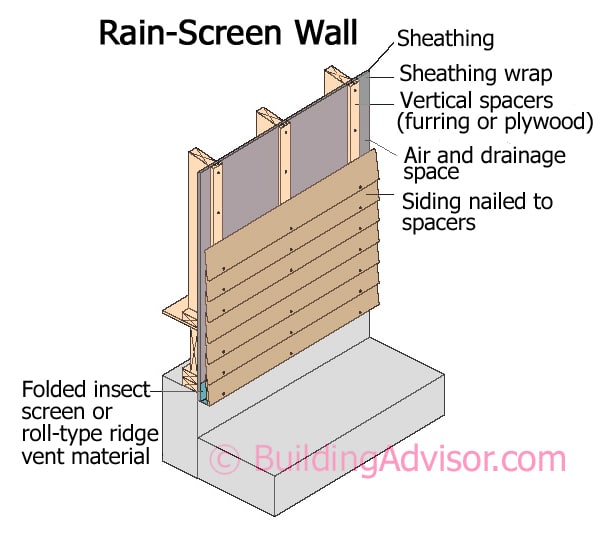
This is accomplished by separating the outer cladding from the building’s water-resistive barrier with an air space. This approach accepts the fact that no siding system is entirely waterproof and relies, instead, on the drainage layer for waterproofing and moisture control (see illustration).
A rain-screen wall is the best defense against moisture problems with today’s wood sidings and finishes. To be effective the air space must be a minimum of 3/16″ — more is better in cold or wet climates.
The interest in rain-screen systems has grown in response to problems that modern builders were experiencing with premature failure of sidings and exterior finishes.
Modern construction is a lot more challenging to exterior finishes for a number of reasons. Insulated walls keep siding materials colder and wetter. And, in some cases, material quality has suffered as well.
Older, uninsulated walls were warmed by heat loss from the house and and kept dry by wind blowing through the plank sheathing. Also premium, quarter-sawn siding was dimensionally stable and held paint well. The result was durable exteriors, but high energy bills. Rain screens bring some of the same resilience and durability to modern energy-efficient wall systems covered with the types of siding and finishes commonly used today.
Rain screens are the optimal approach to exteriors and will increase the siding performance with any wall system. They are especially important with foam-core panels (SIPs), walls filled closed-cell foam, or other wall systems that need to dry to exterior. This includes the installation of wood siding over foam sheathing, a detail which has had a long history of problems.
The rain-screen system has four components: an exterior cladding, an air space, a drainage plane, and weep holes.
1. Cladding. In a rain-screen wall, the exterior finish material — whether wood, brick, vinyl, or stucco – is mainly aesthetic. In addition, the cladding must sheds most of the water that strikes the side of the building and also protect the sheathing wrap from wind and ultraviolet (UV) radiation. While some exterior claddings are more porous to water than others—for example, brick, vinyl, and vertical-wood sidings are particularly leak prone— all can function well with a proper drainage plane. Some siding materials, such as vinyl and aluminum, and to some extent, wood shakes and shingles, are self-ventilating, so less in need of an added rain screen.
There are many choices for exterior cladding. In choosing one, consider both its first costs and its durability and maintenance costs. A cheap siding that need frequent repainting may not be so cheap in the long run. If you need to replace the siding in 10 years, you’ll definitely wish you had chosen a more durable product the first time.
2. Air space. The air space behind the cladding serves several important functions. First, it allows water that has penetrated the cladding to drain safely away. Second, it provides a gap (called a capillary break) between the cladding and the building paper. Wet wood siding or stucco has been shown to degrade both building paper and plastic housewrap if it is directly touching the wet cladding. Cedar and redwood sidings can leach out tannins that are particularly corrosive to building papers. Third, the air space helps promote drying from the back of wood siding or from the framing and sheathing in the event of a leak. With painted or stained wood sidings, the air space will add years to the life of the finish.
How big should the air space be? Most experts agree that a small gap of 3/16 to ¼ -inch space is adequate for a capillary break, drainage, and some ventilation to assist drying. A few manufacturers and researchers claim that a space as small as 1/16 inch is sufficient, but long-term performance data on real job sites is lacking. And since many of the “draining housewraps” are well under 1/16 inch thick, I would not consider these suitable for a rain screen. In general more space is better, so with wood, stucco, or other siding types in a wet climate, I would not use less than a 3/16-inch air space. The two main options for creating the air space are: furring strips and plastic drainage mats.
Furring Strips. For horizontal wood siding, an air space can be created by nailing the siding to vertical strips of 1×3 furring. Although furring out the siding provides excellent protection for the siding and structure beneath, it also adds significant cost and complexity to the job, so it is used mainly in high-end custom building. To simplify the detailing around doors and windows, some builders use thinner material for furring, such as ¼-in.-thick wood lath or strips of ¼-in. or 3/8-inch plywood or plastic.
Plastic drainage mats. Where you’re looking for the protection of a rain screen, but don’t want to cost and hassle of furring out the siding, consider one of the new plastic drainage mats available for sidewalls. Two well established products are Benjamin Obdyke’s Home Slicker 6 and MTI’s Sure Cavity SC 50. These products create a 6mm (1/4 in.) gap between the siding and housewrap (water-resistive barrier in Code-Speak).
Home Slicker is also available laminated to the housewrap Typar for a one-step installation. Both drainage mats are strong and rigid enough to resist compression by the siding but thin enough that windows, doors, and trim can be installed without shimming or furring. A thicker version (10mm) of each product is available that complies with Canadian code. These products simplify rainscreen installations, but can cost $0.50 to $1.00 per square foot.
3. Drainage plane. The drainage plane typically consists of asphalt-impregnated building felt or a plastic housewrap that is fully integrated with all door, window, and wall flashings. The system must provide a clear drainage path out the bottom of the building. In general, the housewrap must be cut to lap over window and door cap flashings and under window and door sill flashings. In addition, the house-wrap should lap over step flashings, the upper leg of abutting roof flashings, and deck ledger flashings. Upper courses of sheathing wrap should lap lower courses by at least 6 inches and vertical seams should lap 6 to 12 inches.
4. Weep holes. Any water trapped in the air space must safely drain to the outdoors at the bottom of the wall and above doors and windows. For this purpose, brick veneer has small “weep holes,” and stucco has a perforated flashing called a weep screed. If furring strips are used with wood or composite sidings, the openings at the bottom should need be screened against insects.
To simplify the installation, most builders now use pieces of corrugated plastic ridge vent material across the bottom of each drainage channel to provide drainage and solid backing for the siding. If you are using a plastic drainage mat, closely follow their installation instructions for these terminations. Some of the drainage mats, such as MTI’s Sure Cavity, have accessory products for these terminations.
Optional Top Vents. With a 1/4-inch or larger gap, you can generate some vertical airflow in the gap by creating vents at the top (protected from insects). Researchers have shown that adding a top vent speeds up drying of the cavity, making this a good detail in wet climates or on walls with a lot of rain exposure and limited protection from overhangs.
Stucco & Brick Veneer

Traditional stucco, as well as brick veneer, have always been applied over a type of rain screen to allow for adequate drying of the wall system. Because both stucco and brick veneer are very porous to water, drainage is an essential part of the system.
Both systems absorb water and dry to both the exterior and interior. As with all types of siding, some water also penetrates at openings, cracks, and penetrations in the exterior finish.
In a stucco wall, the metal lath provides the air space, and the building paper is the drainage plane. Any water that accumulates in the wall flows down the building paper and drains out the weep screed at the bottom. When the system works as planned, the sheathing and wall cavity remain dry.
It’s interesting that this traditional approach, used by tradespeople for decades, follows the same principles that building experts are just beginning to apply to other types of siding.
Rain Screen Over Foam Sheathing
A rain-screen design will improve the longevity of any siding and finish, but it is critical when installing wood siding over foam sheathing. Wood sidings installed directly over foam sheathings are more prone to problems such as cupping, cracking, and paint failures than wood siding installed over wood sheathings. Because it absorbs excess water, wood sheathing acts as a temporary reservoir for moisture that penetrates the siding, releasing it back to the air in warmer weather.
With foam, on the other hand, the moisture tends to build up on the back of the siding and cause problems such as cupping and paint peeling. An air space between the foam and siding, even a shallow space of ¼ to ½ in., will reduce or eliminate these problems. However, to provide a solid nail base for wood siding, most builders use 1×3 or 1×4 vertical strapping over the foam.
Tara says
Hydrogap Vs. Furring Strips in Hot, Humid Climate?
I’m using Hardie fiber-cement siding, CDX plywood sheathing, Typar sheathing wrap, and flexible tape on windows with drip pans. Over the Typar. Then I plan to add furring strips to create a rain screen The house is built over a crawlspace in a hot, humid climate (Zone 3a).
I’m still considering felt, but it does not hold up to UV as well as Typar. I think Zip sheathing would require an ERV to correct air quality from such a tight home. Do not like the tight house concept — worrying about a sick house from trapped air recycling and don’t want to encapsulate the crawlspace and add an ERV.
A few questions: Would 1mm Hydrogap be effective in our hot humid climate (Zone 3a) to allow drying behind the cement board? Also would the holes in the Typar created by nailing the furring strips cause problems?
Read more on Zip Sheathing and Vented vs. Unvented Crawlspaces
buildingadvisor says
You’ve touched on a lot of issues.
Modern building science experts are in agreement that the best crawlspace is one that is sealed and conditioned as part of the living space. This does work well, assuming that the house is built with good drainage and you do not have water sitting on the crawlspace floor. In that case, you will have moisture problems with a tight house or a leaky house.
I think the jury is still out on how well Hydrogap and similar products work, whereas 3/4 in. drainage gap is proven to work well. In a warm, humid climate like yours, I would go with the full drainage gap. On the other hand, Hardie siding is pretty durable stuff and holds paint well, so a full rain screen with furring is not absolutely required — but it never hurts.
And no, the nails through the Typar or felt paper are typically not a problem.
As for Zip sheathing, you are correct that taped and sealed Zip sheathing installed as per the manufacturer will result in a very tight home that will need supplemental ventilation (but not necessarily an ERV).
On the other hand, building a pretty tight home of unknown tightness and hoping that you get enough ventilation at the right time and place in a house is a tough nut to crack. That’s why most builders of high-performance homes use the “build tight and ventilate right” philosophy. By mechanically controlling the ventilation, you end up with safer and more pleasant indoor environment.
“Sick house” syndrome is partly a result of poor ventilation and partly a result of all the chemicals that we stuff into a house nowadays. That includes formaldehyde from MDF (in cabinets, woodwork, and carpeting), solvents from paints, varnishes, and sealants, combustion gases from appliances, and so on.
If you are concerned about air, take a look at your building materials in addition to the house tightness and ventilation. It’s always more effective to eliminate the source than to dilute pollutants with ventilation.
Terry says
Rain-Screen Wall In A Porch?
Is there any benefit or need to having a rain screen on a wall covered by a roof? Such as a porch.
Thanks for any feedback.
buildingadvisor says
I like a certain amount of redundancy in building systems as few things are built perfectly. But using a rain screen on a wall that never sees rain seems like overkill to me.
The purpose of a rain screen is twofold: to let a wall shed water that penetrates the cladding system and to promote drying by allowing some airflow on the back side of the siding.
If a wall is never exposed to weather and never gets wet, it will never need to drain and dry. So it won’t hurt to have a rain screen inside an enclosed porch, but it won’t provide any real benefit either.
Tedd VanWagner says
OSB For Rainscreen Spacers?
Would strips of 7/16 OSB be suitable for rainscreen?
buildingadvisor says
I’m assuming that you’re talking about the vertical spacer/nailers.
I wouldn’t recommend OSB because it is vulnerable to moisture penetration and deterioration at the edges — and narrow strips have a lot of edges.
A lot of people rip exterior-grade plywood, such as 7/16-inch CDX or similar grades and some just use 3/4-inch furring. Either will work well.
Freddychef says
The vertical spacers sold in Home Depot are OSB and pressure-treated.
Depends where you shop.
Ron Edelenbos says
Best Options For Housewrap, Wood Siding & Trim With Rainscreen
Re: Rainscreeen over housewrap. I’m restoring a century old 2 story split com/res building, I’m replacing the worn out pine clapboard with 6″cedar clapboard as well as replacing all vertical and horizontal trim.
I’m using PT 3/8 plywood strips as rainscreen.
What’s is my best exterior wrap option, I was considering a perforated Tar /Builders paper but are there safer solutions more durable options for a heritage building ? Lots of old timers in the area suggest Builders paper is as effective and far cheaper than the modern Tyvek style wraps. I’m in a coastal/ windy location in Nova Scotia Canada
I’ll be using metal flashing at all tops and bottom of the rainscreen. Is there a better choice for a screen option Aluminum over fiberglass ?
Cedar siding, should I paintstain all sides? Was told to leave the backside raw, but have also heard 1 coat of stain or prime on the rear should keep the siding from cupping.
Detail trim ,corner trim and horizontal 5/4 mid and base boards, prime all sides? Eastern Pine is our primary wood supply, May have access too some red pine. Best wood choice for longevity ? Best prime paint applications ?
Thank you
Ron
buildingadvisor says
I can see that you’ve given this project and want to do things right — using primarily traditional materials. The problem is that traditional materials are not of the same quality as they were in the past. Plantation-grown trees are smaller and the wood is less stable, dense, and durable. Even asphalt-felt paper has suffered in quality due to both the substrate material (cardboard and wood pulp vs. cotton) and the variable quality of the asphalt or bitumen.
So to get the quality you are after, you need to buy the best materials you can afford and take some extra steps compared to builders 50 years ago.
In answer to your questions, felt paper is a good choice for your underlayment, but go with an ASTM-rated product (scroll down to “asphalt felt) for the weight and quality you need. I would avoid a perforated paper as it will be less waterproof and unnecessary as asphalt felt has a much higher perm rating when wet. It’s like the “smart” vapor retarders only at a fraction of the cost.
In answer to your other questions:
• Aluminum mesh is much more durable than fiberglass, but vulnerable to corrosion if you are anywhere near salt water. In that case, a heavy-duty fiberglass mesh may be preferable.
• A Cedar is a great choice for siding. Heartwood is more durable than sapwood, and quartersawn is much more stable (and much more expensive) than the more common flat-sawn.
• Definitely prime (or stain) the siding on all faces and edges. Maybe this wasn’t necessary 100 years ago with dense, stable wood, but it will help prevent excess movement (cupping, curling, expansion and contraction) in the wood you can buy today.
• For best results, you should also prime your trim boards on all faces and edges. We don’t have access to red pine in our part of the world, so I can’t recommend one type of pine over the other. With any natural wood, however, the quality of the wood is as important as the species.
Along with the wood its applied to, paints and stains have changed dramatically over the decades. Putting a cheap primer and solid-body stain over flat-sawn pine trim in a coastal climate is asking for trouble. Choose premium products and apply as per the instructions.
Many builders have sworn off natural materials on building exteriors after too many problems with stability, durability, paint failures, and other performance issues. Builders don’t want callbacks and most owners are looking for exteriors that are as close to “maintenance-free” as possible.
If you are committed to sticking with traditional materials, then you are smart to go with a rain-screen wall and premium materials, and taking the time to back-prime siding and trim materials. If you go that route and choose your exterior finishes carefully, you should have a durable and attractive exterior – with some periodic maintenance to be expected.
David Trabka says
Should I Caulk Vertical Joints between Siding & Windows?
Do you recommend caulking joints between edge primed cedar clapboard and vertical corner and window trim?
thx, David
buildingadvisor says
If you’ve done a good job with wall and window flashing and sheathing wrap, then caulking the vertical joints is not necessary and, in the long run, creates a maintenance chore. Also, when the sealant starts to fail, it can allow water into the joint and tend to trap it. With a well designed rain screen caulking is definitely not necessary.
One option is to bed the outer edge of the corner boards and the ends of the siding in a bead of sealant, but do not seal the vertical gap along the corner boards and side casings to allow for drainage. This is a reasonable approach if you don’t mind the extra work.
It’s also a good idea to put a piece of felt paper or flashing behind the vertical joints in the clapboards to prevent water entry at the butt joints.
I have used sealant along the side casings of windows as a retrofit stop-gap measure to control water leakage around the widows without tearing out the siding and re-flashing the windows. This can be effective if you use a high-grade sealant and inspect it periodically.
If you do use a sealant, choose the best elastomeric sealant you can find that sticks to the specific materials you are using. I would avoid silicone as it does not bond well to wood. Polyurethane sealant is a good choice as are some of the newer proprietary formulations.
Also never use sealant on any horizonal joints as these well block drainage and lead to moisture buildup in the wall system. All walls should be designed so sheathing wrap, flashings, and the siding itself is installed “shingle-style” so water drains down and out, away from the building. Adequate roof overhangs and gutters also help a great deal in keeping sidewalls dry.
David says
Steve, thanks for the prompt and detailed response. On a Saturday night no less!
My reason for asking (and perhaps I should have stated this upfront) is as follows:
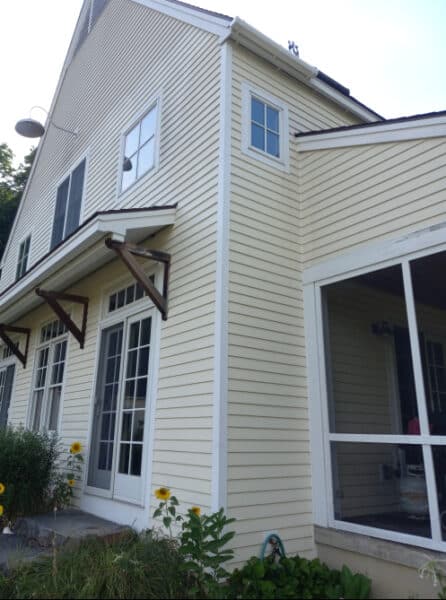
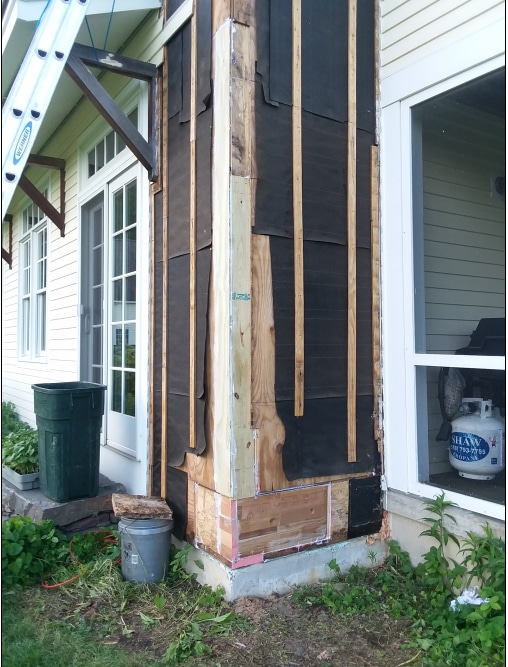
our rain screen house was built 2005 and no vertical caulking was done at that time. I caulked and painted entire house in 2013. some time later i noticed rot at siding ends near bottom of corner boards and around one window. i figured it was due to exterior moisture and installed short gutter sections at all four corners. in doing repairs i also noticed sheathing moisture under felt wrap. long story shorter in the end i opened an area around the corner boards from the bottom up. if u can picture a triangle, four feet wide at the base and twelve feet tall wrapped around the corners you would have a picture of the damage. most extensive at the base and narrowing towards the top. significant moisture under felt, rotten sheathing and in some cases rotten framing. large carpenter ant infestations. damage was worse on two south facing corners but some on one facing north. i rebuilt in the same fashion as original construction.
i wondered if my caulking had contributed this problem.
other factors:
minimal roof overhang
for some time we routinely set winter t-stat from 68 to 55 at night in winter
blueprint calls for venting “bays” top and bottom but i believe only bottom was vented
insect barrier at bottom of bay is some material i don’t recognize but has openings large enough for ants to enter
i am considering installing button vents under small windows at each corner in attempt to prevent further damage. if i had paid for repairs they would have cost thousands of dollars.
I would appreciate any analysis and advice you can provide. I have attached some photos below:
buildingadvisor says
Sorry to hear about your situation. It’s especially galling when you spent the extra time and money to try to do things right.
What went wrong is unclear from your description. Unless you were running a greenhouse operation indoors (ultra high humidity), it’s almost certain that the source of the water is the exterior. Sounds like it was entering near the top of the cornerboards and spreading outward as it leaked downward.
If the vent bays were vented top and bottom, you may have had sufficient drying potential to avert major damage, but there is so much moisture here that the rain screen may not have done enough. In general, rain screens, roof vents, and other venting of wall and roof systems is a backup system to relieve the structure of routine moisture buildup – not major leaks.
Most sidewall leakage is around doors and windows and due to flashing errors. However, I have seen water get behind corner boards, get trapped in wrinkled up Tyvek, and cause decay. The water seems to migrate sideways by capillary action (my theory) from the siding-cornerboard gap. When I reinstalled the corner board, I set them in a vertical bead of high-quality sealant along the back, outer edge of the corner boards.
I would examine the detail at the top of the corner boards to look for routes of water entry, Adding a Z-flashing (like a drip cap) across the top edge of the corner boards wouldn’t hurt.
If you can’t determine where the water in entering, I’d suggest getting it looked at by a professional specializing in exterior leakage mitigation.
One other point is that unrated felt paper, if that’s what you used, is highly variable in quality. It is less waterproof than most synthetic housewraps and, when wet, is highly permeable. This is good in that it can let wet areas dry out, but bad in that it can transmit moisture inward when saturated. ASTM-rated asphalt felt or a good quality synthetic housewrap is a better choice.
KEITH BIRD says
Details for Fiber-Cement Siding on Steel Framing?
I am designing a house near Harpers Ferry, WV, Climate Zone 4. I place a high value on fire resistance, low maintenance, and long lifespan of the structure .
I plan to use cold formed steel framing throughout, and I believe a siding back vent (or rainscreen) is essential to extend lifespan of the fiber-cement siding I plan to use. I have found reports mentioning provision of such a vent space using steel hat channel over rigid insulation, and I have read a report of long term testing of the durability of the galvanized coating on cold formed steel framing in various environments, including under roof yet exposed to outside air. I believe those results of over 100 year lifespan, but it seems to me that rainscreen framing, as well as being exposed to outside air, will be wetted occasionally, such as during rain with enough wind velocity to drive water into the upper vent opening. I am concerned that this wetting may significantly reduce lifespan. Here research has failed me.
I try to base elements of my plan on supporting studies or reports. Are you aware of any documentation of durability in this instance, or can you refer me to where I might find such?
buildingadvisor says
Sorry, but I cannot refer you to any documentation on the durability of these details. However, it sounds like a good approach for durable wall construction.
It sounds like you are using foam insulation over the steel framing and then installing vertical hat channel on the exterior of the foam insulation to create a vent channel.
To protect the framing from any water penetration, and reduce air infiltration, you can add a layer of taped housewrap over the foam before installing the steel hat channel. Lap the upper layers of the housewrap over the lower layers, shingle style, and tape all seams with compatible tape provided (or approved) by the housewrap manufacturer.
As you suggest, small amounts of water may get into the vent space either through the vent openings or at the siding lap or butt joints. However, this should drain safely out the bottom of the vent spaces and not cause any significant damage. In fact, rain screens are the best way to avoid moisture problems in siding.
Most leakage problems in walls are at penetrations for windows and doors. Here is where to focus your attention on flashing details. Using sill pans and carefully integrating the housewrap with the window/door flashing are critical to preventing leakage at penetrations.
You might also find this report of interest on attaching siding to steel framing.
Mark says
Can Rain-Screen Go Over Existing Stucco?
Question: Is it possible to construct a rain screen on top of an existing stucco wall ?
I wouldn’t think it was a good idea, but wondering… Does a proper rain screen have to place the drainage plane on top of exterior sheathing with all other existing materials removed? Any thoughts?
buildingadvisor says
A good question. I don’t have any data or real-world experience with this detail, so I can only speculate.
The purpose of a rain screen is to keep moisture out of the structural wall system and insulation and to provide an escape route for any moisture that enters the wall system — either from the interior or the exterior.
So I don’t see anything wrong, in principle, with this approach. Stucco is a very porous material that dries easily, but also absorbs moisture easily, which can lead to problems — especially in wet climates. So using a rain screen to keep exterior moisture away from the stucco while providing a path for drying seems like an acceptable approach.
Three cautions:
1) Pay special attention flashing and drainage around windows, doors, and other openings. These are the most common place for water entry and moisture problems in walls. Make sure the sheathing wrap, flashing, and new siding drain water to the exterior.
2) I don’t know all the details of your home, wall systems, climate or other details. If you have moisture problems now, you need to address them before proceeding
3) As mentioned above, I have no personal experience with this approach and don’t know of any data. So you’re the test case. If you’re not content with that, then you may want to remove the stucco and follow the normal procedure.