Managing Roof & Yard Runoff
In This Article
Gutters & Downspouts
Slope Around Foundation
Drainage Swales
Curtain Drains
Drywells
View all Foundation & Sitework articles
On most building sites, the main source of water around the house is runoff from the roof. Without proper management of roof water and snow melt, it often becomes the main source water in the basement.
A well-designed system of gutters and downspouts that effectively collects roof water and discharges it away from the foundation is the first line of defense against basement water problems. Combined with a back-up system of footing drains around the perimeter of your foundation, this will keep most basements dry.
If you are building on site with serious water problems, however, you will need to take additional measures. If the water table is above the level of the basement floor part of the year, you should reconsider building a full basement. If your building site is at a low point that collects water or lies in the drainage path from surrounding properties, then you may need an engineered design for stormwater management..
Roof Water
A house with a 1,600 sq. ft. footprint, including roof overhangs, will shed about 1,000 gallons of water for every inch of rainfall. In a downpour, that 1,000 gallons gets deposited close to the foundation unless you have an effective system to collect and discharge that water elsewhere. The water is likely to saturate the soil around the foundation and exert hydrostatic pressure against the foundation wall. Under pressure, the water will find its way through any cracks in the concrete or block wall, as well as the joints between the basement wall, footing, and floor.
Additional surface water may reach the foundation from yard areas and hardscapes, such as patios and walkways that do not slope away from the foundation.
Gutters and Downspouts
Some people live with wet basements for many years, only to discover that the solution was simple – start managing roof runoff properly instead of directing hundreds of gallons of water down their foundation walls.
This does not require anything exotic – just ordinary gutters with downspouts sized properly and kept clear of leaves and other debris. The more important component is what happens to the water when it reaches the ground.
If you have plenty of slope, and a dense layer of clay soil near the surface, then a simple splash block can do the trick of dispersing the water. Manufactured splash blocks, which are typically about 2 ft. long with a molded channel,do a nice job of directing water away from the foundation. A couple of paver stones can work as well. Where the soil is likely to absorb the water an extended downspout to several feet from the foundation is often the best choice.
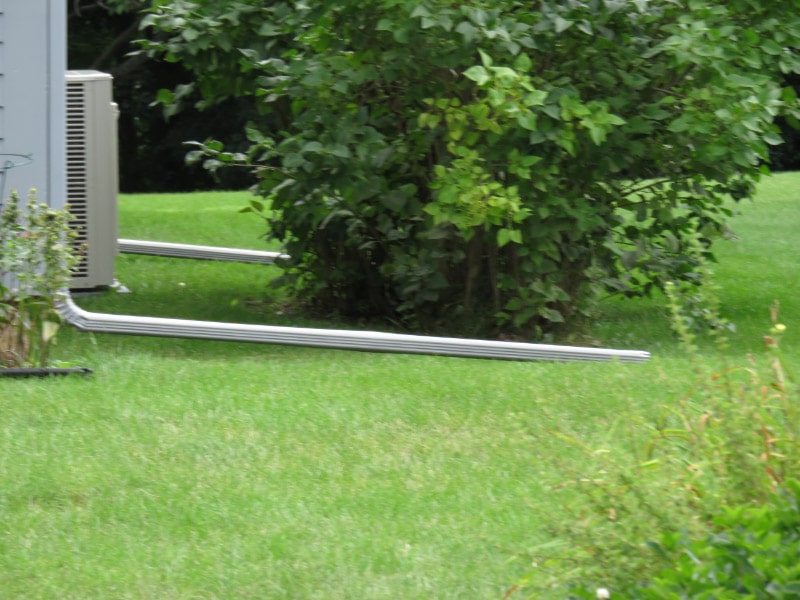
The extended downspout can be above grade if that is visually acceptable, or below grade using solid PVC pipe that drains to daylight. Consider upgrading to 6-in. PVC for long runs (see photos below).
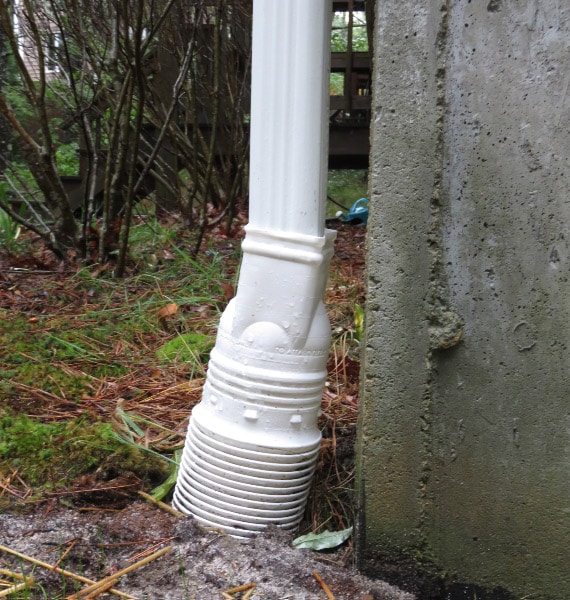
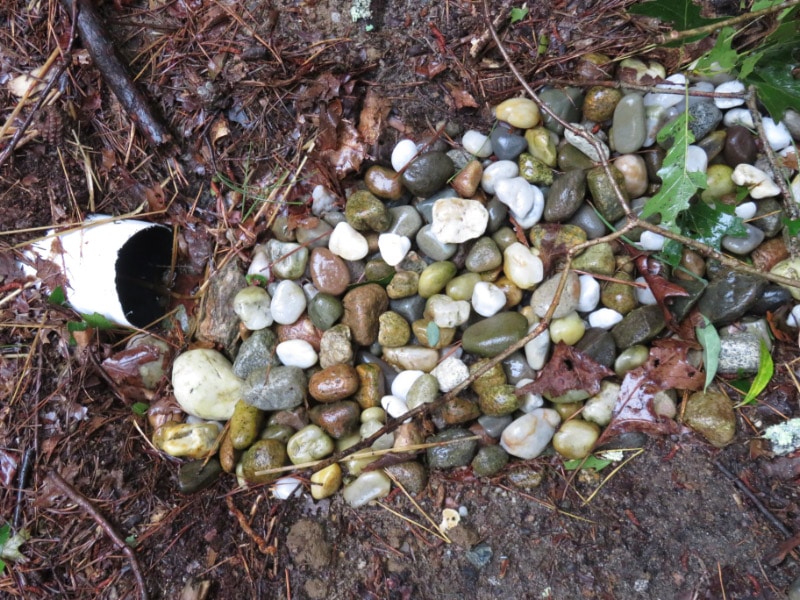
Just make sure that the drainpipe does not deliver the water below grade right next to the foundation. Then you’ve engineered a perfect system to collect roof water and deliver it to your basement – an arrangement more common than you might think. And NEVER tie downspouts to the footing drains. This can overload the system, bring leaf debris from the gutters, and contribute to basement water problems.
Slope Around Foundation
To direct runoff away from the foundation, the ground should slope away from house foundation with a drop of at least 6 in. over the first 10 feet., as specified in the IRC (International Residential Code). This is also called a 5% slope, equal to a little over ½ in. drop per foot.
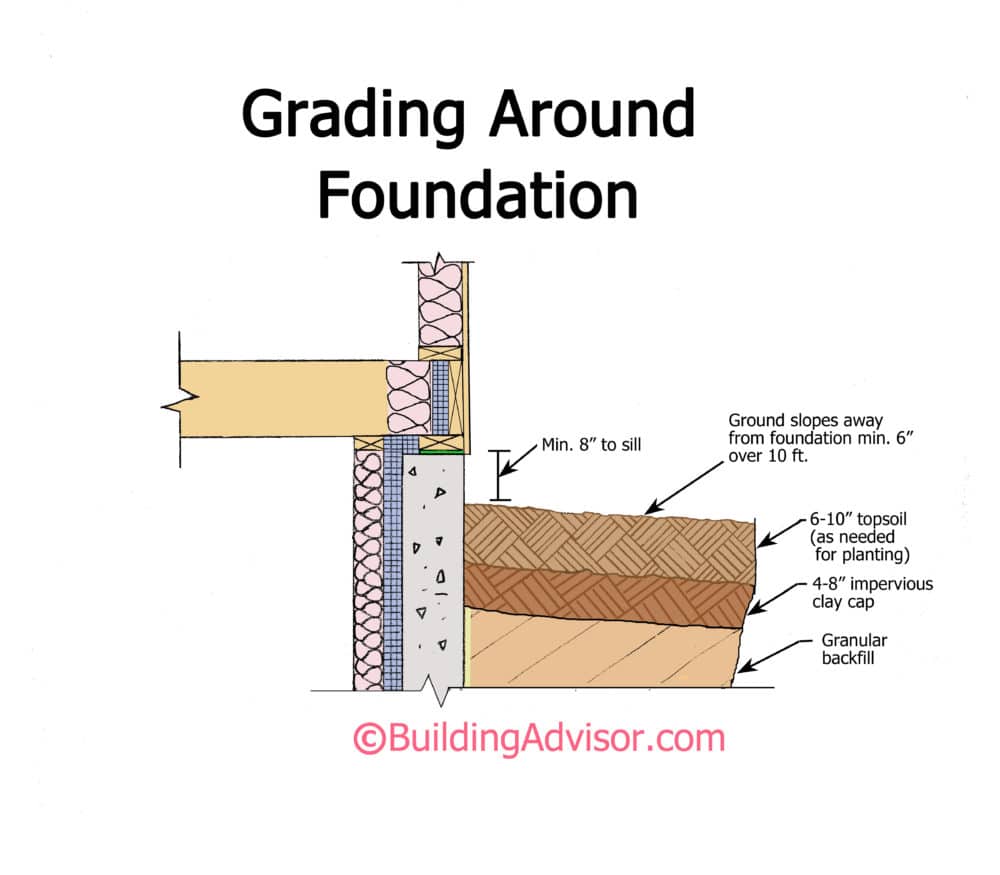
When backfilling, place a layer of low-permeable soil, such as clay, near the finish grade to limit the movement of water into the soil around the foundation. On the surface, place a layer of topsoil for lawn or plantings (see illustration).
Where an adequate slope around the foundation is not possible due to close lot lines, a downslope lot, adjacent houses, or other physical barriers, the code recommends using swales or hardscapes to conduct water safely away from the building. Swales and impervious surfaces should slope away from the foundation at a minimum 2% grade, equal to about ¼” per foot, for a minimum of 10 ft. Another option for difficult lots is subsurface drainage to a storm sewer if allowed by code.
Flat building sites. On a flat site, it is very easy to create moderate drainage around a house at little cost, but this is often ignored. All that is required is to excavate a little less and, thereby, raise the foundation by 6 to 12 in. Then bring in a small amount of fill so the finish grade can slope away from the house at ½ in. per foot for 10 feet or more. Often the fill is already on site from excavation work. It often costs only a little more, or nothing at all to do things right. It just takes a little knowledge and forethought.
Drainage Swales
Swales are wide, shallow ditches that provide a low-cost, low-maintenance approach to managing storm water and snowmelt. They are often used at the lot line between two homes or along the front or back lot line.
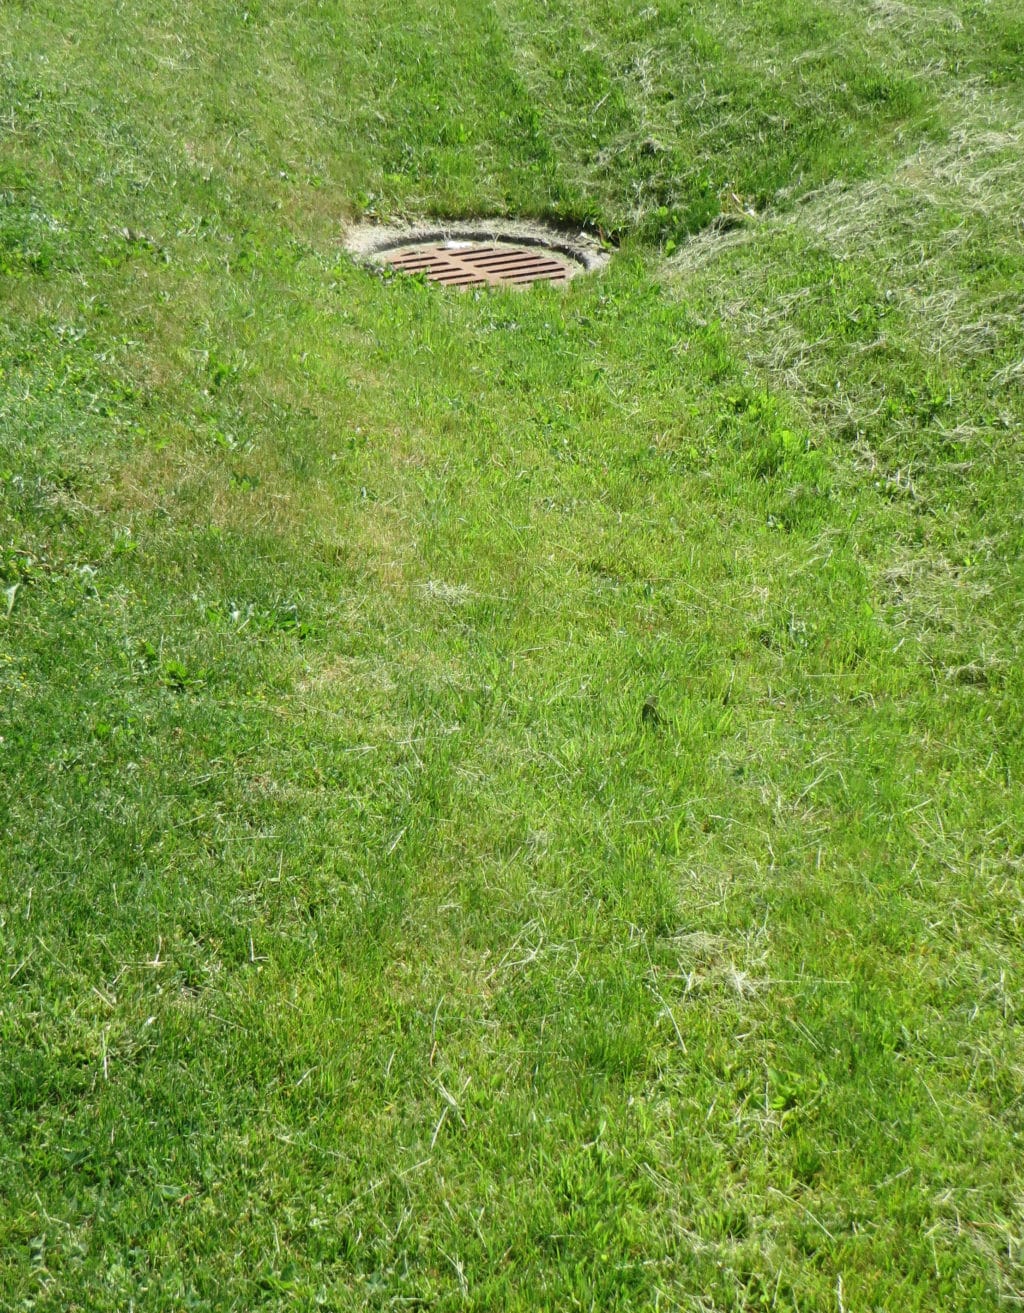

In residential developments, swales are typically planted with grass and may also contain moisture-tolerant plants. They are often referred to as “grassy” or “vegetated” swales.
If properly designed, swales move surface water quickly away from houses and yards and prevent flooding around the house during heavy rains and snowmelt. The grasses and other plants slow the water flow, which reduces erosion and promotes infiltration back into the soil.
Depending on the local topography and codes, swales may drain the water to wooded areas, streams or ponds, man-made “retention” ponds, or into storm sewers by way of subsurface piping. If possible, the swale is sloped about ¼ inch per foot to promote drainage. On flat sites with porous soils, swales may be designed with level bottoms that hold water while it percolates back into the soil or evaporates. Where the slope is steep, stone or concrete “check dams” should be built across the bottom of the swale to reduce the water flow rate and prevent erosion.
Swale Maintenance. Grassy swales need maintenance like other landscaped areas. Typically they means mowing the grass, removing invasive plants, and removing leaf litter and other debris that could kill the grass over time. The grass is essential to slow the water flow, prevent erosion, and promote drainage back into the soil.
Curtain Drains
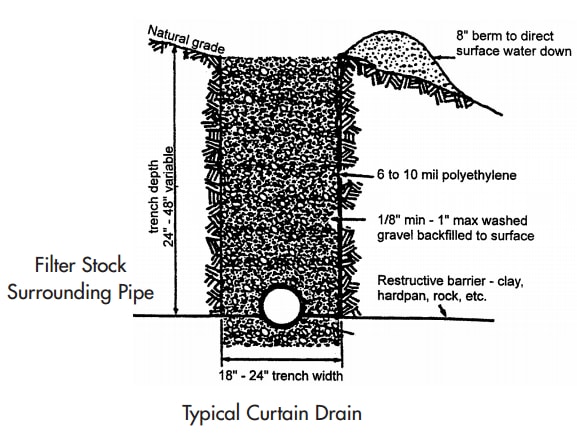
Where swales are not practical, gravel-filled trenches called curtain drains are sometimes used to interrupt the flow of water and direct it away from your home. Curtain drains can help with both surface and ground water and can be tied into storm sewers if permitted.
The trenches are typically 2-4 ft. deep and located several feet away from your foundation on the uphill side. They are generally open at the top, but can be disguised with paving stones or other landscaping features.
Both curtain drains and footing drains are sometimes referred to as “French drains,” which causes a lot of confusion. While both are similar in construction, the purpose of curtain drains is to intercept water before it reaches your foundation. Foundation drains are a secondary defense against water that has already reached the foundation. These drains are buried in the ground directly around the foundation footings and must be below the basement floor to be effective.
Drywells
On a flat site or other site where you cannot safely drain the water away from the house by gravity, you may need to install a drywell. At its simplest, this is a hole in the ground at least 10 feet from your foundation filled with gravel or crushed stone. Its purpose is to collect storm runoff and allow to slowly percolate back into the ground.
The required size and distance from the house will vary depending on rainfall amounts and soil conditions, but a typical drywell is about 4 feet in diameter and 4 feet deep. It is important to line it with a heavy landscape fabric to prevent it from clogging with silt. Fill it with clean course gravel, crushed stone and cap the top with a layer of landscape fabric and topsoil.
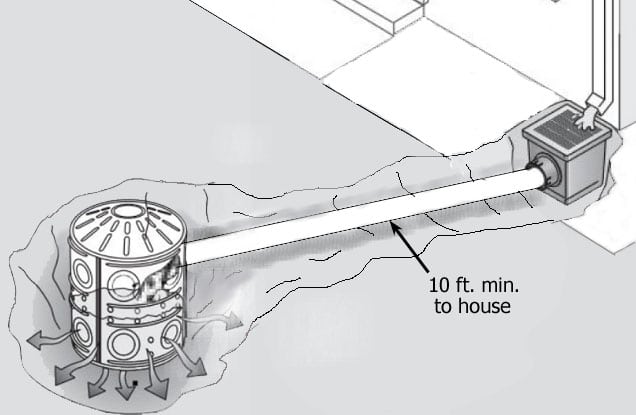
You can boost the capacity and performance of a drywell for a modest cost by installing a plastic catch basin within the crushed stone. These are typically 50 gallons, although for smaller drywells a 20-gallon sump basin could work as well. The catch basin allows more water to collect more rapidly in the event of a very heavy rainfall or rapid snowmelt.
The basin should be set on about a foot of gravel or stone, with stone all around and on top. Use landscape fabric to line both the hole and the ground and the plastic basin.
How well a drywell works will depend on its loading, size, and the how rapidly the water can percolate into the soil. Well-drained soil that easily passes a perc test will be better than dense, slow-draining clay soil.
If you do get an inch of rain in an hour, and all 1,000 gallons of water are channeled into your 4-ft.-deep drywell (375 gallons if completely empty), it will be quickly overwhelmed and the gutters will back up – and that’s assuming it is in good shape and not silted up. So a large house might need two drywells, one on each side of the house.A well-designed drywell with adequate capacity, protected by filter fabric, and situated over well-drained soil can last for many years. On the other hand, if it’s allowed to fill with sediment and leaf debris, it may do little more than collect storm water until it overflows. A design with a lid for occasional inspection and maintenance is a good idea.
Bottom line: Drywells are a nice concept, and can work well for modest loads, but draining to “daylight” is the best choice when possible.
Foundation & Sitework Articles
Foundation Drainage: Below Grade
Waterproofing & Dampproofing
Insulating Basement Walls
Site Evaluation
Basement Leakage FAQs
James Floro says
Can’t Tell If Gutters Drain to Daylight or Drywell
We have a very large shop building that I recently upgraded to 6in gutters with filters on the downspouts to collect the oak and fir needles that blanket the roof and clog the gutters.
I called a company out to determine if my underground drain feeds into a dry well or feeds to daylight somewhere below the shop.
The technician could not get the camera to the end of the line.
I don’t know where the rain water is flowing, but I doubt we have a dry well that could handle 6 downspouts and ive never located an outlet to daylight.
Is there a practical way to determine where the water is flowing? Its possible any outlet could be covered over the years.
buildingadvisor says
If you’re getting a lot of leaf debris in your gutters, gutter guards might be a better choice than filters at the downspouts. While the commercial gutter-guard companies charge a high premium, you can buy high-quality guards and install them yourself for a fraction of the cost. Most snap into place and then lock in place with self-tapping sheet-metal screws. The ladder work is the biggest challenge for hard-to-reach sections of roof.
As for where the water is draining, I would look for a soggy area downslope from the building after a big rain. If a drain-to-daylight is hidden by plants and debris, the water should still be evident. |There could be one or more drywells, which can handle a significant flow if they are large enough and the surrounding soil has a reasonable absorption rate.
It’s also possible that the downspouts connect directly to the footing drains — generally a bad idea, but more common than you would imagine. Of course, then you have to determine where the footing drains are directed. In some cases, the footing drains encircle the house without an outlet. The water either percolates into the soil – or ends up in the basement.
As for locating the drainage point, there are high-tech approaches to locating water flow and leaks underground, but I doubt that these would be cost effective in your case.
If the gutters are draining well and not causing ponding, erosion, foundation leakage or other problems, you can take a watch-and-wait approach. If you’d rather know where the water is going, it’s not difficult to direct the downspouts to daylight or a drywall. On the surface, you can install shallow drains filled with gravel, or you can install subsurface drains in shallow trenches. Use perforated or non-perforated pipe depending on your needs. The pipe should be buried far enough below the surface to maintain a lawn or other landscaping –usually about 6-12 inches is adequate.
James Floro says
The downspouts do in fact feed into footing drains. I can see the direction that 2 drains go. They do go towards a downsloped rough graded area where it would make sense to drain, but even with the large amounts of rain, Ive yet to see any evidence of any saturation where the line may feed to daylight. Last year before I had new gutters installed, I had a sewer/drain tech unclog the line, which has been flowing free since the visit. They also scoped the line to determine where the water flows but could not get the camera to the end of the line. Im curious if I could simply put the hose in my downspout and watch/listen for water flowing out. I do not want to overwhelm my possible drywell or what/where ever the water drains to. Interestingly enough, the line seems to follow a sewer line that feeds into the septic, but I doubt anyone would install footing drains to septic. There is no way our septic could handle the amount of water that we get. But following where the tech scoped the line, they seem to follow a similar path towards the septic downhill.
Any other tips to tracking down where the water flows would be welcomed
James Floro says
Thank you for the detailed response.
I suspect we have a large or multiple dry wells located under our parking lot.
The volume of runoff should create a small “creek” but I have never located just where exactly the water flows.
I did get a quote for gutter guards and the price quoted was more than double what the new 6′ gutter installation would be. I also had multiple phone calls a day from pushy salesmen.
The downspout filters and larger gutters have held up very well and collect all the debris so nothing gets to the underground drains. After years of fir needles and oak leaves going down those drains, it would not surprise me that there could be significant buildup somewhere in the line.
I have not, however, had any back flowing or flooding issues so the water is going somewhere, hopefully away from our buildings.
I guess it’s a mystery for another day.
Maurice says
Poor Site Drainage Undermining My Foundation
I live on a subdivision where I own the house and we rent the land.
The landowner has never installed drainage for the access roads so surface water from the road migrates through our front lawns and under our houses into our weeping tile (foundation drain tile).
Over the past two years I noticed a crack appear starting at the south corner of the house, running at a 45° angle to the north side (inside) corner of the L shaped foundation. The crack has grown from hairline to 4-6mm wide now. The floor sounds very hollow. And “drums” if you strike it!. There are also new cracks through the middle of the ‘L’ shape section going NE, with lateral cracks off about every 2-3meters to new vertical sidewall cracks. Some cracks are now showing water influx.
There are signs of water migration through the surrounding fill at about 30cm below ground level and the weeping tile that extends 4m out of the ground behind the house (NE) end is running a 1/3 full pipe this time of year (early spring).
The landowner has been contacted several times regarding the issue, but is only concerned about me not blocking the weeping tile. When I brought the house 3 years ago it only had 3 hairline cracks in the walls. That was not an issue then to me but now! Help!
buildingadvisor says
From what you describe, it sounds like poorly managed site drainage is undermining your foundation. Your home’s foundation drainage system, is designed to handle runoff from directly around the house, but not the extra discharge from roads or adjacent properties.
Since the cracks are still growing, this is an active problem that will only get worse if not addressed.
If similar problems are affecting your neighbors, it would make sense to combine forces and make your case as a group to the landowner. If he is not responsive, your next step would be to have an engineer evaluate the site and specify a remediation plan. This will include general changes to the site drainage as well as structural repairs to your individual homes.
If the landowner fails to cooperate, you may need the assistance of a lawyer to assess your options for proceeding. Your land leasing contract may include language about the landowner’s responsibility. Also, there may be local laws that provide some legal protections for owners living on rented or leased land.
It does not make sense to repair your home until the landowner reconfigures the overall site drainage. You may be able to divert some of the surface water with swales, curtain drains, and other drainage techniques. But since you do not own the land, it’s not clear that you could do this without the landowner’s cooperation.
See also: Washout Undermined Foundation Erosion From Buried Debris
Maurice says
Hi Steve. Thank you so much for your response. The building is a 2 section mini-home dated 2006. The site was primarily designed as a gated community, but after a limited response , it was opened to everyone. My property is on a 3/4 height heated basement. Others (80%) are on piles. The road in front of me has been replaced twice in 3 years as the frost heaved it up and the drainage to the road is there, but above the ground level by 3-4″. And I expect not even connected. The damage to my basement floor is in the front section of the house (800 sq ft) and is a crack from my south corner going north at a 45° angle and I expect a cavity under there of at least 6 to 12 inches or more.
Tenesha Wescott says
Can I Fill Backyard Hole That Neighbors Use For Drainage?
My husband and I bought a house that has a long distance to the back of the property line. I would say the whole backyard is about 100-180ft but our fence stops at about 80ft. On the other side of the fence is a drop off of about 6ft. Most of our backyard is a hole (very steep slope) where all the surrounding neighbors probably have drainage going to. There is no outlet for the water to escape. Our property takes up most of the area but the other homes also have this area included in their property as well. After days of rain, we can see up to 3 ft. of water sitting there until the ground and trees absorb it. My question is, can we put a retaining wall and extend our yard back to the full property line.
buildingadvisor says
In general, you can do what you want with your own property, but do not have the right to work on or cross other people’s property without their permission.
You say that email that your property includes a “hole” where neighboring properties drain into. But you also state that “this area is included on their property as well.” Does this mean that the drainage area is common property owned by all the neighbors who use it? Or is it your land that they are using without your consent?
As for the retaining wall, you can certainly build a retaining wall on your property and change the slope of the property as you wish – with some limitations. For example, if changes to your property’s grade or landscaping causes more water to run onto a neighbor’s property and causes significant damage, they may have legal recourse against you.
Whether or not your neighbors have the right to drain water onto your property is a complicated issue. Most states allow this unless their actions are intentional or negligent. State laws vary. Also, if neighbor’s have been openly using your land for many years without your consent, they may make a legal claim of “adverse possession.”
Bottom line: If you can work cooperatively with your neighbors to find a solution, you may save yourself a lot of money and headaches in legal battles. Before proceeding you may need to complete a survey to identify your property boundaries. Between 100 and 180 feet is a lot of uncertainty. Once you know who owns what, you can assess your options. Before doing anything that might antagonize your neighbors, I strongly recommend talking to a lawyer.
Bob M says
Can I Raise Grade Above the Bottom of Siding?
We have water puddling at several spots around our foundation because of negative slope of the ground. Unfortunately, the shingle siding starts just 4 to 6 inches above ground (only 4-6 inches of concrete foundation is exposed). I’d like to add soil to create a slope away from the house, but it would be bad to have it close to the siding.
I saw your description of “water table flashing” and wondered what it is made of and whether it could be used below grade. Is it moisture-proof/bug-proof? If the flashing was aluminum, I was thinking of removing the bottom row (or 2) of siding and replacing it with the flashing, overlapping the foundation. I’d then add soil that would be against the flashing and about 6″ below the siding to get a nice slope away from the house. What do you think? If doable, any suggestions or tips to do it correctly? Our 80-year-old house is in central Connecticut
buildingadvisor says
Water table “flashing” refers to the L-shaped metal drip cap that covers the top edge of the water table – a horizontal trim board along the bottom of a wall. The water table was traditionally made out of wood, but you could certainly use a waterproof or water-resistant material such as expanded PVC (such as Azek) or fiber cement to improve its durability.
However, since the water table is covering the lower portion of the wood-frame wall, it would be unwise to raise the grade high enough to reach the water table. This would be especially bad in termite regions, but problematic in any climate. The water table helps protect the lower siding courses, but should never be buried in soil.
If you wish to drain the water from these low areas, your best bet might be to install surface or subsurface drains that conduct the pooled water to a lower part of the site — or if that is not possible to a drywell.
A drywell is a large hole in the ground filled with course stone, which provides a temporary storage reservoir for storm water while it slowly seeps into the ground. Fancy ones use a concrete or plastic chamber with perforations for drainage. A simple hole in the ground lined with filter fabric and filled with course gravel or crushed stone can work just as well. The top of the well can be concealed by grass or mulch.
A professional landscaping contractor can help you come up with a workable plan. The simplest approach to surface drainage is to dig a foot-deep trench, line it with landscape fabric, and fill with crushed stone or course gravel. The trench should ideally slope away from the house at 1/4 inch per foot, any slope is better than none. You can achieve the same result with a commercial plastic or metal “channel drain”. These are usually 5 to 6 in. wide and equally deep and are protected on the top by a slotted or perforated cover designed to keep out debris.
If these are not practical or not acceptable visually, then you can use a system that transports the water underground to a suitable drainage area. In this case, you’ll need a collection point, usually a 9×9-inch or 12×12 inch catch basin with a perforated top and an outlet connected to a 3 in. or 4 in. (non-perforated) drain pipe that slopes downward to a daylight or a drywell.
Other drainage options include shallow ditches called swales and deep gravel-filled trenches called curtain drains. Sometimes a combined strategy is required to move storm water away from the foundation. It will depend on the slope and drainage characteristics of your site and the appearance you find acceptable.
Sandra Lober says
How To Fix Drainage & Bowed Basement Wall
Water comes in our basement when it rains – mostly on the floor, along with slight leakage at the top of the wall. A horizontal crack extends all the way across the middle of the back basement wall. We live below a hill and need to do grading outside and also exterior drainage. We have a slight bow in the wall of approximately 1 in. Should I spend the money on the structure of the wall or start with the exterior drainage to get the pressure off of the wall?
buildingadvisor says
A hill behind the house places an additional horizontal load on the foundation wall facing the hill. The load is exaggerated if the soil is wet, or if water is building up and exerting hydrostatic pressure, so dealing with the water problem is essential.
It sounds like you are addressing both surface drainage through grading and subsurface drainage with foundation drains. If done properly, that should eliminate your leakage problems and reduce the horizontal pressure on your foundation.
A one-inch displacement of wall along the middle is significant, but not an urgent problem, so I would recommend starting with the drainage work. Just be careful not to further the foundation damage by using heavy equipment too close to the foundation wall. Discuss this issue ahead of time with the contractor. An unreinforced block wall is much more vulnerable than a solid concrete wall with proper reinforcement.
If you are excavating on the exterior, you may be able to remove the bow by jacking from the interior, but you risk cracking the wall. So it may be best to live with the bow. If required, you can stabilize the wall with one of three methods: wall anchors, steel I-beams, or carbon-fiber reinforcing.
• Wall Anchors: There are a number of anchor systems that tie the wall back into the soil with steel rods and plates. However, these require periodice tightening by the homeowner and don’t always hold, so may not provide a permanent solution.
• Steel I-Beams: Vertical I-beams from the floor above to the soil below (through holes punched in the basement floor) provide a sturdy, permanent fix, but stick into the room a bit. They can be boxed in with wood or drywall or hidden in the finished wall.
• Carbon Fiber: The newest approach used carbon fiber strips epoxied to the foundation wall. If done correctly, this is as strong as steel, but without the bulk and no need to break holes in the floor. There are specialty contractors for these systems as well as DIY kits. But I wouldn’t recommend this for the average weekend warrior.
It would be worthwhile to get a quick consult from an independent engineer familiar with residential construction (soils, civil, or structural) who can tell you if a structural repair is advisable and can recommend a suitable contactor.
See also: Building a Dry Basement and our sister site: Inspectapedia
Erica Grammont says
How to Prevent Erosion Before Lawn is Planted?
Is excavating a substitute for tilling? We need to place seed down to avoid top-soil erosion. It’s a little late in the season to be getting started on this but the excavation of our land just ended.
buildingadvisor says
In addition to digging the foundation hole and trenching for utilities, excavation typically has two phases – rough grading and finish grading. The rough grading establishes the ground levels and slopes around the house. Rough grading should establish surface drainage that directs water away from the foundation and does not create low spots or other drainage problems.
The finish grading includes replacing and/or adding topsoil and prepping the soil to support a lawn and other plantings. At this point, the excavation or landscaping contractor will remove rocks and other debris, smooth the surface, and prepare the soil for planting. Depending on the type of equipment used, this might involve compacting the soil with heavy rollers or loosening overly compacted soil (e.g., from a bulldozer) with power raking.
You are correct that it is getting late in the year for planting a lawn, at least in the northern U.S., and that some erosion might occur over the winter, especially on steep slopes. Talk to your landscaping contractor about using lawn netting or erosion-control fabrics to protect erosion-prone areas until a the lawn comes in.
Joe says
New House Causing Flooding. Who is Responsible?
My parents have a neighbor who just built a house and now when it rains now there is flooding between the properties. Who is responsible to fix this?
buildingadvisor says
Neighbor disputes over site drainage are a common problem. There are several legal principles that apply and, in some cases, conflict with one another. State laws vary on these questions but most follow the general principle that if a neighbor alters their property in a way that that harms your property, then they are liable – but only IF their alterations were unreasonable (or negligent, in some states). It’s up to the lawyers and courts to decide what exactly is reasonable or not.
This is a legal question and I am not a lawyer. However, I believe it’s always best (and cheapest) to try to settle these problems cooperatively before calling in the lawyers. It’s likely that the problem can be solved with some re-grading and use of drainage swales. If that’s not feasible, you can most likely drain the excess water to a storm sewer or acceptable drainage area using a trench drain at the surface or a catch basin combined with a subsurface drain pipe.
A quick consult with a civil engineer can help you identify the most cost-effective solution. Once you know the cost to fix the problem, you can negotiate with the neighbor about sharing the cost. If that doesn’t work out, you may want to talk with a lawyer. A good lawyer will tell you quickly whether taking (or threatening) legal action is likely to be cost-effective. Of course, suing your next-door neighbor is never a recipe for good relations going forward.
Best of luck in figuring out a workable solution that drains the water and keeps the peace!
You can read a good summary on the legal issues at this link.
Shannon says
Drainage Problems on Down-Slope Lot
We are currently looking at a site that’s been on the market for a long time, and it’s priced really low so it seems like a bargain. It’s in a neighborhood we’ve always wanted to live in, but homes are rarely available. When our realtor called the listing agent to inquire, he basically steered us away, saying it’s a “challenging site”. It’s has a steep slope away from the road and supposedly has the neighborhood storm drain running underneath.
The notes on the listing say, “Site plan for 1800 sq ft home was declined by Health Dept, recommended smaller residence to accommodate dry well”. My question is: Where do we start with this? Should I call the health department first and see if they have a maximum square footage in mind? Should I call an engineer, a builder, an architect? We are willing to build a smaller home if needed, and we’re willing to pay for the site work needed.
But we don’t want to start investing a lot of money without knowing if we’ll just be turned down by the health department again. Also, couldn’t we just build a new dry well? Any advice you can give would be helpful! Thanks!
buildingadvisor says
I would definitely start with the health department first to find out why specifically they rejected the last house design. Also try to get as much information as you can about the storm drain that runs through the property. What area does this storm drain serve? Can you tie into this storm drain? If so, why would you need a drywell? Also ask if there are any swales or other drainage techniques used to handle runoff from the road that drains onto this property.
If a storm drain (or swales) runs across your property, then the town or other jurisdiction probably holds one or more drainage easements across the property that may restrict where on the property you can build. The easement should be recorded on the deed or other public record at the town zoning office or county registry of deeds.
Once you have gathered as much free information as you can, I would suggest a brief consult with a civil or geotechnical engineer to come up with a conceptual building and drainage plan that will work for this site. To be safe, you would want to get this plan approved in writing by the town before completing purchase. To protect yourself, make such approval a contingency of your offer and allow yourself an adequate study period to gather this information.
Building on a down-slope lot can be challenging, but with good engineering you should be able to work around these problems. Make sure that the engineering plan is incorporated into any house plan that you develop for the site.
Best of luck with your new home! See also: Evaluating Slope, Soils & Drainage