Q: How sturdy are helical piers as a foundation for a backyard deck? Also, can I use a ground screws or other type of no-dig post anchor to support a newel post on my porch stairs? – FC
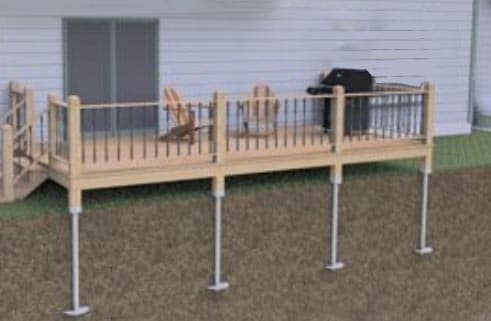
A: Helical piers, when installed properly, can provide a sturdy, code-approved foundation for a raised backyard deck. This type of support, also known as helical “piles” has been widely used for years in commercial and industrial applications, foundation repairs, and temporary structures such as tents.
Until recently, however, helical piers were rarely used for residential decks. This has started to change as more deck builders have become aware of their advantages and have gained confidence in the system.
At the same time, more companies have sprouted up offering professional installation of the pier systems at competitive costs. Code officials are also better informed about the technology and, in some cases, will accept the field report of the installer, stamped by an engineer, as proof of code compliance. This eliminates the need for separate inspections of the piers and speeds up the building process.
Helical Pier Details
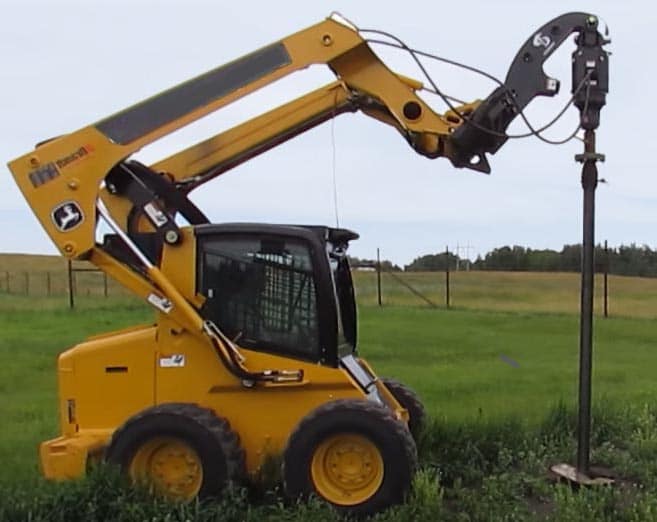
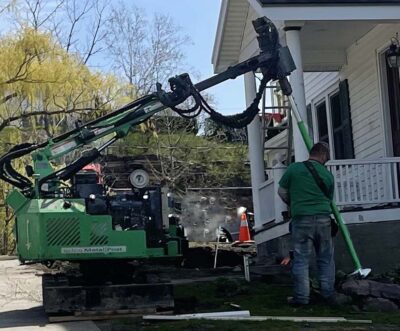
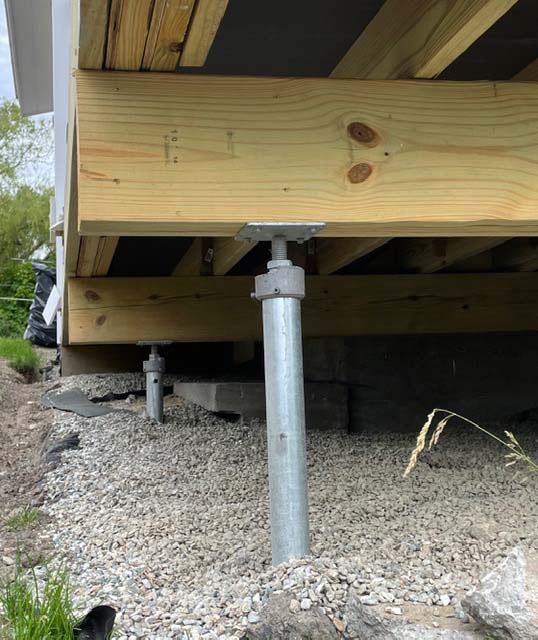
The typical helical pier for a deck consists of a 7-foot-long galvanized steel pipe with a welded helical shaped screw head at the bottom. The heavy-gauge pipe is screwed deep into the ground, below the frost line, by a hydraulic machine. A pressure gauge on the machine shows when the pier has reached an adequate level of resistance. Engineering formulas convert the readout to the bearing load required by code.
The softer the soil, the deeper the pile is driven, in some cases requiring an extension to increase the length. If rock is encountered, the pile is driven through or around the rock, or left in place on top of the rock and tested for bearing load. If necessary, the pile will be moved to a better location.
Compared with traditional concrete piers, helical piles are much simpler to install. Concrete piers involve multiple steps and may require two inspections, holding up progress. Helical piers are generally installed in one step by a specialty contractor. In many markets, the cost is competitive with concrete piers or less expensive when taking into account excavation and inspection costs. Other advantages include:
• Minimal disturbance to surrounding areas
• Works in wet or frozen soil
• Faster installation – no inspection required in some areas
• Engineered performance
The technology usually works well but is not foolproof. High-quality hardware, professional installation equipment, and trained installers are necessary for a safe and successful installation. Enormous forces are applied to the anchor to drive it to the proper depth.
Potential Problems
If the anchor is not strong enough for the type of ground or the driver is not properly aligned, the anchor can be damaged during installation, reducing its bearing strength. On rocky ground, the helical screw may need to be heavier to prevent damage.
Even on suitable soil, the installer must take the time and effort to get the piers carefully placed at the location and height needed by the deck installer. If they are placed wrong, the installer may have to come back re-drive the piers. If a little off on the height, adjustable brackets on the top of the pier enable to contractor to fine-tune the elevation.
These and other problems in the field require an experienced installer who knows the power and limitations of the equipment and has the field experience to work out solutions on the job site. Since many new helical pier companies have sprung up in the past few years, not all installers are as well-trained as well as they should be.
Lightweight Ground Anchors
 For smaller jobs such as posts for mailboxes and fences, a variety of ground anchors are available. The ones I am familiar with are essentially large, hollow screws made of heavy-gauge galvanized steel.
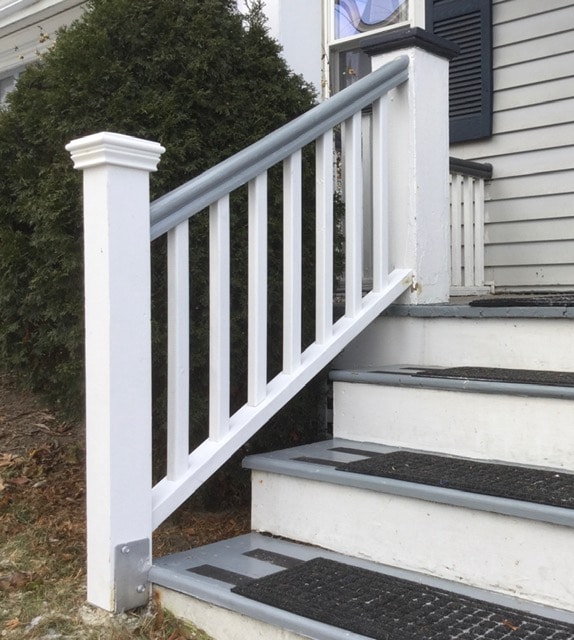
I used one recently to anchor a newel post at the bottom of a porch staircase. Excavation would have been difficult in such a tight space without removing the stairs, so I thought this was worth a try.
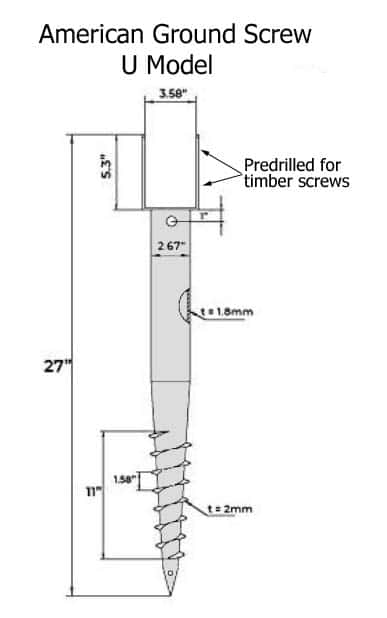
After doing some research, I settled on the American Ground Screw U-Model (see illustration), with a welded U fitting at the top sized for bolting to a 4×4. The shaft is about 2 feet long and screwed into the ground with the aid of a length of rebar supplied with the ground screw.
The resistance was so great that I needed to use a length of pipe to extend the length of the rebar for added leverage. Resistance is a good sign, indicating firm support for the anchor. Check with a level or plumb line to keep the screw aligned to vertical.
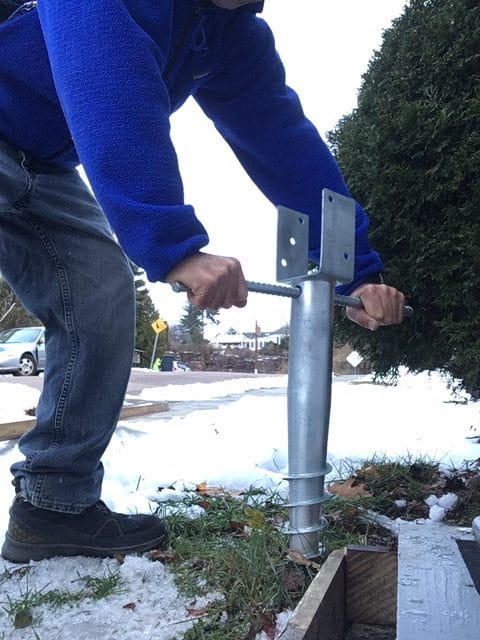
For added stiffness, I drove a 7 x ½ inch galvanized lag screw into the bottom of the post, filled the screw with concrete, and set the lag screw into the wet concrete. This and six structural screws though the base plate provided a solid base for the post.
With the new railing attached, the post seems stiff and sturdy. I’m not sure it would withstand a 200-pound horizontal point load (500 pounds with the safety factor) applied to the top of the post. But since it is at ground level, I am not concerned. It provides a sturdy railing to hold onto when the steps are wet or icy. And it passed inspection, at least in my town.
Read more on Deck Posts & Piers
Leave a Reply