Q: I am redoing my wood floor balcony by sloping it, using a little dry pack mortar and then waterproofing the surface using Henry BlueSkin (peel-and-stick butyl membrane roof flashing).
Can I apply thinset directly to the BlueSkin? I would like to use this as a waterproof barrier and cement the backer board on top of it. Then set the tile on the backerboard.
The photo below shows the 2nd floor balcony of our townhouse on the Oregon coast. The floor currently slopes a little less than ¼ inch per foot and you can see some pooling and algae on the left. Underneath is a soffit and outdoor sitting area, but no living space. The floor is about 5 ft. wide by 4 ft. deep.
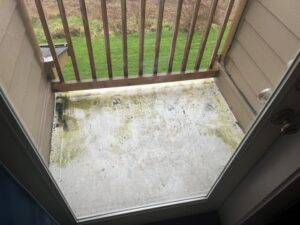
Last year I coated the roof surface material with a white polymer but it has not lasted long. I wanted to fill in some cracks in the material. The deck floor appears pretty solid – no obvious deflection.
Without ripping up the balcony, I am not sure how many joists there are or in which direction they run. I am assuming the integrity of the joists is OK but in order to do this right I am thinking I’ll need to remove the lower boards on the wall an install flashing up the wall.
I have done a shower system in the house using dry pack and a gray sheet of waterproof membrane to waterproof it. I am considering treating this project the same way.
Or do you think I am better off ripping up the system and starting from scratch? – JIm Murphy
A. What you are attempting is a tricky detail – essentially trying to turn your 2nd floor deck into a tiled shower stall — with wood siding on the walls. It’s possible, but not easy to do well.
I would NOT recommend apply thinset to BlueSkin or any peel-and-stick waterproofing membrane no specifically designed for tile. It might work, but you are really winging it here, mixing and matching products, materials, and systems.
There are waterproof tile membranes designed for this task, and well-established ways to apply tile over a wood-framed substrate – although mainly on a building interior.
If the current floor feels very solid, you might be able to clean up what you have and go over it with new materials. But a safer approach would be to tear down to the framing, inspect the support structure, beef it up as needed, and lay new sheathing, flashing, and setting materials.
As for using dry-pack mortar for your base, if you are skilled with setting tile on a mortar bed, go for it. As long as you have a structurally sound deck this is feasible and will allow you to increase the slope to the recommended minimum of ¼ inch per foot.
You will need a wood form at the lower, open end of the patio to contain the mortar and provide a guide for screeding. Once the mortar has dried for 2-3 days, install an exterior-rated waterproof membrane over the mortar bed with thinset and you are ready to tile. If you are not skilled with mortar beds, however, I’d stick with the thinset methods described below. How to detail corners and edges is discussed below – the devil is in the details.
Thinset Basics
Exterior tile on a wood-framed floor is a challenging application. Because tile needs a stiff and stable base, exterior tile is usually installed over concrete or mortar, which is naturally stiff and unaffected by moisture.
Wood, on the other hand, flexes under load and shrinks and swells with changes in humidity, making it less than ideal as a substrate for outdoor tile. These problems are compounded on the exterior by exposure to variable weather.
Thinset tile systems were developed to enable builders to put rigid tiles and grout onto flexible wooden floors without the tile and grout cracking or loosening from the movement. These same materials and techniques can be adapted to your outdoor deck.
The main thinset system components are backerboards, thinset mortars, and membranes that are used to “uncouple” or isolate the tile from small movements in the substrate. Some of these membranes can also serve was waterproofing if sealed properly. Most thinset materials have very specific installation instructions, which should be followed closely. Yes, these are products where it really pays to READ THE INSTRUCTIONS!
The Structure
Before thinking about tiling, I would first want to establish that the underlying structure is sturdy and rigid, and free of excess moisture or wood decay. Many balconies like yours are built with cantilevered joists, which are prone to moisture damage where the cantilevered joists meet the building’s exterior walls – a difficult place to flash effectively.
You also need to be concerned about water leakage along the deck surface where it meets the sidewalls of the balcony – a more standard flashing detail, but you can never assume that flashing was installed correctly.
If the joists are sound, dry, and large enough, you should be good to go. The allowable deflection for ceramic tile is L/360 – that is, the maximum deflection along or between the joists should be less than 1/360 times to span. That’s about 3/16 in. over 5 ft.).
With such a short span, you will be well within the deflection limits along the span with 2×6 or larger joists (see span table below). Between the joists however, can be a challenge if the joist spacing is greater than 16 in. on-center. In that case you would be wise to install additional joists to reduce the spacing, or install solid blocking between the existing joists. Read about how to stiffen a floor.

Roof/Floor Sheathing
In general, you want at least 1-1/8 in. of wood in the subfloor and underlayment combined. A common approach is to combine 5/8-inch plywood or Advantech subflooring, glued and screwed to the joists, with 5/8-inch plywood underlayment – with no voids or surface defects.
The joints in the underlayment (top layer) should be offset from joints in the bottom layer (sheathing), and the underlayment should be screwed only to the sheathing, not through to the joists.
Make sure you leave 1/8 inch gaps at all joints and at least ¼ around the perimeter of the floor – this is especially important as this is an exterior application in a wet climate.
The joints in the underlayment (top) layer should be offset from the subfloor. Read more on plywood subloors for ceramic tile.
Another approved option is to use 3/4-inch t&g Sturd-I-Floor plywood with a cement backerboard, but I would avoid a one-layer plywood floor in an exterior application like this – unless you were going over existing deck boards.
Backerboard, Membrane, and Thinset
There are wide range of tile setting products on the market. For interior floors, you can install the tile membrane directly over the plywood subfloor and omit the backerboard. However, on an exterior job like this, I’d use a cement-based backerboard over the plywood underlayment. If any moisture gets through the system, I would prefer it to hit cement, not wood. Also, the backerboard provides additional separation between the flexible wood and the rigid tile surface.
Choose backerboards and tile membranes that are rated for exterior use. Most cement-based backerboards are rated for exterior use, but check with the manufacturer. For exterior-rated membranes, I can recommend Schluter Ditra or Ditra XL, or Noble Deck. I have used Ditra over existing tile and other difficult substrates with no problems.
Most backerboards install to wood with mechanical fasteners and modified thinset mortar applied with a notched trowel. Read the instructions for fastener type and space, mortar type, trowel notch size, and drying time. Some backerboards use un-modified thinset, others use modified, and some use a different type on the plywood side and the tile side. For example, Ditra uses modified thinset below and unmodified thinset above. Again, READ THE INSTRUCTIONS.
On top of the backerboard apply thinset, tile membrane, a second layer of thinset, and tile, as per the manufacturer. It’s important to get the right depth and notch size of thinset to bed the tile firmly in the mortar, covering 95% of the tile surface.
Most membranes can provide both crack isolation (uncoupling the tile and grout from the structure) and waterproofing. But for waterproofing, you must install them as specified by the manufacturer. This involves sealing all joints and edges with accessories and sealants from the membrane manufacturer. With Ditra, you must cover all seams and corners with strips of Kerdi Band bedded in unmodified thinset. With sheet membranes like Noble Deck, you overlap seams and turn up the membrane at inside corners. Otherwise the membranes are not waterproof. Neither are grout joints, so you will need to use a waterproof membrane to protect the underlying structure.
Once the thinset mortar has set, use a latex-modified grout or, if you’re up to it, an epoxy grout – the strongest and most waterproof grout available. However, epoxy grout is best left to tile pros as you have a short working time and you can easily make a mess that is nearly impossible to clean.
If you use standard grout, you will want to seal the grout with two coats of a silane-siloxane grout sealer, which will help keep any water from penetrating though the grout. Avoid silicones or other DIY grout sealers, which are not very effective.
Edge Treatment
You will want to leave an expansion space around the perimeter. Some contractors use the ½-inch thick foam expansion joint filler sold by masonry suppliers. This makes it easy to keep mortar and grout out of the space. You can leave the material in place and cover it with the membrane and tile.
From your photo, it looks like you have a wood trim board along the bottom of the wall. You might consider replacing this with a waterproof material, such as Azek or fiber-cement, and sealing the tile to the trim with a high-quality elastomeric sealant.
To waterproof the perimeter of the tile floor, I would run the tile membrane up the wall a couple of inches and under the sidewall housewrap or flashing, which will serve as a counterflashing. At the inside corners, you can get a perfect seal using preformed corner pieces provided by the membrane supplier. For this type of detail, a sheet membrane like NobleDeck will be simpler than Ditra since it can easily turn up at where the tile floor meets the sidewall.
Detail the perimeter joints the sidewall trim pieces extend over the perimeter tiles. A bead of high-quality elastomeric sealant in the gap between the sidewall trim and the tile floor completes the seal – and protects the tile membrane from exposure to the elements (detail below).
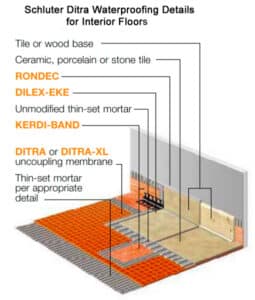
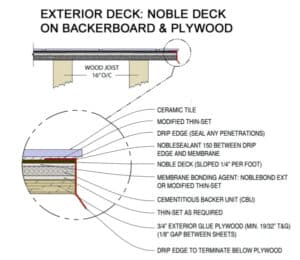
On the open side of the patio, you will need a wide drip edge, like the type used on commercial flat roofs. These typically have a 1 to 3-inch top flange, a long vertical leg, and a small turn-out at the bottom to direct water away from the building. The top leg would go under the tile membrane – or under the roofing membrane if one is used (detail below).
Not For Living Space Below
I would not recommend these details for a rooftop deck or patio with living space below. In that case, you would definitely want a waterproof roofing system in place, such as EPDM, before starting the tile setting system.
More details on tiled patios over wood frame construction can be found in the (Ditra Handbook and (Noble Deck Instructions). Some include roofing membranes and are suitable for patios over living space. — Steve Bliss, Editor, BuildingAdvior.com
See Also Building a Rooftop Deck
Ryan Brandenburger says
I am looking to run the tile from the inside of my home out to my covered patio. The pat pio is completely covered and screened in. The floor is currently a wooden deck with boards. The deck is exposed to partial Florida sun and heat with the possibility of moisture through the screened area at the front. My idea was to put plywood down then a layer of Durock over the plywood. I was hoping I could apply thinset directly over the Durock and tile on top. I see the article mention 1/8 inch along the sides for expansion due to heat.
I am not a contractor but I want to be sure that the person I hire is conscious of the many things mentioned in this artcile.
Thank you
Ron D says
I read your article, HOW TO TILE OVER A WOOD DECK, with much interest.
Our home, in Santa Rosa, CA was built in 2001. The front has a lower and an upper deck. There is a roof over the upper deck. Both decks are open on three sides. Lower deck is concrete. Upper deck is T&G 2 x 6. Not sure of the type of wood.4 or 5 years ago we removed the entire upper deck floor of the 2×6’s. Many had rotted. Repaired dry rot on pillars and support lumber, which is mostly 4x12s. Added in flashing at house and around the 4 sets of double pillars. The wall common to the house is the north wall. The open sides of the deck are east, south, west. The deck is 7′ x 25′. 25′ side is the full on south exposure.
Faces almost a perfect 180 degrees. (I can easily send you pictures which are going to tell you much more than I can.) These few years later we noticed rot happening again on some of the boards.. As I came to learn, what I did with the deck replacement was not handled properly. I had asked around from seemingly reliable sources but this time around I heard very different answers about our approach to correcting this situation.
We were contemplating tile planks. And also wondering if vinyl floor planks, like we have inside our home, are rated to standing up to the UV and the weather. Given the framing we have supporting the upper deck, having an experienced person advise us is essential. We are open to other systems to get the deck protected but want to aim for something that is very resilient and won’t rot. I read your Jan 24, 2023 article, HOW TO TILE OVER A WOOD DECK, with much interest.
buildingadvisor says
Ceramic tile is an option, but this is a challenging detail over wood framing. The flashing, waterproofing, tile substrate, and drainage are all critical. You would be wise to find a tile contractor who is experienced with this specific detail.
There are number of specialized options for waterproof decks. These include cementitious coatings such as Shur-Dek and membrane systems such as Duradek.
Another option is polyester-resin fiberglass – the same material used to build and repair boat hulls. Successfully applying this to a deck surface takes experience, but you end up with a walkable surface that should last for decades if recoated every 10 years or so.
For decks over living space, I have had good luck with spaced wood decking over EPDM installed by a roofing contractor. The decking goes on wood sleepers protected with a strip of EPDM. The decking should be installed in small removable panels so it can be lifted for maintenance and cleaning of the EPDM. With trees overhead, a lot of debris will collect under the wood decking.
If the space under the deck needs to be usable exterior space, you can also consider standard wood or composite decking with an underdeck drainage system. Just be aware that these systems are rarely watertight and you can expect some dripping here and there during a rainstorm.
The advantage of using a manufactured system is that the waterproofing details have been worked out and most products have trained and certified installers. It’s not a situation where you want to be part a contractor’s learning experience.
Evan Bost says
How To Lay Flagstones on a Framed Balcony
We have a client wanting a gauged, varying size flagstone balcony that is fully exposed to elements (central NC, no snow load to speak of) and the pedestal systems we are aware of do not allow for anything other than square pavers that are supported at every corner.. We had thought of installing PT plywood and tile backer on sleepers over EPDM membrane and laying flagstone on tile backer, but would need to verify deflection of this system on 16″ sleeper spacing.
Any system out there for creating a drainage plane beneath masonry flatwork?
buildingadvisor says
Schluter makes a drainage mat called Troba-Plus, that should work for the type of paved deck you are planning. Their detail (below) from the Schluter Ditra Installation Handbook is very similar to your own, with a drainage layer over a single-ply roofing membrane.
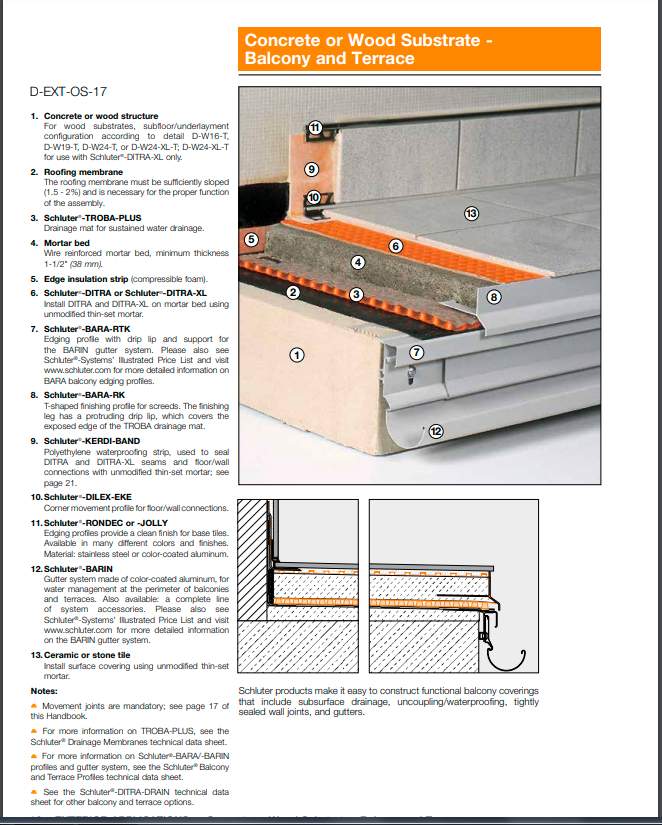
The main difference is that Schluter uses a mortar bed rather than backerboard. With adequate structural support, I don’t see why this approach wouldn’t work with backerboard. However, unless the flagstones are perfectly flat, you may need a medium-bed mortar rather than thinset. Also a mortar bed would provide better support for natural stone than backerboard, which is intended for tile.
Nobleseal also publishes tile details for decks in their Noble Deck Handbook. Noble Deck is their exterior tile membrane. The Noble detail does not have a drainage layer or a roofing membrane. It shows options for backerboards and mortar beds. I think either would be fine for a deck or patio, but not for use over living space.
Read more on Building a Rooftop Deck