In This Article
Ledger Attachment
Ledger Flashing
Lateral Bracing to House
Posts & Piers
Freestanding Decks View all DECKS & PORCHES Articles
Deck building looks pretty simple at a glance, but constructing a safe and durable deck requires good planning, careful material choices, and attention to detail —especially structural details that are sometimes overlooked by both owner-builders and contractors. Modern building codes pay a lot of attention to key details such as ledgers and railings, but codes are not always consistently enforced. So it’s best to familiar yourself with the recommended materials and techniques.
Most residential decks are supported on one side by a ledger that is bolted or lagged to the home’s band joist. This connection is critical, since a failure here can cause a deck to collapse.
Failure of the ledger can be caused by too few or undersized fasteners, or by decay in the ledger or band joist. Lags or bolts provide little support when fastened to rotted wood. So proper flashing of the ledger and band joist area is critical. It is also important that the band joist be nailed adequately to the surrounding structure, since the ledger is only as strong as the structural member it is attached to.
DECK LEDGER ATTACHMENT
A deck depends on a number of key structural connections, starting with the deck-t0-house connection at the ledger. The component you are fastening to must be strong enough to hold the ledger. A rotted band joist won’t work, and few existing ones are pressure-treated. In some cases the band joist was not properly nailed when installed and will need additional nailing. Also, take special precautions when fastening to engineered lumber. LVL at least 1 in. thick is OK, but I-joists need special connection details approved by the I-joist manufacturer.
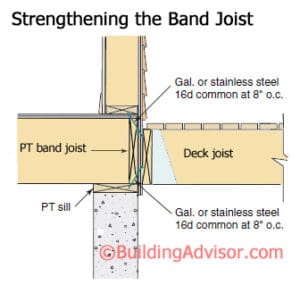
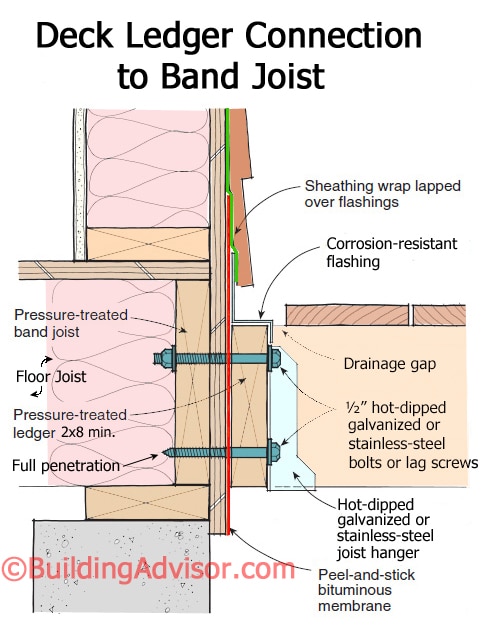
Band Joist-to-House Connection. In new construction, if a deck is planned, it is critical that the band joist be securely tied to the structure. Make sure the band joist is pressure-treated and adequately nailed to the sole plate above and the sill or top plate below with stainless-steel or double-hot-dipped galvanized nails. Fastening with 16d common nails at 8 inches on-center is recommended. If the nailing cannot be confirmed in a retrofit, drive extra 16d nails in toenail fashion (angled) through the exterior to help reinforce this connection (illustration above).
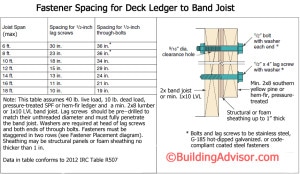
Ledger-to-Band Joist Connection. After a number of widely reported catastrophic deck collapses across the US, engineers at Virginia Tech conducted extensive studies to determine safe fastening details. Their results, originally reported in The Journal of Light Construction, are now incorporated into the IRC and shown in the diagrams and tables below.
Through-bolts are the most reliable connection, but lag bolts are adequate as long as they are long enough to fully penetrate the band joist. For through-bolts, drill holes 1⁄16 inch larger than the bolt. For lags, drill a full-diameter hole for the unthreaded portion and a smaller hole (65 to 75% of the lag’s diameter) for the threaded portion. Use washers under the head of the lag bolt or at both ends of through-bolts to keep the head from crushing the wood. Soak the holes with a preservative before inserting the bolts. Spacing for bolts and lags are shown in the Table below:
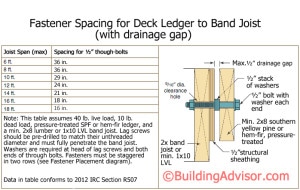
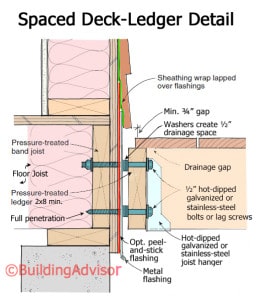
Spaced Ledgers. Some deck builders prefer to leave a ½” gap between the ledger and band joist to permit drainage and help with drying if the area gets wet. It’s a nice detail, approved by the IRC, but not used too often. I would strongly consider it in very wet or humid climates or coastal areas where wood decay is more common. I would also strongly consider it in retrofits where the band joist is not pressure-treated and is difficult to inspect.. To make this connection work, through-bolts should be used, and placed a little closer together, as shown in the Table below.
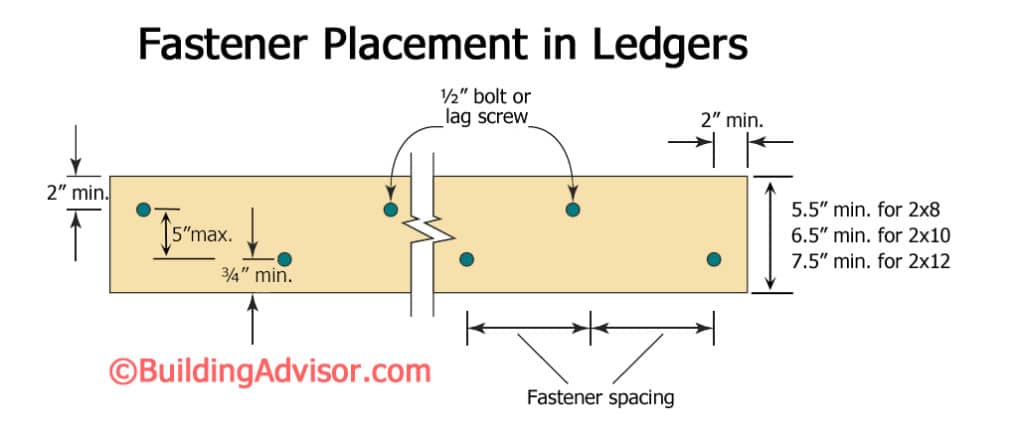
The IRC has established rules for where to place fasteners in the ledger. These are designed to maximize the strength of the connection and to prevent splitting. Lag screws or bolts should be staggered as shown, and held back two inches from top and side edges as shown in the illustration below:
FLASHING THE LEDGER
Proper deck flashing is critical since leakage around the ledger could lead to decay in the band joist and failure of the deck. The siding should be removed over the band-joist area, and a wide band of peel-and-stick membrane or non-corrosive metal flashing should run over the band joist and up under the building felt or house wrap. A second cap flashing should direct water over the ledger and away from the house. Details for a standard and spaced ledger are shown below.
Flashing Leaks. Deck collapses are uncommon, but do occur. In one study by the Consumer Products Safety Commission (CPSC), nearly 700 people per year were injured in deck collapses. Ledger failures are often at fault in collapses.
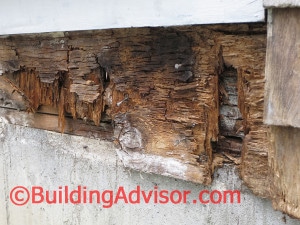
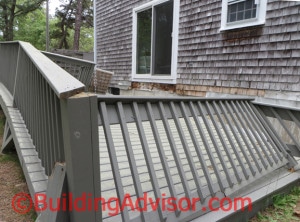
To ensure a safe ledger connection, it is critical to properly flash the ledger area and to only use membrane and metal components that are compatible with today’s highly corrosive pressure-treated wood. The best lag screws and bolts in the world won’t help if the band joist they attach to has rotted due to water intrusion, as in the deck shown here. Periodic inspection of the ledger, band joist, and other critical deck connections is always a good idea.
Caution: Do not use aluminum flashings with pressure-treated lumber unless a durable barrier material, such as a bituminous membrane, separates the aluminum from contact with the wood. Preferably use membrane-type flashings, G185 galvanized steel, or copper. However, copper flashings should not contact galvanized hardware or fasteners.
LATERAL BRACING OF DECK TO HOUSE
Deck ledgers are engineered to resist “shear” forces, essentially keeping the deck from falling vertically. However, decks are also supposed to be braced to resist lateral forces trying to pull the deck away from the house. Code requirements on lateral bracing are not yet enforced in many areas. However, with large decks, high decks, or in areas with high winds or seismic activity, tying the deck to the house laterally is certainly a good idea.
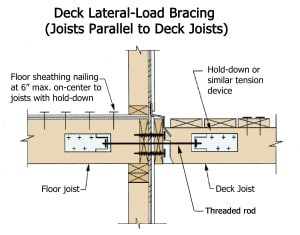
The 2012 IRC shows one solution — where the deck joists run parallel to the house joists. The code requires two hold-down braces per deck, such as the Simpson Strong-Tie DTT2Z or USP DTB-TZ, each rated at the required 1,500 lbs.
Where the deck joists run perpendicular to the house joists, one solution is to nail solid blocking between the first two joists, lining up the solid blocking with the deck joist. Then attach the inside hold-down bracket to the solid blocking.
This approach provides optimal bracing, but is difficult to implement, especially in retrofits where the interior joist bays may not be accessible. Alternative solutions may be acceptable, but it is up to you and the building inspector to work this out.
The newer 2015 IRC provides a simpler alternative, using four simple angle brackets that can be installed from the exterior on new or existing decks. The four connectors must be rated at 750 lbs. each, and be spaced equally along the ledger. The outer two brackets should be within 2 ft. of each end.
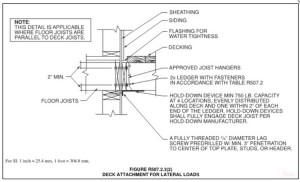
Each connector screws or nails into the bottom of a deck joist and is fastened to the house framing with a single 3/8″ lag screw. The lag screws must penetrate 3 inches (all threaded) into the house framing — into a top plate, stud, header, or sill plate.
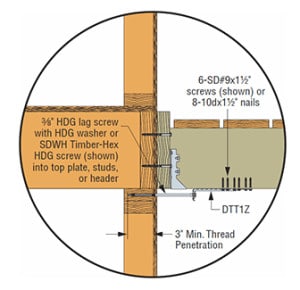
You can use either the Simpson DTT1Z, as shown, or USP LTS19-TZ. The code shows this connection for use where the deck joists run parallel to the floor joists, but your inspector may allow it where joists run perpendicular.
One caution, however: This connection still relies on the withdrawal strength of lag screws, which could fail due to decay in the framing. In a critical connection, such as an elevated deck in a wet climate, the DTT2Z hold-downs described above offer a safer solution.
POSTS & PIERS
In frost-susceptible soils, all posts should sit on concrete piers that extend below the frost depth. The tops of the concrete piers should extend slightly above grade to keep the post ends out of soil and standing water. It is also a good idea to use steel post bases to keep the wood out of direct contact with concrete.
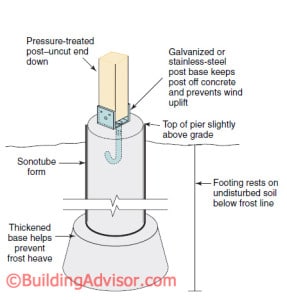
Where uplift from wind is an issue, use structural post bases that are rated for the necessary uplift loads and connected to the concrete with anchor bolts. Many of these are adjustable laterally so the footing and anchor bolt do not need to be precisely placed. Use pressure-treated posts rated for ground contact. Treat any cut post ends and do not place cut ends in contact with soil or concrete.
Depending on the load and soil conditions, you may need a spread footing at the concrete post base. In freezing climates, a concrete pier with a widened base will help protect against frost lifting the post. Even with the base below the frost line, frozen soil can grab the sides of concrete posts and lift them. Backfilling with sand or gravel helps prevent this.
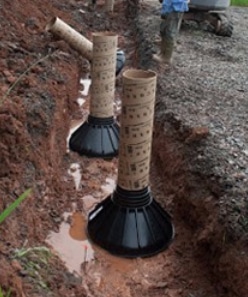
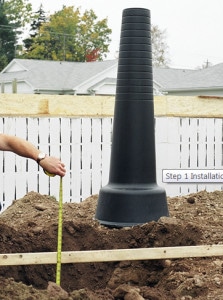
Also, there are a number of products, such as Big Foot and Square Foot that simplify the process of pouring concrete piers with widened bases. Some, like the Footing Tube, provide a single plastic form, which stays in place. The plastic resists adhesion to frost.
Sway bracing. While 4×4 posts can be used up to about 10 feet in height, depending on loads, tall pressure-treated 4x4s are prone to warping and twisting when they dry. Some local codes limit the use of 4x4s to 8 feet. Upgrading to 6x6s for tall posts is a good idea whether required by code or not.
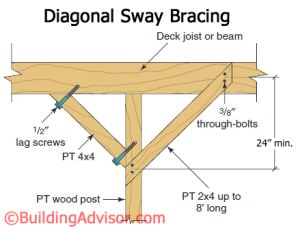
Diagonal sway bracing is an easy way to help stiffen tall posts and provide resistance against racking. The simplest approach is to run short 2×4 or 4×4 sway braces from posts to beams.
FREESTANDING DECKS
There are a number of situations where it is difficult or impossible to achieve a solid deck ledger connection. In this case, the best alternative is to eliminate the ledger altogether and to support the deck independently on its own posts and piers. This type of freestanding deck must have adequate diagonal bracing to prevent racking in the deck structure.
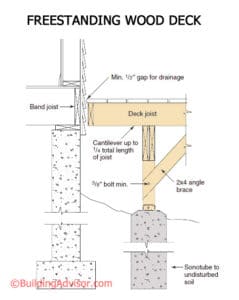
The deck can be braced to the house as well, to help resist racking, but all vertical loads are carried to the ground on posts. The deck should be designed to be structurally independent of the house.
To keep the piers a safe distance from the foundation, the deck will need to be cantilevered on the side facing the house. In general, you can safely cantilever the deck joists up to one quarter their total length. For example, a 12-foot deck joist can be cantilevered up to 3 feet. This assumes that the loading of the joists is uniform with no additional loads on the cantilevered portion of the joists.
See also Deck Fasteners & Connectors Sturdy Deck Railings
Larry says
What Deck Ledger Flashing is Compatible with Vycor?
I plan to install Grace Vycor Plus on my house sheathing behind the ledger for my deck. I also am going to install it over the top of the ledger board and down along the face of the ledger. On top of that I will install a prefabricated Z Type flashing to direct the rain away from the house. I am having a hard time finding what material of the Z Type flashing that could be used with the Vycor Flashing. Vycor just says it is not compatible with PVC. I live in Chicago. What kind of material should I choose for the Z Type flashing that would be compatible with the Vycor Plus? Thank You
buildingadvisor says
Vycor Plus should be compatible with all metals, plus rigid PVC. It should not be used in contact with thin, flexible PVC, used in some flashing products and some window flanges, such as round-tops. The plasticizers used to make the PVC flexible can dissolve the asphaltic adhesive used in bituminous membranes like Vycor Plus, causing black residue to ooze out and stain the surrounding materials.
Where contact with flexible PVC is required, a butyl-based membrane such as Vycor Pro is a better choice.
You can use any flashing metal for the Z-flashing. Aluminum is the most common and one of the least expensive options, but not a good choice in coastal areas or in contact with pressure-treated wood. If you use aluminum, use a heavy-gauge, pre-finished flashing.
Your best (and most expensive) choices are copper, lead-coated copper, and stainless steel. You will need to find a sheetmetal fabricator to form the flashing in these materials.
Read more about: Membrane Flashings Metal Flashing Options Ledger Flashing Details
Wesley Jackson says
Attaching Deck Ledger To Cantilevered Band Joist or Concrete
I’ve got a 2×8 band joist sitting on top of a 2×4 sill plate, and a 3/4″ plywood subfloor. The house joists are also 2x8s, and cantilever 2 ft. out and spanning 10 ft. around the bay window, so a bump-out is out of the question there. Two piers were decided on for the bay window, but the rest of the deck will attach to the band joist via ledger board…..I’m a little concerned about the approved plans that are allowing a 2×10 ledger to attach to a 2×8 band joist.
Any thoughts? by the time the decking is on top, only about half of the ledger will be attached to the band joist, with the rest sitting in front of the concrete foundation. Can I bolt through the foundation in addition to band joist? Pretty sure I cannot bolt through the sill plate. Regardless, abiding by lag bolt spacing is going to be next to impossible even if I would be allowed to bolt to the house foundation.
I would greatly appreciate some input.
buildingadvisor says
In general, it’s OK to attach a 2×10 deck ledger to a 2×8 band joist, as long as it is structurally sound. However, it’s a bit difficult to follow exactly what you are trying to do. A quick sketch would help.
Are you bolting the ledger to a band joist where the floor is cantilevered? This detail is not recommended by the Prescriptive Residential Wood Deck Construction Guide, published by the American Wood Council. The reason is that a cantilevered band joist is more prone to rotate, drop, or come loose than a standard band joist. The prescriptive guide is based on the current IRC and is widely accepted within the industry.
Attaching a deck ledger directly to a concrete wall is allowed by the guide using approved 1/2-inch diameter “expansion, epoxy, or adhesive anchors.” Expansion anchors, such as wedge anchors, are easier to use (and less costly) than epoxy and adhesive anchors unless you have a lot of experience with these. You will want to use hot-dipped galvanized or stainless steel bolts as they will be in contact with the pressure-treated wood. Half-inch galvanized wedge anchors are readily available
These will provide adequate shear strength if spaced according to code (see the Fastener Spacing for Deck Ledger tables.) They also provide excellent pullout strength. For example, a Trubolt ½-inch wedge anchor provides over 3,400 pounds of pullout strength (tension) when embedded 2-1/4 inches. Deeper embedment provides greater strength.
The IRC also requires two lateral braces per ledger, each rated at 1,500 pounds, that tie the deck joists directly to the house floor joists (not to the band joist). Where you are connecting directly to the concrete, this type of lateral bracing might be difficult to achieve unless you can, for example, tie the deck joists to the house’s floor joists with a heavy steel strap across the top of the joists. You would need to check with your local building inspector, who may want you to check with an engineer – something you may want to do anyway.
Structural concerns are greatest when the deck is elevated high above grade. While the building code may be the same for deck attachment whether the deck is 2 feet or 10 feet above grade, the consequences of deck failure are much greater for the elevated deck.
Where deck ledger attachments are questionable, the best approach is to build a freestanding deck, supported on its own piers, with angle bracing to prevent racking. No ledger is required. You may still wish to provide some form a lateral attachment to the house, but this not difficult to achieve with galvanized steel brackets.
Jacquelyn says
Hanging Deck off Cantilevered Joists?
I am a drafter with a client who wants to stabilize a second-floor deck attached to an addition. The deck cannot attach to the rim joist because it is cantilevered about a foot. He wants the joists to insert into the 2nd-floor house joists (sistered to the joists with a 3 ft. overlap). The deck extends 9ft-6in off the house and is supported by 6×6 posts 7ft-6in on center with a 18-inch cantilever at the front. The deck joists are 2×6 lumber 16 oc. The info I find says that this can cause thermal bridging and I cannot find a flashing detail for this, so I am recommending he just add two more posts for a four-post deck instead . Any thoughts? thanks
buildingadvisor says
Your suggestion to create a freestanding deck by adding two posts is probably the best solution as it is very difficult to insulate and flash cantilevered decks (where the house joists extend beyond the exterior wall to form a deck). You would end up with the same sort of detail if you sistered the deck joists to the house joists as your client requested.
I’ve seen cantilevered joists used to create narrow decks on condos and they do not perform well over time. Because of the flashing difficulties, water leakage and wood decay are common with this detail.
One other possibility is to use hold-down hardware, such as the Simpson DTT2Z, to tie the new ledger back to the house floor joists. This detail for lateral bracing of decks attached to a standard band joist is incorporated into the latest version of the IRC. However, it should work for a cantilevered floor as well and be easier to flash.
The IRC calls for two lateral braces for each deck ledger. Because you are attaching to a cantilevered floor, however, you may need more than the two lateral braces specified by the code. A quick review by a structural engineer is always a good idea when getting creative with structural details or building outside of standard construction.
The cantilever at the outboard side of the new deck should be fine. The latest version of the IRC allows for exterior decks to cantilever up to one-fourth the main span of the joists, up to a maximum of 3 ft.
Jacquelyn Sauriol says
thanks so much this is incredibly helpful
jackie in portland OR