• Skip to main content
  • Skip to secondary menu
  • Skip to primary sidebar
  • Skip to secondary sidebar

Building Advisor

Practical Building Advice

search icon

Search This Site

search icon
  • About Us
  • Contact Us
  • HOME
  • BUYING LAND
    • OVERVIEW
    • GETTING STARTED
    • LAND CHECKLIST
    • IS IT BUILDABLE?
    • ZONING
    • LAND REGULATIONS
    • SEPTIC SYSTEMS
    • WATER WELLS
    • SITING A HOUSE
    • SITE EVALUATION
    • QUESTIONS TO ASK WHEN BUYING LAND
    • SITE DEVELOPMENT BUDGETING
    • TYPICAL COSTS
    • REAL ESTATE AGENTS
    • MAKING AN OFFER
    • LESSONS LEARNED
  • DESIGN
    • OVERVIEW
    • PLANS & SPECS
    • SITE PLANNING
    • SITING A HOUSE
    • FLOOR PLANS
    • HIRING AN ARCHITECT
    • HIRING A DESIGNER
    • DESIGN-BUILD CONTRACTORS
  • HIRING
    • OVERVIEW
    • GETTING STARTED
    • TASKS & PLAYERS
    • ARCHITECTS
    • DESIGNERS
    • CONTRACTORS
    • SUBCONTRACTORS
    • DESIGN-BUILD CONTRACTORS
    • CONSTRUCTION MANAGERS
    • OWNER-BUILDERS
    • REAL ESTATE AGENTS
  • ESTIMATING
    • OVERVIEW
    • COST OVERRUNS
    • PRELIMINARY BUDGETING
    • BALLPARK ESTIMATES
    • PRICING GUIDES
    • CONTRACTOR ESTIMATES
    • OWNER-BUILDER ESTIMATES
    • REMODELING ESTIIMATES
    • STEP-BY-STEP GUIDE
    • OVERHEAD & PROFIT
    • ESTIMATING SPREADSHEET
    • ESTIMATING FAQs
  • BIDDING
    • OVERVIEW
    • PRICING THE JOB
    • FIXED-PRICE BIDS
    • COST-PLUS BIDS
    • DESIGN-BUILD BIDS
    • NEGOTIATED BIDS
  • CONTRACTS
    • OVERVIEW
    • CONTRACT BASICS
    • CRITICAL CLAUSES
    • STANDARD CONTRACTS
    • MODEL CONTRACT
    • SIMPLE PROPOSALS
    • WRITTEN SPECS
    • ALLOWANCES
    • CHANGE ORDERS
    • DOCUMENTATION
    • DISPUTE RESOLUTION
  • FINANCE
    • OVERVIEW
    • WHAT’S YOUR BUDGET?
    • GETTING BIDS
    • OVERHEAD & PROFIT
    • CONSTRUCTION LOANS
    • DOWN PAYMENTS
    • DRAW SCHEDULES
    • ALLOWANCES
    • CHANGE ORDERS
    • LIEN WAVERS
    • THE FINAL CHECK
  •   
  • WELLS
    • OVERVIEW
    • WELL DRILLING
    • FROM WELL TO TAP
    • WATER QUALITY
    • WATER TREATMENT
  • SEPTIC
    • OVERVIEW
    • HOW IT WORKS
    • PERC TESTING
    • ALTERNATIVE SEPTIC SYSTEMS
    • SEPTIC SYSTEM MAINTENANCE
    • SEPTIC SYSTEM FAQs
  • FOUNDATIONS
    • OVERVIEW
    • DRY BASEMENT DETAILS
    • SITE DRAINAGE
    • WATERPROOFING
    • BASEMENT INSULATION
    • CRAWLSPACES
    • SITE EVALUATION
    • SITING A HOUSE
  • EXTERIORS
    • OVERVIEW
    • ALL EXTERIORS LEAK
    • RAIN-SCREEN WALLS
    • SHEATHING WRAP
    • WINDOW FLASHING
    • WALL FLASHING
    • FLASHING MEMBRANES
    • METAL FLASHINGS
    • PAINTING & STAINING
  • DECKS
    • OVERVIEW
    • STRUCTURAL DETAILS
    • FRAMING MATERIALS
    • DECK RAILINGS
    • WOOD DECKING
    • COMPOSITE DECKING
    • DECK STAINS & FINISHES
    • FASTENERS & CONNECTORS
  • FREE FORMS
    • FORMS INDEX
  • BUILDING FAQ’S
    • BROWSE Q&A’s
    • Q&A INDEX
You are here: Home / BUILDING MATERIALS & TECHNIQUES / EXTERIOR MATERIALS & TECHNIQUES / ALL EXTERIORS LEAK

ALL EXTERIORS LEAK

View all EXTERIORS articles

While wood siding, brick, vinyl, and other exterior finishes may appear watertight, in fact, all residential “cladding” systems allow some water to penetrate. This is especially true during wind-driven rain when high air pressure forces water to flow through small openings at siding joints, overlaps, nail holes, and other gaps (see photo).

All siding materials leak to some extent. Walls must be designed to safely manage the water intrusion.
All siding materials allow some water to penetrate. The back of these clapboards show significant water staining from leakage at nail holes and from splashback and snow. Photo by author.

Even without wind, some water will seep through tiny gaps to the back of siding through capillary action, the way water is siphoned up a stalk of celery. This is true of brick, wood, and stucco, as well as the newest composite materials.


Older Homes Protected

In older homes, water that penetrated the siding was usually not a problem, since it dried out before it could cause any damage. It dried to both the inte rior of the home and to the outdoors as wind washed through the leaky uninsulated wall cavities. Some claddings, such as brick veneer, were designed with a drainage space for water to safely drain down and out through “weep holes” at the bottom of the wall. The walls did a lousy job of keeping the house warm, but were very durable. They held paint well and often lasted 100 years or more.

Modern Homes Vulnerable

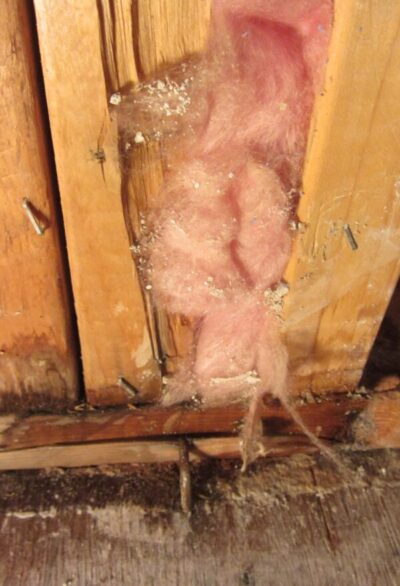
In modern construction, however, the water often get trapped in the walls which are stuffed with insulation sandwiched between plywood and various membrane materials used as vapor barriers and air barriers. Wet materials, such as framing and sheathing, tend to stay wet a lot longer, often leading to mold and decay (see photo).

Wood decay in house framing due to water leakage around window
Water leakage around a window lead to wet insulation and rotting framing. Everything look perfect until carpeting and drywall were removed. Photo by author.


For wood to decay, it needs to be saturated with water and above 50°F, conditions easy to meet in mild climates. In cold climates, the outer parts of the wall are protected by the cold temperature, giving wet walls more time to dry out before it’s warm enough for damage to occur. If water reaches to warm side of the insulation, decay can occur even in mid-winter.


Drainage Plane

While the exterior finish should be designed to repel and shed water, in a modern home a backup system is needed for the times when it fails. The backup system must stop any water that penetrates the cladding and drain it safely away at the bottom of the wall. This backup layer, called a water-resistive barrier by the International Residential Code (IRC), typically consists of properly overlapped building paper or plastic housewrap properly tied into the wall flashings to safely drain water away. This is also called the drainage layer or drainage plane. In this approach, the outer cladding functions as a decorative “rain screen” slowing down wind and water, but it is not expected to be 100% waterproof.

For the drainage plane to be effective, there needs to be a small gap between the water barrier and the siding, allowing water to drain downward. The easiest and least expensive way to achieve this is by installing a wrinkled housewrap under the siding. However, the effectiveness of the 1-2 mm space created is debated. A better approach is a plastic drainage mat, such as Slicker HP (Benjamin Obdyke), which creates a 6mm space. Where the budget allows, a true rain screen, with the siding installed over vertical wood strips is optimal — providing both drainage and ventilation.

Reader Interactions

Leave a Reply Cancel reply

Your email address will not be published. Required fields are marked *

Primary Sidebar

Visit Inspectapedia.com our Sister Site

Secondary Sidebar


ESTIMATING SPREADSHEET SPECIAL

Only $19.95 for Lifetime License LEARN MORE


Share this article

Recent Posts

  • Best Approach to Hot-Climate Cathedral Ceiling
  • Frost-Protected Shallow Foundations
  • Patios & Decks for Coastal Homes
  • Can I Foam Basement Wall With Existing Studs?
  • Is Top Railing On Deck Code-Approved?

Copyright © 2026 · Magazine Pro for Building Advisor on Genesis Framework · WordPress · Log in