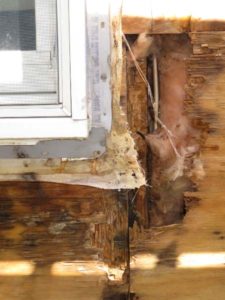
Water leakage from faulty window and door flashing is one of the leading trouble spots in new construction. The damage, often hidden under the siding or within the wall cavities may not show up for several years.
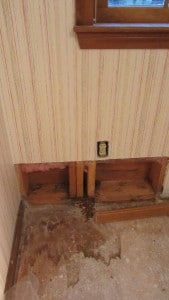
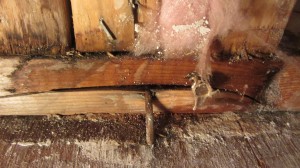
Exterior leakage may first show up on the exterior of the house as peeling paint around or below windows or on the interior as water stains on the drywall. But it’s the hidden damage to the sheathing, framing, and insulation that can be the most destructive and expensive to fix. Damage from leaky window flashing has spawned a number of lawsuits by homeowners’ associations in large developments.
To prevent serious problems down the road, it’s critical to get window flashing installed properly when the house is built. Since the window flashing must be woven into the housewrap (water-resistive barrier), it is very hard to make corrections once the house is complete.

Roof overhangs. Not surprisingly the greatest leaks occur on windows exposed to a lot of rain. This is typically on the side of the house facing the prevailing winds during the rainy season. It is also more prevalent on walls with small or no roof overhang. In new homes, make sure your design has adequate roof overhangs on all sides. This is the first line of defense and will prevent against water leaks at windows and doors.
Flange-type windows. Most new windows have an integral nailing flange, either plastic or metal, that is nailed to wall to secure the window in place. The flange must be sealed to the surrounding walls and flashed to shed water. The flashing needs to be integrated properly with the house wrap and siding for the system to work properly.
There is still some debate about the best way to flash this type of window, and most window manufacturers publish their own details. The most recent published details follow the general approach shown below. Avoid the commonly used X-cuts or I-cuts in the housewrap and never fold the housewrap into the rough opening. You will still see this approach in older installation details. However, this approach tends to conduct water into the house and can cause air leakage where the housewrap folds into the rough opening.
The detail relies on sealant and peel-and-stick flashing tape, both of which are adhered to a plastic housewrap, a material notoriously difficult to stick to (see Illustration).

The key to success with any flashing detail is to follow the shingle principle, with upper layers of waterproofing materials overlapping lower layers, shedding water to the building exterior. Properly lapped flashing will continue to provide protection even if the sealant or tape fail over time as is often the case.
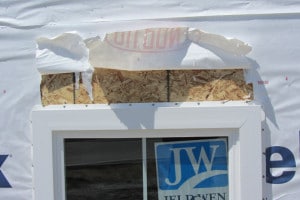
The other key is good workmanship on the job site. It’s easier to draw a tricky detail than to build it in the real world — with dirt, rain, time pressure, and workers who may not have the best training. The more fussy the detail, the greater the chance it will be messed up. This is one place where it’s worth extra supervision, inspection, or whatever it takes to get it done right.
Following the shingle principle, start at the bottom with a sill pan (membrane, metal, or plastic), lap side flashing tape over the sill pan, then install the window, bedding the window flange into sealant on the top and sides. Next, add a second layer of flashing tape on the sides and tape the top, always lapping upper flashing layers over lower ones. Finally tape over the top flange and fold down the top flap of housewrap, and tape the flap, as shown. You can use housewrap tape (also called contractor’s sheathing tape), but peel-and-stick flashing tape is optimal.
For the sill, moldable flashing, such as Tyvek FlexWrap, is the best choice as it is made to bend up the side jambs without stressing the material. When standard flashing tape is used, it is usually cut part way and patched at the bottom corners, a potential leak point.
For best results, slope the sub-sill towards the exterior before installing the sill pan. A piece of clapboard or beveled wood siding works well. On doors, fold the interior lip of the sill pan upwards to create a water dam. The lip can rest against the flooring.
Flashing Tape and Sealant. While peel-and-stick flashing tape is very sticky stuff, it is not magic and will not stick to wet or dirty housewrap that has been exposed to the weather for weeks. It’s best to wipe off dirt, make sure the wood or housewrap is dry, and to press the flashing tape in place with a roller, as recommended by most manufacturers. Where caulk is required, choose a high-quality “sealant” approved by the manufacturer of the housewrap. Low-cost hardware store caulk will fail quickly. The best installation details, however, should not rely on tapes and sealants to stay stuck forever. The flashing should shed water even if the adhesives fail.
NOTE: Do not caulk any horizontal joints below the window. These should be designed to shed water to the layer below. Sealant will trap water instead of allowing it to drain. Above the window, tape the top window flange directly to the sheathing. When the top flap of housewrap is folded down and taped in place it’s best to leave gaps for drainage in the horizonal tape.
Window Cap Flashing. Before sealing the top of the window, I prefer to install a traditional metal cap flashing, which outlasts vinyl flashing . The cap flashing helps direct water out away from window.
The cap flashing can either go under or over the horizonal flashing above the window. In either case, cut the cap flashing a little wider than the window. In the simplest approach, the cap flashing goes directly over the top window flange and is bedded in sealant on the both legs of the cap flashing. The top edge of the cap flashing (vertical leg) should be lower than the top of the window flange. Then complete the flashing as show in the diagram above.
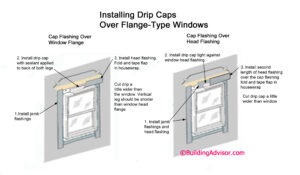
In extreme conditions, you can place the cap flashing over the top piece of flashing tape (the head flashing). Then a second piece of flashing tape goes over the cap flashing before folding down the flap in the housewrap.
If brickmold is used around the window, place the cap flashing over the brickmold, sealing it directly to the wall sheathing.
A Better Way to Flash Windows
The detail described above, if followed carefully, works well. You will see variations of this approach published by product manufacturers, designers, and code organizations. The approach below was developed by architect Harrison McCambell who sees many flashing failures in his consulting work. McCambell gets called in to diagnose and fix buildings after they have failed. The “thru-wall” flashing shown is intended for stucco, brick veneer and similar thick cladding systems.
Writing in The Journal of Light Construction, a leading technical magazine about residential construction, McCambell attributes most of the problems to a combination of poor workmanship, material limitations (like stretching flashing tape beyond its limits), over-reliance on tapes and sealants, and the detail itself even when followed diligently. The corner patches, often used at the two bottom corners, are problem areas. Also conflicts between code requirements and manufacturers’ instructions lead to confusion about what exactly to do.
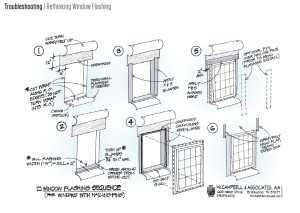
McCambell often works on large residential complexes with 200 or more windows, so he needs to provide construction details that are easy to follow, durable, and reliable. His solution, which I would use on my own house, eliminates key weaknesses of the standard approach. Key details to McCambell’s approach (see Illustration below) are:
- The housewrap is cut flush to the opening on the side and bottom — no more flaps to wrap inward (sometimes bringing air leakage and water with them). The top flap is cut vertical at least 6 inches beyond the opening.
- Jamb flashings are bonded directly to the rough opening since the flashing tape protects the wood framing more effectively than the housewrap can.
- Flexible/moldable sill flashing is turned up the side jambs only 1 inch (rather than 6 inches), and downward only 2 inches, which puts less stress on the corner points.
- The sill flashing laps over the housewrap or a separate piece of through-wall flashing needed for brick and other masonry veneers.
- While deviating from the window manufacturer’s instructions could potentially void the window warranty, McCambell feels (and I agree) the potential cost and liability of water damage far exceeds the dubious value of a manufacturer’s warranty.
You can read the full article at The Journal of Light Construction.
Harrison McCampbell is a consulting forensic architect in Brentwood, Tenn., specializing in moisture-related construction defects.
Read More at these links:
Leakproof Window Flashing
Window Flashing With Felt Paper
Black Stains From Flashing Tape
Rick says
How Should I Flash Triangular Windows?
I need some ideas on flashing a triangular window. We’ve been contracted to fix a geodome home. A bunch of others have tried. Thanks in advance for the advice.
buildingadvisor says
I’m not sure about the shape of your windows, but basically, I would treat any non-vertical side as a window top and detail it like window head flashing.
I would recommend using using a cap flashing on any non-vertical sides. If you have two angled sides, make sure one length of cap flashing overlaps the other at the top. Or use a moldable flashing like Flex Wrap to seal the joint where the two sections of window cap meet at the top of the window.
If the window is a right angle, I would treat the point at the high side of the window the same way – with a flexible flashing sealing over the high point of the window.
If you don’t want to mess with housewrap and tape around the windows, consider using one of new liquid flashing products, which you can read about at this link. This is a good system to use with Zip sheathing, with fat window wells, brick and stucco, and just about any hard-to-flash exteriors. It’s not 100% foolproof, but comes pretty close.
If some the windows are on non-vertical walls. I would treat these as skylights rather than windows. That would mean using step flashing on the angled and vertical sides of the window, and wider pieces of membrane on all sides of the window. In fact, you should be using skylights or roof windows on any non-vertical walls — not windows. Windows are designed for vertical walls and are prone to leakage if installed in an sloping wall.
Mark Scully says
Details for Flashing Recessed Windows
I am looking for some well-illustrated details on how to flash an inset window. From the face of finished stucco and wood siding the window nailing fin is recessed 3-1/4″. From the face of finished stone veneer, the nailing fin is recessed 8-1/2″.
buildingadvisor says
Recessed windows are a challenge to flash properly and a common trouble spot for leakage. You are smart to develop a detailed plan ahead of time. Some guys try to puzzle it out on the job site, usually with poor results. While we don’t see this much in the Northeast, contractors in West and Southwest deal with this regularly on stucco exteriors and have worked out some reliable details often working closely with manufacturers.
Creating leak-proof joints at the inside and outside corners at the bottom of the recessed opening is a big challenge. Equally tough is integrating the inner opening with the outer opening and tying the window flashing to the house’s water-resistive barrier (WRB or house wrap). It is critical that all materials are durable, compatible, and layered properly to drain to the exterior.
It’s best to start with a sloped bottom sub-sill in the framed recess and to carefully seal all inside and outside corners. It’s possible to patch together corners with small pieces of peel-and-stick membrane, but it is much easier and more reliable to use pre-formed corners (available from Fortifiber) or a pieces of stretchable flashing such as DuPont FlexWrap, along with a compatible high-performance sealant.
It’s best not to mix and match materials from different companies. Both Fortifiber and DuPont publish field-tested details for recessed openings. If you use the Zip System (Huber), they now offer a 10-inch-wide “Stretch Tape” that also works well for sealing complex joints.
For recessed window flashing, I am most familiar with the details provided by Dupont and Fortifiber and have confidence in either approach: Dupont Tyvek and Fortifiber.
Another option gaining in popularity is liquid or “fluid-applied” membranes. Huber makes a product called Liquid Flash that integrates with their Zip System. Dupont’s product is called Tyvek Fluid-Applied Flashing & Joint Compound. Fluid-applied membranes have been used commercially for a number of years, but are finding their way onto more high-end residential projects. While the materials are more expensive than sheet membranes, the installation is much simpler and it is the closest thing to foolproof that you will find for recessed windows and other head-scratching flashing details.
Here are links to Dupont Tyvek’s Fluid-Applied Flashing and Huber’s Liquid Flash
shuloo says
Is aluminum flashing recommended for new construction on windows?
buildingadvisor says
Aluminum is the most common material for window cap flashing and other wall flashings in the US because it is inexpensive and works pretty well in typical conditions. Use minimum .019 in. stock — the heavier the aluminum the better — and prefinished aluminum will hold up better than “mill” finish. However aluminum flashing is not recommended for use in contact with pressure-treated wood or masonry materials (concrete, stucco, brick, etc.), or in coastal areas or areas with a lot of air pollution. All of these conditions can lead to pitting and corrosion in the aluminum.
For difficult conditions, you might want to consider copper, which is very durable but expensive. PVC is another option popular with some builders. A good quality, heavy-gauge plastic should last as long as vinyl siding, but over time can get brittle and crack. Also it is vulnerable to damage in freezing weather. A solid drip cap made from Azek or similar plastics is another choice that will last indefinitely, but does not provide a leg up under the housewrap like a standard metal drip edge.
Around the sides of the window and at the sill, it is best to use peel-and-stick membrane flashing properly integrated with the housewrap or building paper.
Read more on metal flashings
Greg Lepore says
Retrofit Window Flashing
My house was built in 2001. The living room has a 2×8 wall. As a result, the aluminum windows are recessed. The sill angles down from left to right, a design detail, which has caused leakage. I’ve now exposed the Protecto Wrap flashing underneath and plan on re-flashing a sill pan. The problem is how to apply self-adhesive butyl flashing, such as Dupont Flex Wrap NF, without being able to overlap from top to bottom, as only a small segment of the jams have been exposed to access the leak area. Is there a common technique for such a situation?
buildingadvisor says
I am not aware of any standard approach to this problem. Each situation is unique and needs a custom solution tailored to the particular materials and field conditions. Important details include the type and condition of the window (with or without a nailing flange), sheathing, housewrap siding type, and original window flashing. Materials that are in poor condition may be difficult or impossible to seal to. How much access you have from the interior or exterior will also limit what is possible in a retrofit.
A flexible flashing membrane such as Flex-Wrap is a good choice for a form-in place sill pan if you have room to install it. Otherwise, a preformed metal flashing may be easier to slip into place. While the standard recommendation is to turn the sill flashing up 6 inches at each side jamb, a few inches should be plenty as the water is not going to run uphill here. Leakage consultant Harrison McCambell recommends a turn up of only ¾ to 1 in. to relieve any stress at the corner points where the flashing must fold three ways – down the wall, out on the sidewall, and up the jamb. View this detail here.
Since your jamb slopes from left to right, an unusual detail to be sure, you will want the turned up leg taller on the low side to prevent any water buildup from reaching the top of the turn-up.
If possible, you want to slip the sill pan membrane up under the house wrap or flashing membrane from above. If not, you will have to seal over the jamb and sidewall flashings and rely on the bond of the Flex Wrap. Prep the existing surfaces as best you can, make sure they are dry, clean, and unwrinkled, and apply pressure to the overlap area with a roller or block.
You’ll also want some type of water “back-dam” at the back of the sill pan — or a sill pan that slopes to the exterior. A dam can be created with a small length of wood under the membrane at the interior edge of the membrane. A slope can be created using a piece of beveled wood siding under the sill pan membrane.
With a metal flashing, use a short turned-up leg on the interior edge of the pan. The corner points can be soldered to prevent leaks or sealed with a high-quality sealant. The important thing is to keep the water from leaking into the frame wall or interior – and to get it to drain safely to the exterior.