In this article
Building Corners
Water Tables
Termite Shields
Decks & Ledgers
Step Flashing View all EXTERIORS articles
Properly installed wall flashing is critical to your building’s health. Many builders and designers believe that inadequate vapor barriers are the main cause of moisture problems and wood decay in walls. However, the vast majority of water problems in walls are caused by water leakage from the exterior — not by poor vapor barriers.
These leaks are primarily around windows and doors, but also occur at other penetrations and joints in the siding and trim. The long-term solution is proper flashing. Caulking can help in some cases, but never lasts for long and in some cases can do more harm than good. See Window Flashing for details.
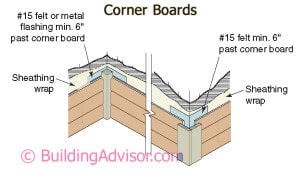
BUILDING CORNERS
Building corners are prone to water leakage due to wind exposure and shrinkage of the corner boards. A simple approach that works well is to add a spline of asphalt felt paper at outside corners that extends 6 in. beyond the corner boards. The asphalt felt paper should go over the sheathing wrap, which should also wrap the corners at least 6 in. each way. Inside corners also benefit from a spline (see Illustration).
.
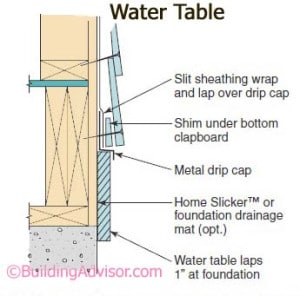
WATER TABLE FLASHING
Many traditional homes have a wide board called the “water table” that runs around the house along the foundation and supports the first piece of siding. The water table should overlap the foundation by about 1 in. and be capped on top with either a preformed metal drip cap or a custom flashing installed under the sheathing wrap. Cut a slit in the sheathing wrap along the entire length of the water table and slip the upper leg of the flashing under the wrap (see Illustration).
TERMITE SHIELDS
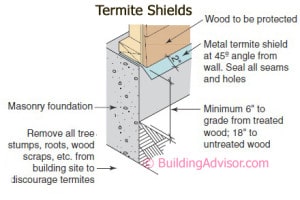
Metal termite shields are still widely used as a physical barrier to termite entry at the top of foundation walls in the southern US and in tropical climates. The metal barriers sit directly on top of foundation walls, piers, and other supports before the first piece of wood is installed (see Illustration).
Subterranean termites. Termite shields were originally developed to block the entry of subterranean termites, the most widespread and harmful wood-destroying insect in the United States. The termites nest in the soil outside the home and enter the building to feast on the wooden portions of the house. Unfortunately, the tenacious creatures will find and penetrate the tiniest gaps in termite shields to reach the wooden portions of a house.
Inspect for tunnels. Since subterranean termites cannot tolerate open air for long, they build mud tunnels from the soil to the house, along exposed foundation walls and around termite shields if necessary. Although the shields rarely stop termites, they impede their progress and force them to build tunnels that are easily seen during inspections.
Seal all joints and penetrations. To be effective, termite shields must have tightly sealed joints and be sealed around foundation bolts and other penetrations. Joints should be either soldered or mechanically interlocked. If the metal barrier is not tightly sealed at joints and penetrations, termites will easily bypass the shield.
Termite shield details. Termite shields should be at least 6 in. above grade and extend out 2 in. on either side of the foundation downward at 45 degrees. In addition to making infestations visible, termite shields also form a capillary break between the foundation and sill, protecting the sill from moisture.
Trouble spots. Areas that are hidden from inspection and where termite shields cannot be used are at high risk of infestation. For example the crevice between concrete stairs and the foundation is a common entry point. The same problem occurs where a raised porch or patio slab attaches to the main building. Another common entry point is where stucco or exterior foam insulation extends below grade, providing a perfect hidden entry route for termites.
Chemical treatment. In termite-prone regions, the only reliable way to prevent termite damage is to use treated wood in critical locations and treat the surrounding soil with termiticide. Modern baiting systems are more costly than traditional treatment, but use smaller quantities of less toxic materials, making them appealing to many homeowners.
DECKS & LEDGERS
Most backyard decks are supported along the house by a “ledger,” a length of framing bolted or nailed (not a good idea) to the house. It is critical to protect this area from water problems, since decay in the ledger or the framing it attaches to can cause a deck to collapse.
For water protection here, at a minimum install a cap flashing that tucks under the sheathing wrap and goes over the ledger. Adding a second flashing, either peel-and-stick membrane or metal flashing, between the sheathing and ledger, as shown, is a worthwhile backup should any water get over, around, or through punctures in the cap flashing. Since pressure-treated wood is corrosive to aluminum, it’s best to use membranes, plastics, or corrosion-resistant metals such as copper or lead-coated copper in direct contact with pressure treated wood. Read more on Flashing Deck Ledgers.
STEP FLASHING
All flashings must integrate with adjacent materials, so water always flows to the exterior, following the shingle principle. Where a slope roof meets a sidewall, slip the upper legs of the step flashing under the sheathing wrap (see Illustration).
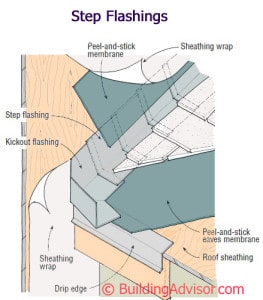
In areas where snow may build up, add a wide band of peel-and-stick membrane over the step flashing but under the sheathing wrap, as shown.
Where the step flashing terminates along a sidewall is a common trouble spot for moisture problems. The best solution is a preformed or custom-bent kick-out flashing to divert the water away from the siding. Otherwise, dripping water will leave its mark along the siding.
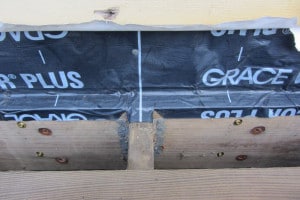
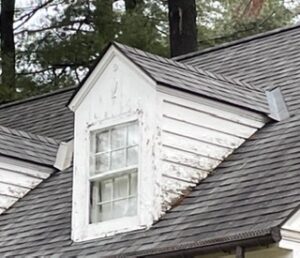
Where wood or composite siding meets the roofing or any other horizontal surface, leave a gap of 1 to 2 inches to protect the siding from moisture damage. The end grain of wood siding will wick up moisture, leading to paint failure and wood decay. The risk is greatest in cold climates where snow buildup can keep the area wet for extended periods (see photo).
Splashback
In wall areas frequented wetted by splashing rain (splashback) or snow buildup, flashing membranes up to 36 inches wide can be used to protect the wall sheathing and structure. Water damage from splashback is common in wall areas located:
- under the eaves of a roof with little overhang and no gutters
- where an attached backyard deck meets the house
- above a lower roof where it abuts the wall
In all cases, make sure to detail the flashing membrane so that it sheds water. It should tuck under the sheathing wrap above and over the flashing below. If installed along the foundation, the membrane should cover the joint where the sill meets the foundation.
Do not apply more membrane than is needed to protect the wall – up to 3-feet wide in climates with substantial rain or snow. Applying too much will create a cold-side vapor barrier, which can lead to serious moisture problems in cold climates.
See also Window Flashing Rain-Screen Walls
Bryan says
Any Way to Repair Masonite Siding?
My elderly mother has a home (Rule, Texas) with exterior siding that is damaged.
Do you know what are the best remedies for this? The home inspector said the exterior siding is Masonite. There are signs of vertical seams having failed caulk and some weathering can be seen along the bottom where the walls hang past the foundation. Any advise how to seal up behind and under the bottom of the siding where it overhangs the foundation?
buildingadvisor says
Masonite siding has a long history of problems and was the subject of multiple class-action lawsuits against multiple manufacturers.
e problems include buckling, swelling, blistering, discoloration, and deterioration, mostly as a result of moisture absorption. End joints are especially vulnerable to moisture intrusion – even if they are caulked well as caulk joints eventually fail. Once the compressed wood pulp and fiber is wet and deteriorated, it is also an attractive food for termites and other wood-destroying insects.
As a result of the lawsuits, most companies stopped selling hardboard or “Masonite” siding, but some such as LP still sells a composite siding – LP Smartside made of OSB treated to increase water repellency.
In addition to vertical joints, deterioration is also common along the bottom of the wall due to wicking of water and splashback. You can reduce splashback by adding gutters above and replacing hard surfaces (concrete/asphalt) next to the house with gravel, mulch, or other softer materials. You might also consider removing the bottom courses of siding and replacing with a water table made from Azek or another waterproof trim material. Place a draining house wrap, such a Benjamin Obdyke Hydrogap or Slicker.
If there is no way to prevent the area from getting wet, then you might also want to add a band of membrane flashing against the sheathing before adding the house wrap and trim. Make sure all membranes, house wraps, and flashings are layered in “shingle fashion” with upper materials lapped over lower materials to carry water away from the structure to daylight.
Fixing damaged hardboard siding is difficult. If you catch it early enough, you may be able to sand the surface, prime any damaged areas with a stain-blocking primer, and repaint. Before priming, clean out any vertical joints, prime, then seal with a good quality elastomeric sealant. Cheap caulk is a waste of time and should never be used – it does more harm than good. You may also be able to scrape out and patch small areas of deteriorated siding with a high-quality wood sealer.
For badly deteriorated pieces, you will need to remove and replace with a more durable product such as fiber-cement siding, if you can find a close enough match. Eventually, you will need to replace the siding with a more durable product. I would recommend fiber-cement for a similar appearance with much greater durability. High quality vinyl siding is a less expensive option if that appeals to you.
Brian says
Splashback Wetting Vertical Siding and Bottom Plate
I live in south Louisiana and I have a new TuffShed building that was built a month ago on a concrete slab with a concrete walkway attached to the front. When it rains I am getting splashback off the walkway under the front lip of the vertical wood siding. I am worried about the bottom of the siding and the lower wall plate getting wet every time it rains and rotting. What can I do to prevent this from happening? I was thinking about running a bead of caulk behind the siding where it overlaps the concrete to seal water from getting to the bottom wall plate. Would this work? How can I prevent the wicking action of the vertical siding? Thanks for your help!!!
buildingadvisor says
Applying a bead of high-quality sealant, as you suggest, may help, but I’m not sure how you can get the sealant where it is needed — where it overlaps the edge of the slab. Isn’t the bottom plate in the way? It would be best if you caulk the joint from the exterior to keep the water out? It would also help if you used PT wood for the bottom plate.
You would need to wait until the wood is dry and use a flexible, long-term sealant that bonds well to wood. A polyurethane sealant such as Sikaflex (not canned urethane foam) would be my first choice.
As for the splashback, the best solution would have been a wide roof overhang to get the water away from the building — probably not an option at this point. Gutters and downspouts that get the water away from the building would also help.
Termite flashing or a horizontal water table (see details above) would also have helped, but are not easy to retrofit. If you decide to add a water table at the bottom of the siding, I’d consider using a piece of plastic (like Azek) or composite trim. These materials now come in many colors and textures so you could probably find something that matches your siding pretty closely.
Finally, if you want to leave things as is and try to prevent wicking, you can try sealing the bottom edges and lower sections of the wood siding. A number of product are sold to seal the cut ends of wood decking – especially hardwood decking which is prone to splitting at the ends if not sealed. However, I don’t know how well these will work in your situation.
I have had good luck with a product called Minwax High Performance Wood Hardener. I have used this to repair the bottom edges of door casings that are beginning to decay from wicking and splashback. The treated wood is impervious to moisture. Once sealed, you can add a compatible filler if needed. However, you need to test any of these products first to see if the appearance will be acceptable.
Justin says
Will Flashing Under Siding Help With Splashback?
Like the person in Louisiana, I am getting a lot of splashback, and there is some wood rot behind the bottom hardy board panel. Based on the example images above, it may be the bottom shim or plywood behind the siding. Would it be possible to try and slip a metal drip cap behind the existing wood and siding to add that barrier?
buildingadvisor says
Yes, it makes great sense to slip a flashing behind the bottom Hardiboard panel if you are able to do so. This is commonly done above windows and above a “waterboard” when used (trim board along the bottom of the siding). Otherwise the bottom of the wall is often not flashed.
You could use either a drip cap, cap flashing, or Z-flashing – essentially the same as a drip cap, but with a taller upper leg. You could also adapt a roof drip edge or have a custom flashing fabricated by a siding or sheetmetal shop. Any flashing that kicks the water away from the bottom of the siding would be helpful. It would be best to have the top leg extend up under the siding by at least 6 in. or however high the water is reaching.
Slip the flashing under the siding, as you suggest. Ideally the flashing will also slip under any felt paper or house wrap that was used under the Hardiboard.
Your biggest challenge to installing the flashing will be siding nails. You can try to cut the nails in place or pull them, but the easiest approach is probably to remove the bottom course of siding, or at least pull the bottom of first course out from the house far enough to get access to the space behind. This way you can assess the damage and place the flashing in the best location.
The other key issue to consider is the source of the splashback – usually rain water dripping from the roof above. Gutters usually help a great deal, as will softening the surface below with grass, low plants, gravel, mulch or other materials that will minimize splashback.
Read more on Splashback Solutions
Mike says
Fiber-Cement Siding Over T1-11?
Can I install fiber cement board over my existing wood T-11 siding?
buildingadvisor says
In general, seems fine to me. In most cases, the T1-11 is nailed directly to the framing, so it will act like plywood wall sheathing. Make sure the T-1-11 is in good condition and well-nailed, following the nail schedule for plywood wall sheathing. That’s typically 8d nails at 12 in. on-center, 6 in. along edges.
If you are planning to use the T1-11 as a nail base, make sure it is in suitable condition. Another option is to nail the fiber-cement directly to the studs (you may want to check with the fiber-cement manufacturer).
Just cover the T1-11 with a suitable sheathing wrap, and make sure all your wall flashings (see above) and window flashings are properly integrated with the sheathing wrap and new fiber-cement siding. Then you should be good to go.
Best of luck with your new siding – a great choice for longevity and low maintenance.
Vanessa Knutsen says
Wall Leakage On New Home
Our friends have a new home (only 4 years old) where they have had various water seepage and leakage problems. Some spots are obvious (cracks in foundation); but they also have had water coming in through the walls, and they were told that there were some issues with their siding or possibly the Tyvek installed incorrectly.
They were already told by one local inspection company that there were issues with other subdivisions built by this particular builder.
But what they want to do now is to find a contractor to look at EVERY possible water entryway into the house besides the basement. Possibly windows, siding/Tyvek, walls, flashings…
Currently they are not even living in this home as the reactions of one member (who has Lyme disease) is bad. But other family members are experiencing negative reactions also.
So…is there likely to be one contractor who can look at EVERY possible hidden water entryway?
buildingadvisor says
Sorry to hear about your friends’ water leakage problems. The most common areas for water leakage are basements, roofs (typically around chimneys, skylights, and other penetrations), and wall penetrations such as windows and doors. In most cases, roof and wall leaks are related to improper flashing.
Diagnosing and solving leakage problems can be challenging and expensive. Sometimes the place where water appears in your home is a distance from where it is leaking in. It may run along a framing member or building cavity before appearing on the interior. Sometimes a condensation problem or plumbing leak is mistaken for a leak in the building shell.
Once the source of a leak is identified, it can be expensive to fix. If one window is flashed poorly, it’s possible that all are. However, some may not leak despite faulty installation because they are protected by a roof overhang, and some may leak more than others due to exposure to wind-driven rain or water dripping from above.
In some cases the source of a leak is pretty obvious, but other times it can take a good deal of detective work to identify the cause and how to correct it. Often a section of siding or roofing, or interior finishes, need to be removed to confirm the source of the leak. Additional materials may need to be removed to correct the problem. For example, if the windows are flashed incorrectly, then siding must be removed around each window to re-flash them correctly and properly integrate the flashing with the sheathing wrap such as Tyvek. Caulking around the top and sides of window can often provide a temporary fix, but over time the caulking will fail. Read more on Window Flashing.
Basement water problems can be particularly vexing as multiple factors may be contributing to the problem in addition to the cracks, such as surface drainage around the foundation, water table, footing drains, and soil characteristics. Sometimes the fix is relatively easy and inexpensive, but often it is very costly to do the job right – the way it should have been done when the house was built. To avoid the expense of excavation and regrading around an existing home, sometimes a sump pump that runs frequently and/or retrofitting an interior basement drainage systems is the most practical approach. Read more Basement Leakage FAQs.
Can one person identify and fix all these problems? Possibly, but you might be better off using a foundation expert for the basement problems and a flashing expert for the sidewall leaks. I would recommend talking to two or three contractors about each problem to see if you are getting consistent answers and to compare bids. Make sure you get a written guarantee that the remedial work will solve the problem and make sure it is solved before making the final payment.
Your friends might also consider hiring a water-leakage consultant to analyze the problem and specify the solution and then hire one or more contractors to do the work. This may be the most expensive approach, but given the scope and complexity of the problem, it may be worthwhile to have a third party acting on your behalf.