David Asks: Are there industry standards for the horizontal alignment of cedar siding boards? We had a home remodel and new cedar siding had to be installed on some of the exterior walls. The horizontal siding aligns evenly at the bottom of two adjoining walls however part way up on one wall, they decreased the overlap of each board and now the horizontal siding on one wall is out of alignment with the siding on the adjoining wall by as much as 3/4” to 1-1/4”. Even though we have wood corner boards on each corner, this is very noticeable. I was told that the contractor was cutting corners by not replacing all the siding on the one wall, and the decrease in the vertical overlap was needed in order to meet up properly with the old siding they did not want to replace. Therefore I am wondering if there are industry guidelines and best practices that cover this type of situation?
Steve Bliss, of BuildingAdvisor.com. responds:
The standard practice is for each course of horizontal siding to match the next and for boards to line up at inside and outside corners. Sometimes, in remodeling, it is necessary to fudge this a little to “match existing” or to blend old and new. However, where the contractor must improvise a solution, he should discuss the options first with the owner – especially where the variance will be readily observable.
Also if he is decreasing the overlap below the recommended minimum, you will be risking excessive intrusion of water at the overlap from windblown rain and capillary action. The recommended overlaps for different siding profiles are shown in the attached siding manuals.
In the building industry, most industry guidelines for the installation of materials come from trade associations and manufacturers. Building codes, on the other hand, cover safety and structural standards, but have little to say about the quality of the workmanship.

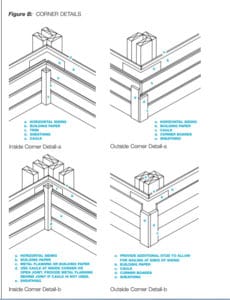
The main industry guideline for wood siding installation is the WWPA’s Natural Wood Siding. A similar guide How to Install Western Red Cedar Siding (by Western Red Cedar Lumber Association), is largely based on the WWPA guidelines. While these guides don’t specifically address the alignment of siding, they both show details for corner installations, with and without corner boards, which clearly show the two sides lining up at the corner. These guidelines are attached.
The National Assoc. of Home Builders (NAHB) publishes a general set of quality standards called the Residential Construction Performance Guidelines . These are consensus standards among members of the homebuilding industry and should be considered minimum standards for workmanship. The guide states, on page 30:
5–1–3 Observation: Siding is not parallel with the course above or below. Performance Guideline: A piece of siding may not be more than ½ inch off parallel with contiguous courses in any 20-foot measurement. Remodeling Specific Guideline: The contractor and consumer may agree to install siding to match existing conditions on the existing structure and to disregard the performance guideline for this item. If the contractor and consumer have agreed that the floor of an addition is to be on a different plane from an existing floor (e.g., out of level), the siding on the addition may not be parallel and in line with the existing siding.
I can’t say specifically why your contractor took the approach he did, but your explanation is certainly plausible. I’d suggest asking him – and if you are not satisfied with the answer – request that the work be redone correctly before making the final payment. If he claims that the work meets normal industry standards, then you might want to share this material with him.
You can read more here about quality standards in contracts and construction specifications.
David says
Should You Leave a Gap Between Siding and Patio?
Steve, thank you so much for your quick response, which I appreciate very much. We live in Reno Nevada and unfortunately I have run into numerous issues with our contractor.
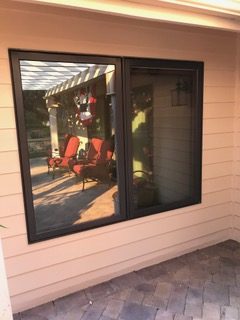
I have one other issue that involves both my remodel contractor and landscape contractor — the clearance between our cedar siding and our paver patio. As you can see by the picture below the contractor installed new cedar siding behind our patio pavers.

The pavers were installed first and most likely were touching the old cedar siding prior to its removal. However, our contractor, rather than raising the issue with me, went ahead and installed the new siding behind the pavers.
When I had a home inspector review some other issues he said that this situation would be reflagged if the house is inspected prior to us selling our home. He said that the pavers should not be touching the siding and there should be a clearance of 2” to eliminate any moisture being trapped behind the siding. He said the siding even though it is cedar can still rot, the wood behind the siding could be negatively affected and there is a possibility of getting mold in the walls. Armed with this information I contacted both my landscape contractor and our remodel contractor. The landscape contractor agrees and is willing to work on a solution to remedy the problem. The remodel contractor says there is not problem and sent me an excerpt for the 2012 International Building Code (2304.11.2.6). His position is the 2” clearance doesn’t apply because cedar is a natural durable wood.
I can find no one that agrees with my remodel contractor and my position is that there needs to a some gap between the pavers and the siding even if it is less than 2”. However I can find no formal documentation to support my position. Is there such documentation available?
buildingadvisor says
It’s definitely a good building practice, and a standard detail, to leave a minimum of 1-2 inches clearance between any type of wood siding or exterior trim and any horizontal surface – including a roof or wood deck. The clearance from siding or trim to the ground should be 6 inches or more.
This is documented by The Western Red Cedar Lumber Association in its publication How to Install Western Red Cedar Siding. The guide states that:
• Siding and Trim that extends down to a roof (dormers, second floors, etc.) and decks requires a minimum of a 2-inch gap to avoid wicking.
• Trim, such as water table or skirt boards must be a minimum of 6 inches above the
grade.
Any gap small enough to trap moisture and leaf debris can lead to wood decay, insect infestation, as well as mold growth and discoloration. It also potentially provides a path for moisture and insects to pass into the framing cavity where it can cause more serious damage.
Mold will grow even on treated or decay-resistant wood. Also, it is important to remember that only the heartwood — the darker, reddish wood, toward the center of the tree — is protected to some extent from insects and wood decay. The lighter colored sapwood is offers little protection. Also, the quickly produced plantation-grown wood used today is rarely as durable as the denser, old-growth timbers used in the past. So it’s best to leave a gap with any species of wood.
In wet climates or areas with a lot of leaf debris or pine needles, the greater the need for a healthy gap between the wood siding and horizontal surface.
The building code also provides some guidance here, although – as is often the case with the code – there is room for interpretation by the local inspector. Also individual states or cities/towns often amend or modify the national code – the International Residential Code (IRC).
I believe Reno has adopted the 2012 IRC. Section R317.1 of the code states that only “naturally durable wood or wood that is preservative-treated to AWPA U1” should be used for “wood siding, sheathing and wall framing on the exterior of a building having a clearance of less than 6 inches (152 mm) from the ground or less than 2 inches (51 mm) measured vertically from concrete steps, porch slabs, patio slabs, and similar horizontal surfaces exposed to the weather.”
It also states that untreated wall framing should be a minimum of 8 in. from grade, with greater clearances in a crawlspace.
In Section 2302 (Definitions), the 2012 IRC defines Naturally Durable Wood, as follows:
The heartwood of the following species with the exception that an occasional piece with corner sapwood is permitted if 90 percent or more of the width of each side on which it occurs is heartwood.
• Decay-resistant: Redwood, cedar, black locust and black walnut.
• Termite-resistant: Alaska yellow cedar, redwood. Eastern red cedar and Western red cedar including all sapwood of Western red cedar.
As you can see, the code requires a 6-inch clearance to the ground and a 2-inch clearance to concrete slabs and “similar horizontal surfaces” unless your siding is all-heart cedar. Then, presumably, no clearance is required. Even if allowed by code, however, it is a poor building practice to install wood siding or trim in contact with a deck or patio. I would follow the guidelines of the manufacturer’s trade association, generally a better source than the code for “industry-standard” practices.
Still, it would be a good idea to contact the local building department to get their opinion. There is always room for local discretion in the interpretation of the code. For example, does the local inspector consider a brick patio to be more like “porch slab” or more like the ground? Even if he allows the cedar siding to directly contact the brick patio, would he allow the siding to extend below the surface of the patio, as your contractor has done? I would be surprised if anyone with building experience would endorse this detail.