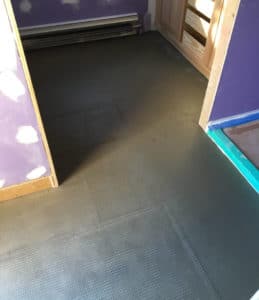
Scott writes: I have a galley style kitchen that is approximately 10×20 ft. The floor joists are 2x10s, spaced 24” on-center and running lengthwise. The maximum span is 14 ft., as a steel I-beam breaks the floor into two sections of 14 ft. and 6 ft. The basement ceiling is finished in drywall so I do not have access from below. The subfloor is 23/32 T&G OSB, with ¼ inch lauan and sheet vinyl over top.
I would like to remove the lauan and sheet vinyl then lay 12×12 porcelain tiles over the entire floor.
My concern is with weight on this floor. Instead of cement backboard, should I use ½ inch plywood to provide extra support for the tiles? Is there too much weight for the joists? It would be a lot of work to double up on the joists because of perpendicular wires, copper pipes, and PVC through some of the joists and some round duct running along between two joists.

Steve Bliss, of BuildingAdvisor.com, responds: Wood framing is not an ideal substrate for tile since wood tends to flex, shrink, and expand, while tile and grout are very inflexible. Excessive deflection in a wood floor system is a common cause for cracking in thin-set tile installations. The Tile Council of America (TCA) recommends a max. deflection of L/360 for ceramic tile and L/720 for natural stone tiles.
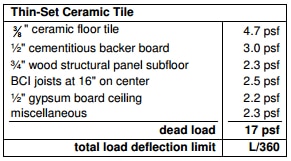
Residential floors are typically sized for a live load of 40 psf and a dead load or 10 psf. This is fine for wood, carpeting, and resilient flooring, but not for ceramic tile. Tile floors are likely to weigh 15 to 20 pounds or more when you add the framing, ceiling below, subflooring, tile, and setting materials. Kitchen cabinets or bathroom fixtures above can also add to the dead load.
Typical values are shown in the table below from lumber supplier Boise Cascade.
So sizing for a 20 lb. dead load or greater is necessary to prevent cracking in a tile floor.
Residential span tables for 2x10s, 24” on-center, with a maximum deflection of L/360, show a max. span of 11 ft. 6 in. for No.1/No. 2 SPF or 12 ft. 3 in. for hem-fir. With Select Structural grades, you could span up to 13 ft. 8 in. for SPF and 14 ft. 0 in. for hem-fir, but these grades are less commonly used.
To stiffen the floor, you would need to remove the drywall and beef up the framing from below. Since adding additional joists (or sistering the existing joists) would be impractical, you could improve the stiffness somewhat by adding solid blocking every couple of feet.
For greater strength and stiffness, you could add a layer of subflooring to the bottom of the floor joists on the 14 ft. span. If you glue and screw structural plywood to the bottom of the joists with construction adhesive, you turn the floor system into a very sturdy box beam the should handle the load. I’ve used this technique successfully after a plumber did his best to destroy the floor framing in a bedroom ceiling by notching his way down the center of the span in nearly every ceiling joist.
Once you’ve stiffened the floor framing, I’d recommend adding plywood underlayment rather than cement board. Plywood is lighter and much stronger. In fact, cementitious panels are not considered structural at all.
Use at least 1/2 in. underlayment-grade plywood, but I’d recommend 5/8 in. or ¾ in. plywood in your case as the stiffness of the framing is in question. Also you need to stiffen the plywood over the 24 in. span between joists.
Ideally, you should screw and glue the plywood underlayment to the subfloor using Type 1 or Type 2 yellow carpenter’s glue brushed over the entire surface of the plywood. The joints in the underlayment should be offset from the joints below by at least 2 inches and the screws (or underlayment nails) should penetrate the subfloor but not the floor joists.
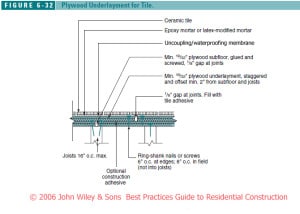
Add a good quality crack-isolation membrane – Ditra, Stratamat, Nobleseal, etc. – to this two-layer plywood base and you will have one of the best substrates available for thinset ceramic tile. This is the preferred detail on wood-framed floors for tile expert Michael Byrne and other expert tilesetters I have worked with. It also one of the preferred methods recommended by the Tile Council of America, as shown in the illustration below.
John asks: For a ceramic tile floor, do you recommend a second layer of plywood over the 23/32″ plywood subfloor. Your drawing suggests that it should be two separate layers. Could you please clarify? Thank you. (Posted at our sister website InspectApedia.com at Cement Backerboard Installation regarding Figure 6-34).
Steve Bliss, of BuildingAdvisor.com, responds: The drawing you refer to shows a layer of ½ in. backerboard, such as Hardibacker, over nominal ¾ in. (23/32) plywood, which is an acceptable detail for a countertop, as shown, or a floor. However, backerboard does not provide any structural support, so many tile setters prefer two layers of plywood on a floor.

The two-layer floor shown here is the preferred substrate (in wood-frame houses) of tilesetter Michael Byrne, author of Setting Tile, and Tiling for Contractors. Michael, an industry expert who I’ve worked with on several projects, goes further and glues the underlayment to the subfloor with yellow carpenter’s glue and puts solid blocking under all joints in the subfloor to increase the stiffness. A crack-isolation membrane is used under the tile. His reasoning is that wood-frame construction moves around a lot (deflection, shrinkage, seasonal moisture) while tile and grout are very inflexible and prone to cracking. Michael does a lot of failure inspections and feels that this detail is pretty bulletproof.
Tile installation standards are established by TCNA, the Tile Council of North America. The detail shown is essentially TCNA’s F150 method – with the addition of an uncoupling (crack-isolation) membrane. The TCNA spec shows this detail with the tile bonded directly to the plywood, but few tile experts recommend doing this. Another TCNA method (F147) uses a min. 3/8 in. plywood underlayment over a 3/4 in. subfloor with a crack-isolation membrane under the tile.
The report Ceramic Tile Over Wood Structural Panels shows the plywood assemblies approved by the TCNA for residential and light-commercial projects.
The crack isolation membrane is critical as it protects the tile from small movements in the wood subfloor. Most tile membranes are also designed to provide waterproofing if installed according to specifications.
TCNA does still show a single-layer ¾” T&G subfloor with an uncoupling membrane (F148), but I don’t know anyone in the tile industry who advocates a single-layer plywood substrate for ceramic tile or stone.
While some consider Byrne’s a approach overkill for ceramic tile, a more common method is to use nominal 1/2 in. plywood underlayment instead of 3/4 in. over the 3/4 in. subflooring, for a total plywood thickness of 1-1/4 in. While few contractors add the carpenter’s glue between the plywood layers, I would consider it cheap insurance against future problems. Another option for tile is to use 1/2” Hardibacker instead of plywood underlayment although this is not as strong as plywood. In all cases, use a membrane under the tile. Some key details to keep in mind:
- The floor framing should be designed for max. deflection of L/360 (stiffer for stone).
- Both t&g subflooring and underlayment should be gapped 1/8”
- Underlayment should be exterior-rated “underlayment grade” plywood with no voids.
- Joints in underlayment should be offset min. 2” from joints in the subfloor. A 6″ offset is optimal.
- Underlayment should be nailed or screwed only to the subfloor, not into the joists below.
- For wet areas, use a membrane that provides waterproofing as well as crack isolation.
- Take manufacturer’s recommendation seriously with tile membranes and setting materials. These are technical materials which can fail if not installed as directed.
- Don’t mix and match. Stick with one manufacturer for setting materials – thinset, grout, colorant, sealer. Mix two products and no one is responsible if there are problems.
- Never grout tile joints that abut other materials, planes, or restraints such as wood, fiberglass/acrylic, tile base, recesses, etc. These joints should be caulked with a high-quality sealant. Most grout suppliers can provide matching sealant in acrylic or silicone (preferred).

There are many choices for the uncoupling membranes. I’ve used both Ditra and Strata Mat – the main difference is that Strata-Mat uses modified thinset to bond the tiles while Ditra requires unmodified thinset. Both use modified thinset to bond to the plywood – tile installation gets pretty technical nowadays. I’ve used both of these membranes in remodeling projects, going over various substrates including new plywood and well-bonded existing flooring.
Grout joints are the bane of tile jobs, which often get badly stained on floors over time. The trend today is to use larger tiles and smaller grout joints of 1/8” or less where possible (not possible with irregular shaped tiles). The latest thing is “stain-resistant” grouts that supposedly don’t need sealing. There are marketed as a cheaper alternative to epoxy grout, which is truly stainproof, but very expensive and difficult to install.
I used Laticrete Permacolor with Stonetech Stain Protecting Grout Additive (also from Laticrete) on two recent bathroom remodels. It has resisted any deep stains for a few years. Another contractor I know likes TEC Power Grout, a similar stain-resistant grout.
The tile industry is rapidly evolving with new setting materials and membranes coming on the market all the time. It takes some effort to keep up with it — even for tile contractors.
Read more on Tiling Over an Exterior Wood Deck Q&A Index

Mark says
Is 3/4″ OSB Stiff Enough for Tile?
I am currently building my house in which I installed 2×12 floor joists with 3/4 Dryguard T&G subfloor. Spans on either side of center beam are about 11’4”. I think the floor joists are more than adequate along the length of the floor joists, it’s the 14 1/2” spans between joists that I am concerned with after reading your article and the comment section. This area would be the entry/mud room and the kitchen. I will be sistering up some of the floor joists that run under the gas range and the 9 ft island. Radiant floor pex tubing will be installed under the subfloor so blocking every 16” between joists is not an option.
So I guess the only option left is to add the extra layer of 1/2” underpayment ? I am planning to use Schluter Ditra membrane under the tile. I was hoping to have the 3/4” hardwood flooring from the living room/dining room match up fairly close to the tile floor. I questioned the architect during the blue print phase regarding tile floors and deflection and he assured me the 2×12 floor joist would be plenty stiff enough but I guess maybe the subfloor should have been upgraded to 1 inch or even 1 1/4 inch. I think advantech makes it, but the lumber yard here doesn’t carry it and wasn’t sure how long it would have taken to get it.
buildingadvisor says
You are right to question using a single ¾-inch layer of OSB subfloor under ceramic tile.
The Tile Council of North America (TNCA) publishes the TCNA Handbook every year showing the approved substrates and installation methods for stone and ceramic tile. The latest editions show at least 23 options for plywood and OSB subfloors. It gets pretty complicated, but the bottom line is that you are at the absolute minimum – usually not a good idea in construction.
Of the rated options, there is only one method (F148) for nominal ¾-inch plywood with an uncoupling membrane approved for on-center joist spacing up to 19.2 inches. OSB is not listed and is generally a little less stiff than plywood.
Without a backerboard or membrane, the minimum recommendation for residential applications (F150) is nominal 5/8-inch plywood subfloor plus 1/2-inch plywood underlayment – for a total thickness of 1-1/8 inch for joists 16 in. on-center.
Method F147 Show shows 3/8-inch underlayment and membrane over a ¾-inch subfloor for joists up to 24 inches on-center – for tiles 4×4 inches or larger. Some of the methods have tile size limitations since floors with small tiles flex more, putting stress on the grout joints.
If you add a cement backerboard, method F144 shows a minimum 5/8-inch subfloor for residential applications up to 16 inches on-center. The backerboard thickness is not shown.
Remember that these are minimum requirements. Only one of the 23 methods uses a ¾-inch subfloor with no backerboard or plywood underlayment. Most tile installers recommend at least 1-1/8-inch combined subfloor and underlayment. In the article, I recommend 1-1/4 inch total thickness where feasible.
An APA report on wood tile substrates does endorse a one-layer substrate under their “Sturd-I-Floor” standard for combined sublfoor/underlayment. For example, they show a 1-1/8-inch layer of Sturd-I-Floor subfloor, but recommend adding a min. ¼ inch underlayment. So even the American Plywood Association is hedging on using one-layer substrates under tile.
In your case, I would consider adding 3/8-inch underlayment-grade plywood over the ¾-inch subfloor. If that’s too thick for your floor levels, consider a product like 1/4-in Hardibacker, which I would provide more benefit than ¼-inch plywood.
Adding a second layer of underlayment will provide greater strength and stiffness than going with a thicker subfloor. Also using a thicker underlayment over part of a floor makes for tricky construction details.
Nona says
New Specs for Ditra Thinset
My understanding is that Ditra has now changed their recommendation to use modified thinset instead of unmodified as they previously recommended. Great article! Appreciate the info.!
Joe says
What Plywood Thickness Needed for Ceramic Tile?
I’m in the process of remodeling my bathroom and have ripped up the old tile floor down to the floor joists.
Would installing 3/4″ ply with Ditra (1/8″ uncoupling membrane) be sufficient enough to lay 12×24 porcelain tile on top of?
Or should I add 3/8″ ply on top of the 3/4″ ply with the Ditra on top?
buildingadvisor says
When laying tile directly on plywood (with or without an uncoupling membrane), the Tile Council of North America (TCNA), which establishes standards for the tile industry, recommends a minimum 3/8-inch plywood underlayment nailed or screwed to 3/4-inch subfloor. Another option approved by TCNA is two layers of nominal 5/8 plywood. These conditions apply to both standard and large-format tiles, and floor joists up to 24 inches on-center.
The critical installation details are:
• Lay all panels with long dimension perpendicular to the joists.
• Avoid driving T&G joints tight in the subfloor.
• Use underlayment-grade plywood for underlayment (no voids, surface resin, other defects).
• Offset underlayment joints from subfloor joints by at least 2 inches.
• Nail or screw the underlayment into the subflooring, but not into the joists underneath.
Remember, these are minimum standards. Some tile contractors prefer 1/2 or 5/8 inch underlayment for greater stiffness, or glue the two layers together if they are concerned about movement in the floor system. The main benefit of a thicker plywood base is to limit deflection between the floor joists. For ceramic tile, deflection should not exceed l/360 either between the joists or along the direction of the joist.
Joist sizing is the main factor that determines the deflection along the joists, so its important to make sure the joists are deep enough and sound. If not, you will need to add sisters or other support to strengthen the joists.
For stone and mosaics, a much stiffer floor is needed. Stone requires a stiffer floor with deflection less than l/480 to L/780 depending on the specific product.
Nick says
What’s Best Surface to Install Floor Tile?
I’d like to know what the best kind of surface to lay ceramic tile on.
Concrete slab or wood subfloor with HardieBacker sheeting, or is there some other better surface to lay ceramic tile on?
buildingadvisor says
All things being equal (as they never are) a well-built concrete slab is the ideal base for ceramic tile due to its stiffness. Tile and grout are rigid materials, so they do well on a solid, rigid base. However if the slab cracks, the crack is likely to telegraph through the tiles. To prevent this, it’s best to install the tiles over a crack-isolation membrane.
With a good crack-isolation membrane, a stiff plywood floor with properly sized joists and a double layer of plywood, also makes a good substrate for tile. For standard tile the deflection in the floor should not exceed L/360 either along the joists for between the joists. For large-format tiles and most stone tiles, the floor should be even stiffer — L/480 to L/720 depending on the specific product.
Adding a layer of HardieBacker or other cementitious board does not really add much to the mix as it does not increase the floor stiffness like a second layer of plywood. A detailed drawing of the this approach is shown above.
There are many different types of isolation and waterproofing membranes on the market. Most can serve as both if they are installed per manufacturer’s instructions. I have used a few different membranes and all have worked well. On a floor, I’d go with a sheet membrane rather than a trowel-on product, which is usually fine on walls.
I’ve had good luck with Schluter Ditra on challenging floors in remodels where the old wood substrate is less than ideal. It is beefy, but needs a different type of thinset on each face – so pay attention to the instructions.
The substrate is very important in a tile installation, but so is the type of thinset, application of the thinset (correct thickness and tile coverage), and the grout mix and installation. Using latex-modified thinset and grout adds strength and flexibility and is always recommended except for certain membranes that require unmodified thinset. For a successful tile floor, all these components must work together.
Mike Elchuk says
Where To Install Crack-Isolation Membrane?
Hi, when adding 3/8” plywood on top of 3/4” OSB for the purposes of acting as a tile underlayment are you recommending the crack isolation go between the plywood and OSB?
buildingadvisor says
Crack-isolation membranes are designed to go directly under the tile, so the membrane would go on top of the plywood. Many crack-isolation membranes also function as a waterproofing layer as long as you follow the instructions.
It’s important, with these materials, to carefully follow the instructions. Some use modified thinset, while some use unmodified. Some use a different thinset adhesive above and below the membrane. Joints and edges may need special treatment.
Although it may seem strange, at first, to tile over a flexible material, tile membranes do a great job. I think you’ll be happy with the results.
John Cooke says
Minimum Subfloor For Tile?
After having removed vinyl, and then particle board, I’m left with a 5/8″ plywood subfloor for a rarely used bathroom. I’d like to add minimal height to this so that when I add ceramic tiles the height will be equal to the hallway hardwood floors. Calculations on the John Bridge site show I have a deflection over L / 1700, on 16″ joist spacing. Is it then acceptable to add 1/4 ” marine plywood and just thinset over that? Thanks.
buildingadvisor says
The calculator you are using is for deflection along the length of the joists. With ceramic tile, you also need to limit the deflection between joists, which is a function of the subfloor thickness and how it is installed.
It sounds like your joists are well within the acceptable limits of L/300, so your main concern is the deflection of the subfloor between joists. Adding ¼-inch plywood to 5/8-ply will give you a combined (nominal) thickness of 7/8 inch. The bare minimum recommended by most tile setters is a total subfloor thickness of 1-1/8 inch. Most prefer a minimum thickness of at least 1-1/4 inch, such a ¾-inch t&g subfloor with ½ inch plywood underlayment.
You might be OK with your installation, but are risking cracked tiles or grout joints. You’ll be better off with ½-inch plywood if you can make it fit.
• To get the best performance out of any combination of subflooring and underlayment, make sure you do the following:
• Add solid blocking to the underside of the floor at subflooring joints, unless they are t&g.
• Offset joints in the underlayment and subfloor by min. 2 inches and avoid screwing the underlayment into the joists below. Place screws 6 to 8 in. o.c. in both directions.
• Use a crack isolation membrane between the underlayment and subfloor. If height is a concern, you can use a very thin membrane such as Nobleseal or a liquid-applied membrane. There are many options.
• Where you are concerned about rigidity, you can stiffen the floor by spreading an even layer of Type I or Type II yellow carpenters over the surface of the subfloor before installing the plywood underlayment.
Whatever you do, don’t omit the crack-isolation membrane, which is designed to protect the tile from small movements in the subfloor. If you are unable to build up a thick enough subfloor, you can reduce deflection by add more joists or adding solid blocking between the joists at 16 inch intervals. This is assuming you have access from below the floor.