Q: What is the best way to connect a deck railing to the posts? There are detailed instructions for how to connect railing posts to the rim joist to meet code. However, the attachment of the railing to the post can be the weakest link in the system. How should the railing be connected to the rail post to meet the code when force is applied to the railing? The post connection to the rim joist will meet code but the railing may break away from the connection to the railing post. Thanks, Larry
A: The building code and manufacturers of steel-connector are mainly concerned with the post-to-rim joist connection due to the leverage exerted over the length of the post, multiplying the force at that joint.
According to the International Residential Code (IRC), the railing assembly needs to resist the following loads:
- 125-pound uniform load applied horizontally or vertically to the railing
- 200-pound point load applied at the top of the post in any direction, or at mid-span along the railing

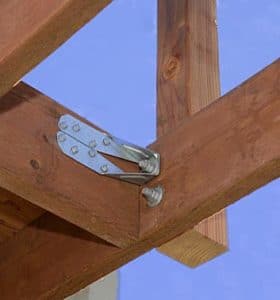
Engineers then apply a safety factor of 2.5 for testing, so these loads become 300 pounds and 500 pounds, respectively. It’s very hard to meet these load requirements without specialty hardware such as the Simpson DTT2Z (read more on steel connectors).
Connecting the Top Railing
The connection of the top railing to the posts does not have the leverage effect, so it is mainly a shear connection resisted by the screws or nails into the tops of the posts.
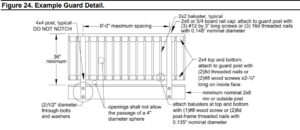
The American Wood Council (AWC) publishes a prescriptive deck construction guide based on the IRC. The guide is accepted by many code officials as compliant with the code. A typical connection for the railing to post is shown in the diagram below. It uses a 2×6 or 5/4 top rail attached to each post top with three 3” screws or three 16d nails. Additional fasteners into the horizontal 2×4 would add additional strength.

Since these connections are rarely engineered, an authoritative prescriptive guide is often the most practical approach for a builder and likely to be accepted by the local inspector. Click here to download the most recent edition of the Prescriptive Residential Wood Deck Construction Guide by the American Wood Council.
For the sturdiest railings, use the longest top rails you can find, with the fewest joints. One continuous railing is best, if possible. I typically reinforce all joints in the railing with galvanized steel strapping or angles. I typically use one or two straight straps at horizontal railing joints (on the edges or bottom of the 2×6 railing) and a corner angle on the outside edge of the railing at each corner.
Where feasible, I also use a steel angle to tie the inside ends of the railing to the house wall framing. The steel straps add rigidity and help a lot over time when pressure-treated lumber starts to check and twist, which can loosen the railing connections.
The Railing Infill
The area below the top railing is called the “infill” in code-speak. This part of the railing commonly consists of 2×2 balusters nailed or screwed to the the top and bottom rail or horizontal members. It may also be horizontal steel cables, plexiglass, or any solid material that meets the code requirements.
The gaps between the balusters or cables must be less than 2 inches. If a 2-inch diameter ball slips through, the railing fails. The 2-inch limit is designed to keep small children from slipping through the cracks.
The structural rule states that the balusters or other infill materials placed between the posts must resist a load of 50 pounds applied over an area of one square foot. Applying the typical safety factor of 2.5, the test load would be 125 pounds applied over any area of one square foot. As a practical matter, that means the infill needs to be strong enough to resist a swift kick or any other impact it might face in normal use. There’s no sense in building sturdy railing posts and top rails, and then filling in the rest of railing with flimsy materials. Always first when it comes to deck railings.
Read more on Building Code-Compliant Deck Railings
Sharon Shook says
A Cure for Shaky Railing Posts
Some of the 6X6 posts that have already been installed on our new deck have a substantial shake. They extend the full length without any ties. Can these posts have some bolts and metal plates added to reinforce them so the shake is negligible? Also, so that it would pass muster with an engineer?
These posts are not only holding the handrail, but also heavy glass around the perimeter of the deck.
buildingadvisor says
There is hardware readily available that is specifically designed to stiffen the posts on deck railings and meet the requirements of the building code. Fastening posts to deck joists is a difficult connection to make without specialty hardware because of the large forces applied through the lever of the deck post. If you push at the top of the post with a 50-pound force, the force at the connection is several times larger.
The most commonly used steel connector for the post-to-deck connection is the Simpson Dtt2Z and the equivalent Mitek/USP USB DTB-TZ.
Depending on the specific installation detail, wood blocking is often needed to achieve a solid connection. The installation is a little different depending on where the post connects and whether it aligns with a joist. Rim joist, end joist, and corners require different treatment. Installation details are available from the manufacturers Simpson Strong Tie and Mitek/USP. The attached illustration, adapted from Simpson Strong Tie, shows some common installation details.
If your deck contractor is unable or unwilling to complete the job, you should consider bringing in a second contractor who specializes in decks, or get a quick consult from an engineer, who can spec out a plan that a contractor can follow.