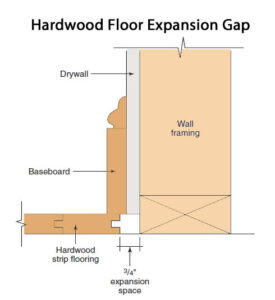
Q: I hired a 20+ year veteran flooring pro to install red oak hardwood floors. After the install, I was told by a friend about expansion gaps needed around the perimeter to prevent buckling, etc. as humidity changes and the house settles, in New England.
When I asked, the contractor said this was unnecessary because he had stored the wood for several weeks where it could expand before installing the floor. This sounds sketchy. Now that the installation is done flush with the walls, what do I do? – J.E.
A: With any wood flooring installation, it is important that the house is tight to the weather with all “wet work” completed in the house — mainly concrete, drywall and paint, and that other significant sources of moisture are controlled. For example, crawlspace soil is covered and wet basement problems are corrected.
At that point, the home’s HVAC systems should be running for at least five days to bring the house into the normal range of temperature and relative humidity that it will experience year-round. In New England, that’s somewhere in the range of 60 – 80°F with relative humidity ranging from 30% to 50%.
Equilibrium Moisture Content
All wood in a house will, over time reach a moisture content based on the home’s relative humidity. This is called the “equilibrium moisture content” or EMC. For humidity ranging from 30% to 50%, the EMC of wood ranges from 6-9%. The actual numbers for a given project will depend on the region of the country, house tightness, the type of HVAC system used, and the owners’ behavior. A house is Houston with a ton of house plants will be a lot more humid that a house in house in Santa Fe.
Once the house is dry, the flooring should be delivered and tested for moisture content (MC). The ideal target is average of the summer and winter extremes. Using the numbers above, that would be about 7.5%. If the new flooring is too dry, it may cup after installation. If it is too wet, it may have permanent gaps.
If the wood flooring is delivered within about 2 percentage points of the target number, it can be installed right away. If it’s not even close, it should be sent back to the supplier as is prone to cupping and warping before installation.
Acclimate Flooring As Needed
In many cases, allowing the wood to acclimate for 3-7 days is adequate to get it close enough to the moisture content it will experience under normal living conditions. For this to work, the flooring must be stacked in a way to allow air circulation.
However, it’s a big mistake to acclimate kiln-dried hardwood flooring to a very wet house. It only makes sense to allow wood to acclimate to a house that has been brought to normal living conditions — even if temporary heating, cooling, or dehumidification is required.
Along the same lines, it is important that the subfloor be sufficiently dry before installing the flooring. The MC of the subfloor must be within 4 percentage points of the flooring for narrow boards (up to 3 inches wide) and within 2 points for wider flooring boards. Also an approved moisture barrier should separate the subfloor from the finished flooring.
Failing to follow these recommendations can result in wide gaps in winter (flooring installed too wet) or cupping in summer (flooring installed too dry). In extreme cases, wood flooring boards can become permanently compressed as the wood as it tries to expand under moist conditions, leading to permanent gaps between the boards — called “compression set.”
Expansion Gap Parallel to Flooring
Finally, an expansion gap around the perimeter is highly recommended — 3/4 inch if possible. This is mainly an issue along the walls parallel to the boards as wood expands and contracts mainly across the grain, not along the length of the board. (With laminated products, follow the manufacturer’s instructions.)

In your case, if everything was done right, the amount of expansion and contraction might be minimal and not cause any visible problems. A moisture meter can help you determine if the wood is currently at a reasonable moisture content. However, you won’t know for certain if the job is problem-free until you get though the first year with the new flooring.
To be on the safe side, you could remove the baseboard and cut 1/2 to 3/4 inch lengthwise off the outer edge of the first and last plank in the floor (or cut away the drywall at the bottom of the wall if that’s an option). Then replace the baseboard to conceal the expansion gap.
Either of these is a pain, but not so difficult with the flush cutting tools available today. With the right tool, it’s a half-day job at most for a flooring or remodeling contractor. – Steve Bliss, BuildingAdvisor.com
Juan Longoria says
Can You Cut Drywall to Make Gap?
Can you cut away on the bottom of the drywall instead of leaving an expansion gap?
buildingadvisor says
If you look at the illustration in the article above, you will see that there is a gap between the drywall and subfloor equal to the thickness of the hardwood flooring. The ¾ – inch expansion gap is provided by the sheetrock and the baseboard.
If the drywallers did not leave a gap, you can cut one in place – obviously, not the easy approach.
In older homes, a base-shoe molding was often used to conceal the gap.