• Skip to main content
  • Skip to secondary menu
  • Skip to primary sidebar
  • Skip to secondary sidebar

Building Advisor

Practical Building Advice

search icon

Search This Site

search icon
  • About Us
  • Contact Us
  • HOME
  • BUYING LAND
    • OVERVIEW
    • GETTING STARTED
    • LAND CHECKLIST
    • IS IT BUILDABLE?
    • ZONING
    • LAND REGULATIONS
    • SEPTIC SYSTEMS
    • WATER WELLS
    • SITING A HOUSE
    • SITE EVALUATION
    • QUESTIONS TO ASK WHEN BUYING LAND
    • SITE DEVELOPMENT BUDGETING
    • TYPICAL COSTS
    • REAL ESTATE AGENTS
    • MAKING AN OFFER
    • LESSONS LEARNED
  • DESIGN
    • OVERVIEW
    • PLANS & SPECS
    • SITE PLANNING
    • SITING A HOUSE
    • FLOOR PLANS
    • HIRING AN ARCHITECT
    • HIRING A DESIGNER
    • DESIGN-BUILD CONTRACTORS
  • HIRING
    • OVERVIEW
    • GETTING STARTED
    • TASKS & PLAYERS
    • ARCHITECTS
    • DESIGNERS
    • CONTRACTORS
    • SUBCONTRACTORS
    • DESIGN-BUILD CONTRACTORS
    • CONSTRUCTION MANAGERS
    • OWNER-BUILDERS
    • REAL ESTATE AGENTS
  • ESTIMATING
    • OVERVIEW
    • COST OVERRUNS
    • PRELIMINARY BUDGETING
    • BALLPARK ESTIMATES
    • PRICING GUIDES
    • CONTRACTOR ESTIMATES
    • OWNER-BUILDER ESTIMATES
    • REMODELING ESTIIMATES
    • STEP-BY-STEP GUIDE
    • OVERHEAD & PROFIT
    • ESTIMATING SPREADSHEET
    • ESTIMATING FAQs
  • BIDDING
    • OVERVIEW
    • PRICING THE JOB
    • FIXED-PRICE BIDS
    • COST-PLUS BIDS
    • DESIGN-BUILD BIDS
    • NEGOTIATED BIDS
  • CONTRACTS
    • OVERVIEW
    • CONTRACT BASICS
    • CRITICAL CLAUSES
    • STANDARD CONTRACTS
    • MODEL CONTRACT
    • SIMPLE PROPOSALS
    • WRITTEN SPECS
    • ALLOWANCES
    • CHANGE ORDERS
    • DOCUMENTATION
    • DISPUTE RESOLUTION
  • FINANCE
    • OVERVIEW
    • WHAT’S YOUR BUDGET?
    • GETTING BIDS
    • OVERHEAD & PROFIT
    • CONSTRUCTION LOANS
    • DOWN PAYMENTS
    • DRAW SCHEDULES
    • ALLOWANCES
    • CHANGE ORDERS
    • LIEN WAVERS
    • THE FINAL CHECK
  •   
  • WELLS
    • OVERVIEW
    • WELL DRILLING
    • FROM WELL TO TAP
    • WATER QUALITY
    • WATER TREATMENT
  • SEPTIC
    • OVERVIEW
    • HOW IT WORKS
    • PERC TESTING
    • ALTERNATIVE SEPTIC SYSTEMS
    • SEPTIC SYSTEM MAINTENANCE
    • SEPTIC SYSTEM FAQs
  • FOUNDATIONS
    • OVERVIEW
    • DRY BASEMENT DETAILS
    • SITE DRAINAGE
    • WATERPROOFING
    • BASEMENT INSULATION
    • CRAWLSPACES
    • SITE EVALUATION
    • SITING A HOUSE
  • EXTERIORS
    • OVERVIEW
    • ALL EXTERIORS LEAK
    • RAIN-SCREEN WALLS
    • SHEATHING WRAP
    • WINDOW FLASHING
    • WALL FLASHING
    • FLASHING MEMBRANES
    • METAL FLASHINGS
    • PAINTING & STAINING
  • DECKS
    • OVERVIEW
    • STRUCTURAL DETAILS
    • FRAMING MATERIALS
    • DECK RAILINGS
    • WOOD DECKING
    • COMPOSITE DECKING
    • DECK STAINS & FINISHES
    • FASTENERS & CONNECTORS
  • FREE FORMS
    • FORMS INDEX
  • BUILDING FAQ’S
    • BROWSE Q&A’s
    • Q&A INDEX
You are here: Home / Energy Conservation / Air-Sealing Between Chimney & Framing

Air-Sealing Between Chimney & Framing

January 27, 2022 by buildingadvisor Leave a Comment

Q: What’s the best way to air seal and insulate between a masonry fireplace and the surrounding wall? There is a lot of contradictory advise around about how to handle this. I will be installing a direct-vent gas insert with aluminum liners in my fireplace opening, so heat in the flue cavity will not be a big concern.

How to seal the 2-inch gap around a chimney.
To air-seal the 2 in. gap around a chimney, you can use metal flashing or cement board. But insulation and foam sealants are a code violation.


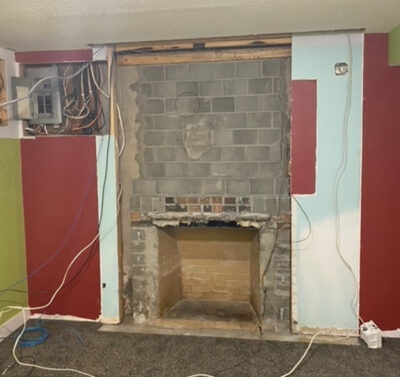
The chimney material is cement block above the rough-in opening (see photo) I was hoping to reframe and seal/insulate the wall above and to the sides of the fireplace opening but would not be able to use foam board against the chimney due to the 2” clearance rule to combustibles. How would I prevent moisture and air migration from the outside in that area? I plan on using rockwool in the wall cavity that will be spaced 2” off the masonry. — Dan K.

A: Sealing between a masonry chimney and wood framing is tricky. Codes generally call for a 2-inch gap that is not filled with any insulation – even a non-combustible material such as mineral wool.


The gap is required to prevent heat transfer to the framing. If there is ever a hot spot in the masonry, the gap is there to provide a physical break. The regulations are the same whether you burn logs in a fireplace or gas in an insert.

Use Metal Flashing To Bridge Gap

The gap is often sealed with metal flashing and a non-combustible caulk where it contacts the masonry. To bridge from the chimney to a drywall surface, you can patch in with cement board (such as tile backer) for the last 6 inches or so and caulk the cement board to the chimney with fireproof sealant. You can then finish the cement board-to-drywall joint with standard joint compound or skim-coat plaster.

There are a wide variety of caulks and sealants used in fire blocking, but not all are completely non-combustible. I would look for a non-combustible fireblock sealant approved for contact with chimneys, such as 3M Fireblock Sealant FB136. If in doubt, check with your local building inspector as local codes and code interpretations have the final say.


Seal The Vertical Chase

One other thing to consider is the vertical chase around the chimney — in this case, a 2 inch gap, but sometimes much larger with manufactured fireplaces. It’s good to seal this chase where it enters the attic to reduce air and moisture leakage into the attic. Use metal flashing and fireproof sealant, as described. In this case, the flashing is horizontal between the ceiling joists and the chimney.

Typical air leaks from house to attic should be sealed.
Air leaks into the attic should be sealed to prevent heat loss and attic moisture problems.


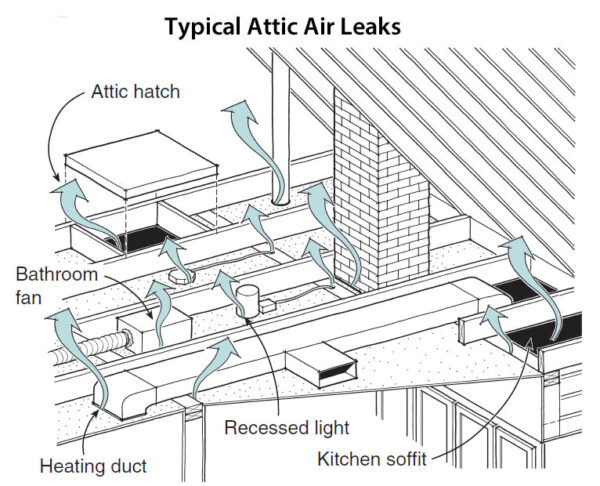
To seal other air leaks into the attic, canned foam is usually a good choice. It can be used in combination with pieces of foil-faced foam for larger gaps or to build airtight boxes if needed.  Common leakage paths are shown above.

Air leaks into the attic are a major source of air infiltration into a house. All the air that leaks out the top of the house is replaced by air leaking in lower in the structure. In cold climates, air leakage into the attic also contributes to ice dams and condensation on the roof sheathing. — Steve Bliss, BuildingAdvisor.com

Filed Under: Energy Conservation, Framing Tagged With: Air Sealing, Insulation, Moisture Problems

Reader Interactions

Leave a Reply Cancel reply

Your email address will not be published. Required fields are marked *

Primary Sidebar

Visit Inspectapedia.com our Sister Site

Secondary Sidebar


ESTIMATING SPREADSHEET SPECIAL

Only $19.95 for Lifetime License LEARN MORE


Share this article


Q&A INDEX


Recent Posts

  • Best Approach to Hot-Climate Cathedral Ceiling
  • Frost-Protected Shallow Foundations
  • Patios & Decks for Coastal Homes
  • Can I Foam Basement Wall With Existing Studs?
  • Is Top Railing On Deck Code-Approved?

Copyright © 2025 · Magazine Pro for Building Advisor on Genesis Framework · WordPress · Log in