Q: Hi. We recently moved into an older home with hardwood floors that are very squeaky in some spots. Some areas are hardwood and some are carpeted over hardwood . Any tips or products you can recommend minimize the squeaks without tearing out the ceiling below. In some places we can access from below. – MH
A: Floor squeaks in hardwood floors are generally caused by spaces that have opened up between the finish flooring and the subflooring , or between the subflooring and the floor joists. The squeak can be from wood rubbing against wood or wood rubbing against the nails as the wood flexes. With carpeting or vinyl over plywood or particleboard underlayment, you can have similar problems.
While new construction tends to use screws and adhesive to attach the subflooring, older homes mostly used nails. The seasonal shrinking and expansion of wood tends to loosen nails. Also, the individual boards used for subflooring in older homes create additional places for movement and squeaking between boards.
The solution is to limit the movement of the flooring or subflooring by tightening the connections or filling the gaps between wood members. This is usually pretty easy if you have easy access to the floor joists from below, but otherwise can be challenging. The first step is to determine how your floor system was built.
How Many Layers and What Materials?
First, you need to determine the layers of material used in the floor. Every floor system starts with a layer of structural subflooring, usually plywood or OSB in modern homes, or individual wood planks in older homes. On top of the subfloor, there is often a layer of underlayment if the finish flooring is vinyl, carpet, laminate, or thin laminated wood. The underlayment is often particleboard or hardwood, but may be other softer materials.
If the finish floor is traditional ¾-in. hardwood strip flooring, it generally nailed directly to the subflooring.
Some modern construction uses a single layer of combined subflooring/underlayment, such as Sturd-i-Floor, ranging from 5/8 to 1-1/8 in. thick. These are rigid T&G panels made from plywood or OSB are designed to be rigid and smooth enough for finish flooring.
If it’s unclear what you have underfoot, you can drill a ½-in. observation hole in the subflooring inconspicuous area in the basement. There may be a single layer of tongue-and-groove plywood or OSB, with vinyl floor, carpeting, or laminate/laminated wood above. Or you may find a separate layer of underlayment on top of the floor (better quality construction). With traditional hardwood strip flooring, you will typically find one layer of subflooring under the hardwood.
Once you have a handle on the materials and their thickness in your floor system, you’re in a good position to locate and stop the squeaks.
With Access Below
If you have access to the floor joists below, typically in an unfinished basement, you have a lot of options. Start by locating the source of the squeaks, as best you can, by having someone walk above while you observe below.
You might be able to see the movement in the subfloor or you may need to rely more on your ears. Are the squeaks mainly at the floor joists, between the joists, or both? Mark the noisy areas with a pencil or pieces of masking tape.
If you can see gaps and movement where the subflooring rests on the floor joists, the first step is to fill the gaps to eliminate any movement. For small gaps in a limited area, use a few thin wooden shims, coated with yellow carpenter’s glue. Push them firmly into place, but do not hammer them in as that could make the gaps bigger and created a bump in the floor.
For a larger area along the length of a joist, buy a tube of construction adhesive and inject it into the gap with a caulk gun. Use an old putty knife to force the bead of adhesive into the gap.
With either approach, it’s usually helpful to drive some short screws at an angle through the top of the floor joist, and into the subflooring. First predrill the floor joist to the diameter of the screw and make sure you choose short screw length that will not penetrate through the subflooring. A #8 star-drive wood screw is a good best choice for this task.
If necessary, you can also screw and glue a sister joist alongside the existing floor joist, jammed up tightly against the subflooring above. Use carpenter’s glue on the side and construction adhesive on the top of the sister. A 2×4 should work well for the sister, or even a 1×6 — whatever you have on hand. Choose a long enough sister to bridge the area of movement.
If the squeak is between the joists, you can screw directly up through the subflooring into the hardwood flooring above. Again, drill a large pilot hole in the subflooring equal to the diameter of the screw. Drill a small pilot hole in the hardwood flooring a little smaller than the screw diameter, being careful not drill through the finish flooring. Also, select a screw length that will not penetrate the finish flooring. A #8 wood screw is usually fine.
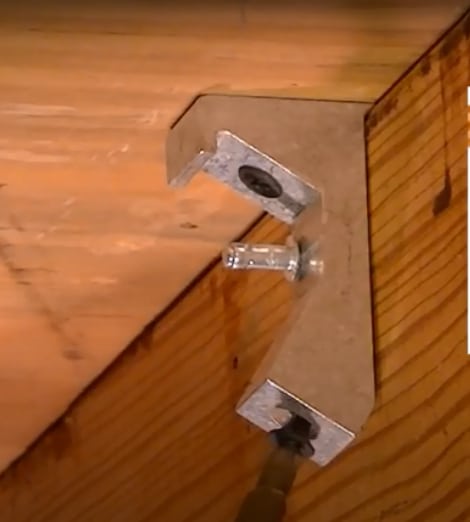
There are also commercial products you can use from below. I tried a product called Squeak-Relief a few years ago on a condominium with OSB subfloor, particleboard underlayment, and carpeting above. The floor squeaked in a lot of places, I needed to use quite a few brackets before the squeaking was substantially reduced. Where needed I also used wood shims screws up through the subflooring into the underlayment.
In this case, it was difficult to determine exactly where the squeaks originated. One benefit of the Squeak Relief is that I could move the brackets around easily to see where they were most effective. These are more expensive than shims, adhesive, and sisters but can be helpful for locating leaks and for fast fixes when needed.
Top Access Only
If you do not have access from below, the best solution I have found is a clever product called Sqeeeeeek No More (yes, that’s a lot of eeeee’s). I used this several years ago on a carpeted area of a condominium and more recently on a hardwood floor in an older home.
[NOTE: These are my unbiased opinion. I receive nothing for mentioning this or any product.]
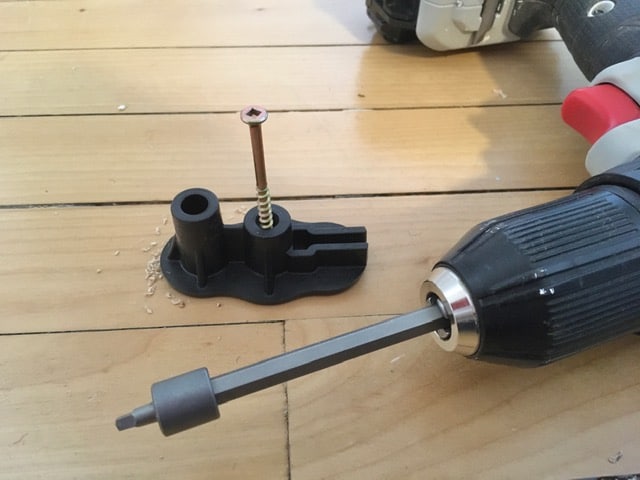
The kit includes a pack of 3 in. long wood screws, two long screws for locating joists, and two hard-plastic jigs – one for wood flooring and one for carpeting. The 3 in. square-drive screws are scored just above the threaded part of the screw, creating a weak point. As you drive the screw through the guide, it snaps the screw just below the finish flooring (or below the subflooring with carpeting). Different thread counts on the upper and lower portion of the screw help snug the flooring to the subflooring.
With hardwood flooring, you can drive the screws wherever you hear a squeak. Hitting a floor joist provides a more solid connection, but is usually not necessary with hardwood. However, with carpeting (or resilient types of flooring), you will have much better luck if you hit the joists, since that’s most likely the source of the noise.
With hardwood flooring, first drill a pilot hole through the thickness of the flooring. An 1/8 in. pilot hole worked well for my maple flooring and left small, clean holes that filled easily with color-matched putty.
In one case, the screw snapped prematurely and had to be backed out with a vice-grip. Otherwise I drove in a dozen or more screws without incident. In short order, I reduced the loud squeaking in a doorway by about 90% with about ten screws.
With carpeting, you will have to first locate a joist, which takes a little detective work. If you have a gable roof, the joists usually run parallel with the ceiling rafters – 90 degrees to the ridge line of the roof. Also, in most houses, there is a central supporting beam or wall that runs down the center of the house. The joists run at 90 degrees to this beam or wall, usually across the shorter dimension of a rectangular room.
If you can see the joists in basement ceiling or attic, the rest of the joists in the house usually run in the same direction. If you don’t have any access you may be able to detect the line of nail holes in the ceiling drywall – or you can sometimes see “ghost” lines along the joists. With acoustical tiles, you may be able to remove a few to get a view, or pull a heating or cooling register.
If all else fails, find an inconspicuous place to drive long thin nails, like a 10d finish nail, up into the ceiling below the floor in question. Start in about 10 inches from the outside wall and moved in or out in 1 inch increments till you hit pay dirt. From there, your joists are likely to be 16 in. apart, but possibly 24 in. in some modern buildings. Measure off the wall to locate the joist from above. A sketch of your foundation wall and wall framing will help.
If this seems like too much for you, the Squeeeeeek No More kit provides a couple of 4-1/2” “Stud Finder” screws – basically long, rigid screws with a short threaded section at the bottom. Drive this through the carpet, starting about 9 in. in from the wall until you hit a joist. Then, with any luck, the rest will be 16 in. or 24 in. intervals. That’s “16 in. on-center” in carpenter talk.
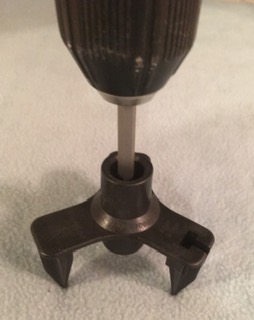
Once you’ve located your joists, just drive as many nails as necessary, using the carpeting jig, which you force down into the carpet. This worked well on the medium-pile synthetic carpet where used.
Sometimes it’s obvious where to place the screws, sometimes not. But since they are all safely hidden under the carpet and sunk below the surface of the underlayment, you can keep driving screws until satisfied. About a dozen screws did the trick in my case. – Steve Bliss, BuildingAdvisor.com
Avinash rao says
Who To Hire To Fix Squeaky Floor?
ery good article. I have a squeaky two level house with basement access for first floor. Can you suggest a good company in my area code to fix it ?. I have bought the squeaky no more kit already and will try it.
But I want professional help. Thanks
buildingadvisor says
Sorry, but I don’t have any names in your area. Right now, it’s especially hard to find people for small jobs as remodeling contractors are very busy and often not interested in small repairs like this. Also, not everyone is familiar with these techniques — especially on floors where you don’t have access from below.
You might be able to find a company or individual specializing in “handyman” services. Another route would be to contact retailers who sell and install flooring, or flooring contractors who install whatever type of flooring you have. They may have more experience with squeaky floor troubleshooting and be more readily available.
You can find more tips on hiring contractors at this link.