By Gordon Tully
Last month we considered the problem of adding space to a typical New England Cape Cod without compromising the original structure’s basic lines, particularly from the front. We came up with a two-story, gabled addition set at right angles to the rear of the original house (see Illustration).
This month we’ll consider how to create a floor plan that makes the best use of the new space.

Planning Goals
To begin, we need to have in mind a good general plan for improvements. These might include: • Maintain the front entry (there is nothing worse than an unused front door) but expand it and add a draft lobby if necessary.
- Make at least some of the rooms bigger and better organized.
- Try to create greater vertical spaces, either by extending the ceiling to the rafters or by lowering the floor.
- Add a central passage to the house to avoid using the front rooms as corridors. • Open up long views within the plan. In addition, some specific planning goals might include: • Create a larger kitchen, possibly a “great room” with dining and sitting facilities. • Add utility space: mud room, laundry, storage.
- Add a master bedroom suite with large bathroom and extensive storage.
- Improve the bathrooms.
- Add a family room.
If there were a known client involved, the goals might be even more detailed and specific. Even in that case, however, it is important to analyze the organization of the plan in a general way before trying to squeeze in everything the client wants (which is often impossible anyway).
Know Your Way Around
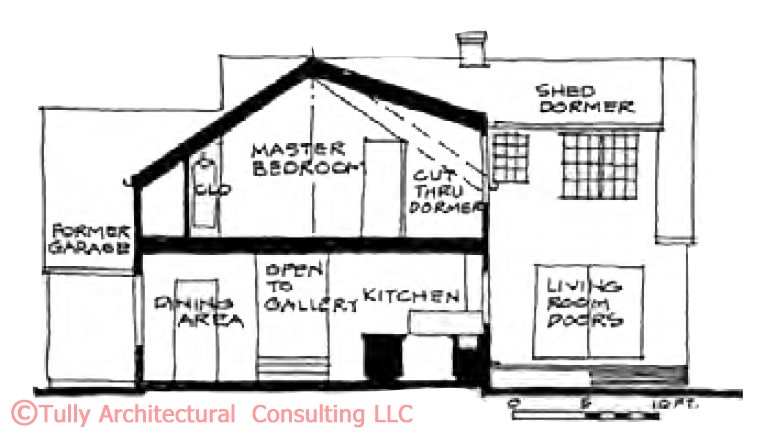
Now that we have some goals to work toward, we can start playing around with various solutions. Starting with the existing plans at 1/8- or 1/4-inch to the foot scale, overlay cheap tracing paper and sketch out a variety of approaches to the design. Work back and forth between floors. Before you draw any plans, draw a 1/4- inch-scale cross-section through the building, preferably through the stairs and extending into the new wing, to show headroom conditions at the second floor and at the stairs (see Illustration).
By playing around with various solutions, it is possible to develop a kind of insight about the plan, the way parents develop insight about their kids. You discover the plan’s basic structure and learn about its quirks.
Bathrooms and stairways. One of the tough decisions in any renovation is whether to move the bathrooms and stairways. Even if the baths need a facelift, leaving the plumbing alone will save some money. But if the plumbing is brass and/or lead, the bathrooms themselves are crowded, or you are moving the fixtures around anyway, it may cost little more to move the baths, and it is worth considering.
The key word here is “consider.” For planning purposes at this point, blow the baths away. After you have worked out your ideal plan, you might discover (as I did) that at least one of the baths can stay right where it is. Stairways, too, can be a problem. I spent most of the design time on this plan trying out locations for the stairway. In the process I got to know the plan very well, but none of the new stair arrangements worked on the second floor. Frustrated, I decided to turn the old dining room into a passageway. While this meant losing a useful space (that space could have been made into a library or den), it created a generous entry space with a new half-bath and coat closet. And by leaving the main stair where it was, I cut costs and greatly reduced the changes required on the second floor.
The trick in this scheme is turning the bottom four risers of the stair at right angles to the front door (see Illustration).
Entering, you are confronted with a handsome balustrade, which turns you right toward the entry hall. (I also closed off the opening between the former living room and the entry, which makes the living room cozier and easier to furnish and reorients that room toward the new center of activity at the rear of the house.) And the main stair now has grace and drama, enhanced by a cathedral ceiling over the stairway.
To make the scheme work, the former master bedroom had to be narrowed to create headroom over the turned stairway and to make room for a door into the new master bedroom suite off the second floor hallway. Were this not a modest Cape, where every foot on the second floor counts, I might have considered removing the former master bedroom altogether and creating a wonderful double-height entry hall with an entirely new staircase located within that space.
Working Out the Plan
With the stairs settled, we now have a basic plan organization. The next step is to develop the plan in more detail and assign uses to the various available spaces.
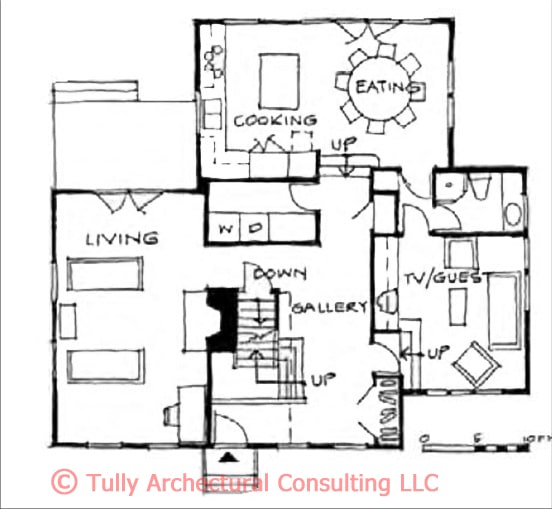
Downstairs, the entry hall becomes a picture gallery and the central hall which links all the spaces. The former garage becomes a TV room that doubles as a guest bedroom; or it could become a downstairs bedroom in an emergency. It is located at grade, so a disabled person could live on the lower level, which also houses the kitchen and dining room.
A flaw in the plan is the absence of a mudroom-utility entrance. One could be provided if the first floor bathroom and laundry are exchanged. However, this would place the TV/guest bedroom on a different level from the bath, spoiling its potential as a temporary residence for a disabled person.

Upstairs (see Illustration), the former two small bedrooms at the left are combined to make one of reasonable size. The former master bedroom on the right now becomes the small bedroom, or perhaps an office or study. The new master bedroom suite at the rear is pleasant, although not at all lavish. Headroom under the roof makes it difficult or impossible to fit in walk-in closets, so the closets are fit in under the eaves. Two skylights set into the back roof light the master bath and the stair. (It’s best not to spoil the Cape effect by putting a skylight on the front roof of the house.)
Developing the Design
In the final stage, often called design development, all the dimensions must be worked out more accurately, basic details drawn, and the structural and mechanical systems resolved. This is a time-consuming effort. Ingenuity and confidence are needed to stay with the design concept when something doesn’t work out exactly as planned. Sometimes, if the design just doesn’t “develop,” you may have to go back to the earlier stage, sadder but much wiser.
Finally, be bold in your planning. You may have to back up to a more modest design if you exceed the budget, but your explorations will leave a trail of good ideas that can be incorporated into a more modest design.
Leave a Reply