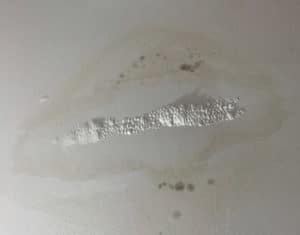
Q: How do I identify the source of a water stain on the ceiling? I’m not sure if a leak is from the bathroom directly above or from something else. Also, once identified, how do I go about fixing the leak? – A.G.
A: Finding the source of a leak in a ceiling often involves a bit of detective work. Like a detective, you start with the most likely suspect. If you can rule out the source, you move down the list. Work logically and methodically and you’ll find the leak. The more you know about house construction, the better your chance of finding the leak quickly.
Water Can Run Horizontally
Sometimes the source is obvious and easy to spot – right above the stain on the ceiling – but other times it’s maddeningly difficult. The source may be distant from the visible stain.

The leakage source can be easy hard to pin down when the water dripping directly downward from above the stain on the ceiling. However, water from a leak can run horizontally or at an angle along pipes, framing, or other building components before showing up in your ceiling.
Surface tension, sheets of plywood or drywall, or other materials allow water to follow a horizontal path. So the water source may be directly overhead, or it can be several feet or yards away horizontally.
Common Sources of Leakage
Some common sources of water leaks include:
- Toilets: at the water supply connection to tank, tank-to-bowl gasket, or wax ring
- Tub or shower: at the drain, mixing valve, or behind a slip-on tub spout. Or, rarely, where the shower arm (for shower head) or threaded nipple (for tub spout) screws into the supply line.
- Sink: At the faucet set, drain, trap, or other connections
- Plumbing drains: Either at a joint or where the PVC pipe is pierced by a nail or screw
- Plumbing supply lines: A pin-hole leak from acidic water or where pierced by a nail or screw (usually this causes a major leak requiring you to shut off the water supply). Or a badly sweated copper joint, or bad compression joint in plastic plumbing.
- Bath fan – Condensation at a sag or low point in a horizontal run
- Roof leaks – Most likely at the flashing around a roof penetration such as plumbing vent, skylight, or chimney. Also from ice dams at the eaves (for stains near outside wall).
- Wall flashing: Especially around windows, for water stains near an outside wall.
Note: Over the course of my career, I have seen every one the leaks mentioned except for a cracked toilet bowl (which my plumber has seen). I’ve also seen some more rare ones – see Case Study below.
If you have the luxury of time, watch the leak for a few days to see if there is any pattern? Is the stain actively wet and growing or has it dried out – implying a very intermittent leak. Does it appear after showering, after flushing the toilet, after a rain storm? Is there a lag between using water and wetting the ceiling?
Is this a seasonal problem? If only in summer, it could be condensation on AC ducts or the outside of the toilet tank. If only in winter, consider condensation inside bath fan ducts, or backup from ice dams in freezing climates.
You may need to remove a cabinet or piece of drywall to get a better look. This will allow you to see the leak in action instead of waiting for it to work its way through the plaster or drywall ceiling. Also, with the help of a flash light, you may be able to home in on the source of the leak.
Narrow Down Your Leads
Assuming you are still not sure of the source, you will need to draw up a list of likely suspects and start working down the list, starting with the most likely. Normally, that would be any plumbing fixtures directly over the stain on the ceiling.
The basic drill is this: Examine the area visually for signs of leakage. If none can be found, test for leakage. Run water through the fixture to see if the leak increases. If necessary, put red food coloring in the water to make the leak more visible. If you have the time, stop using the fixture for a few days, and see what happens. If no signs of leaks, move on to the next suspect.
Toilet First
If the leak is below a bathroom, the toilet is the usual place to start your search. Look for signs of leakage at the gasket where the tank rests on the bowl. Also check where the water supply enters the tank, and look for signs of leakage on the floor, which would indicate a poor seal at the wax ring, or possibly a crack in the fixture. If nothing is apparent, add bright red food coloring to the water in the bowl and flush. If no red water appears below within a few minutes, you can cross the toilet off your list.
Next move on to the sink and shower and check for visible signs of leakage. First check the drainage under the sink and behind the tub/shower if you have an access panel. Then rapidly run water, with dye if needed, to see if leak increases.
Next, check the supply side. In some cases, a slip-on (non-threaded) tub spout can back up into the wall where it is mounted. Check faucets for leakage as well as the shower mixing valve, if accessible, where worn gaskets or O-rings can cause a slow leak. These leaks generally only occur when the fixture is in use.
If you can isolate which fixture is associated with the leak, you will need to expose the plumbing lines to locate and repair the leak. That is usually easier to do from the wall behind or ceiling below than from the finish materials within the bathroom.
Leaks in drainage pipes are generally found at defective glue joints in PVC or corroded cast iron in older systems. Cast iron and galvanized steel generally rust from the inside, so it may appear just a little rusty on the exterior, but is soft enough to poke through with a screwdriver.
Check the Water Meter
If there are no leaks on drainage side, turn off all water and check to see if the water meter continues to run. There may be slight fluctuations, but if the meter progresses over the course of an hour, then water is leaking somewhere on the supply site of your plumbing system.
This could be a pinhole leak caused by acidic water, a bad joint in the supply piping, or a leak at a threaded joint, for example, where the shower arm or nipple threads into the supply line behind the shower head or tub spout.
The easiest way to isolate the leak is to turn off all shut-off valves in the house. After making sure that the meter has stopped, one by one, turn them back on to see which moves the meter. In older homes with few shut-0ff valves, this can be challenging and will probably require the help of a plumber.
Bathroom Fans
In cold climates, bath fans, are a common source of ceiling stains. When the warm, moist air passes through a cold space in the attic, or even between floors, the water can condense of the inside of the exhaust duct and drip onto the ceiling below.
The problem is increased when there is a low point for the condensed water to collect, especially in the type of flexible ductwork common used for dryer vents.
It’s best to use insulated ductwork that is leakproof and sloped downward, at about ¼ in/ft to the outdoors so any condensation drains to the exterior of the house. PVC pipe works well for this as it is smooth, for good airflow, and easy to seal against leakage. The short ducts with few turns provide the best airflow.
Flashing Leaks
If the stain on your ceiling is near an outside wall, this might be one of the first things to check. Flashing leaks in walls and roofs are a common source of water stains on the interior. In fact, leaks around flange-style windows (the most common type today) are one of the leading causes of contractor callbacks.
These leaks can go undetected for a long time, doing damage to the wall framing and sheathing, before they show up as a stain on the wall or ceiling or mold spot in the carpet. To diagnose this type of leakage, you will probably need to remove an exterior molding or some interior finish materials to pinpoint the location of the problem.
Case Study – Mystery Leak

A house where I was working had water dripping slowly, about a teaspoon a day, into the ceiling over a kitchen wall cabinet. The cabinet was installed below a soffit and both the cabinet and ceiling were damaged. It looked like the leak had been there for a while.
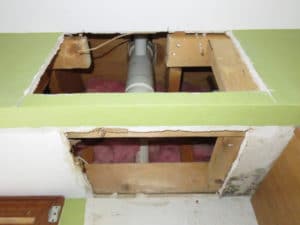
I removed the cabinet and part of the soffit to get a better look. Above was the home’s main vertical plumbing drain and bathroom. The drain continued up through the roof as a vent stack. Other horizontal drains teed into the main drain just above the leak area. So there were a lot of pipes and a lot of joints.
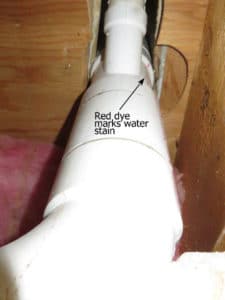
I could see a trickle of water dripping down the main vertical drain but could not see where it was coming from. I examined and tested all three fixtures in the bathroom above, but none seemed to correspond to the leakage. Red dye confirmed that the fixtures were not leaking. The water meter did not indicate any leakage on the supply side.
This is where it gets weird: If the bathroom were completely unused, there was no leak. If a lot of water were run through any fixture, the leak would appear, but hours later – often overnight. Hmmm.

Additionally, the water looked and smelled clean, not like gray water or worse. I suspected water was entering inside or outside the vent stack. To test this theory, I climbed on the roof and poured a cup of red-dyed water down the vent. Voila! Red water streamed down the outside of vent stack.
Had this happened after a rain storm, I would suspect water raining into the top of the vent stack. But it was wintertime and, looking down the vent stack on the roof, I could see beads of condensation on the inside walls of the PVC.
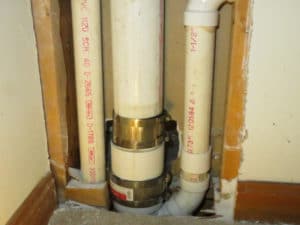
With further investigations inside, I was able to find the PVC hub where the water inside the vent stack was leaking out of the pipe and into the home. Water usage in the bathroom during the day caused enough condensation to drip down and produce a teaspoon or more of water every night, destroying the ceiling and kitchen cabinet over time.

I had to cut out a strip of drywall in a closet to access and replace the offending drain pipe. The joint had been glued without applying the purple primer, which my plumber said contributed to the leaky joint.
Interestingly, I found that a screw used to hand shelves in the bathroom had penetrated the vent stack, but this had not caused a leak. The hub was in just the right (wrong) place to catch the water dripping down the inside of the pipe. — Steve Bliss, Editor, BuildingAdvisor.com
Leave a Reply