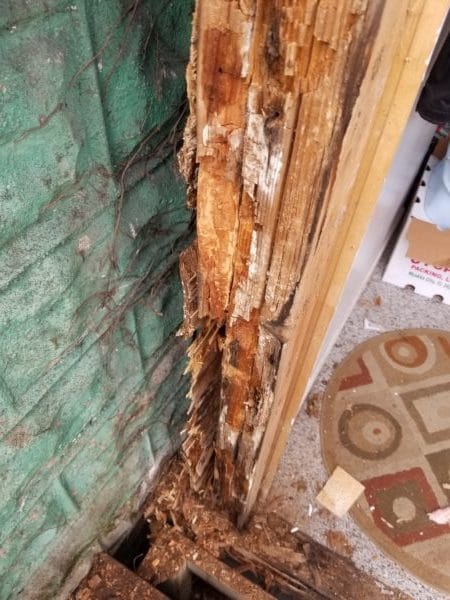
Q: What is the cause and cure for wood rot in an exterior wall? I recently noticed that the corner of my house has rotting studs from the bottom up. The exterior sheathing is rotting as well. This area was never with siding due to being approximately 6 inches from a garage wall. What is the best way to repair the wall and to prevent future problems? The house was built eight years ago in Brooklyn, NY, and I feel it should have lasted longer.
A: You are correct that a framed wood wall should last more than eight years. There are many houses over 100 years old with solid wood.
There is not enough information to pinpoint the source of the problem, but the cause of wood decay is always the same – wood that gets wet and stays wet for too long at temperatures above 40° F. For wood decay to begin, the wood must be saturated with a moisture content over 28%. But once decay fungi get started, it only needs a moisture content above about 20% to continue.
If the studs are rotting from the ground up, the bottom plate (horizontal 2×4) may also be decayed as well as the floor framing and sill – the horizontal beam along the top of the foundation. So a thorough inspected is needed.
Before attempting a repair, you’ll need to determine the source of the water. It may be drawn up from below by capillary action in the wood fibers (like water getting sucked up a straw), or it may be running down the wall from above due to leaking gutters or inadequate roof overhangs. In some cases, piled up snow or “splashback” from roof water is the source of wetting at the bottom of a wall.
Once you determine the source of the water, you’ll need to use the right combination of gutters, downspouts, wall flashing, and surface drainage to move the water away from the wall to a proper drainage area.
Once the wood has dried out, you can assess the need for repairs. Most likely, you will want to tear out the damaged sheathing and rotted framing and replace the damaged pieces. If the studs are only damaged at the bottom, you may be able to leave them in place and “sister” a solid piece alongside for structural support. In either case, you will need to remove the sheathing or drywall to gain access.
You will need an understanding of the structure to determine what you can safely remove, how much structural reinforcement is needed, and whether you need to provide temporary shoring of the structure to prevent further damage to the building during repairs.
A big issue is whether the damaged wall is a load-bearing, supporting one or more floor loads and/or roof loads. In this case, it appears that a corner post has substantial rot. Corner posts are almost always load-bearing, so shoring will be necessary before cutting or removing these pieces. If you’re not familiar with building construction, you should probably hire a professional builder or engineer oversee the repair.
Even though the wood decay will cease growing without a moisture source, the soft, rotted wood does make an attractive home for carpenter ants and other wood-boring insects. So if you leave some decayed wood in place, it’s best to treat it with a field-applied wood preservative such as Cuprinol.
Once you have replaced or repaired the damaged framing, you will want to add new sheathing (boards, plywood, or OSB), a sheathing wrap or asphalt-felt, and a suitable siding. You mentioned that this wall had no siding, so there was little protection for the underlying structure.
Even if this is just a utility wall that is not visible to the public, you need some exterior finish to shed water. At a minimum, you could use something like T-111 plywood, properly flashed to shed water.
If this is an area that is prone to moisture problems, you may want to extra protection offered by a rain-screen wall design. This type of wall is designed to drain away any water that penetrates the siding or exterior cladding.
— Steven Bliss, Editor BuildingAdvisor.com
Read more on: Fixing Bouncy & Sagging Floors
Pradeep K Nannepaga says
Are Wood Shavings On Garage Floor Signs Of Insect Damage?
Thanks for a nice article. I have wet wall in the garage (one of the corners) and see some rotten wood shavings on the floor by the corner. What kind of repair is this? Is this roof and drywall and wood repair or gutter, drywall and wood repair? What kind of contractor should I look for?
buildingadvisor says
First you need to determine the source of the leak and fix it. From your description, it is not possible to tell the source of the leak. It could be the roof, the gutter, the siding, the corner boards, or the joints and flashings where these components connect. A general contractor or roofing contractor should be able to identify the source of the leak and repair it.
Next you need to get rid of the insects. If you are seeing little piles of sawdust or wood shavings near the wet area, this is probably evidence of infestation by termites or carpenter ants. The sawdust or wood shavings left by insects is called “frass”. Termite frass is fine like sawdust or sand and usually contains their droppings. Carpenter ant frass is more like fine wood shavings.
Termites will need treatment by a pest control company. Carpenter ants will most likely abandon the site once the water source is removed, but treatment with non-toxic boric acid is always to good idea to make sure they stay away. A big difference is that termites eat wood and will keep eating until they are exterminated, while carpenter ants just burrow into the wood for living space. Ultimately, termites can do a lot more damage, but neither is good.
Finally, repair any other damage caused by the leak, such as wood rot or peeling paint. But take care of the leak and the insects first or these problems will simply return.