Q: During wind driven heavy rain, I get water coming in at the top of several windows. The single-story ho me is sheathed in plywood that is cover in poly sheeting. I removed the top outer trim on top of a leaking window and found no water behind the trim or on the exterior portion of the metal window frame.
The water appears to be coming down the sheathing BEHIND the poly. There was no evidence of water leaking or stains in the attic. The aluminum window frame outside of the mounting flange was dry. Where could this water be getting into the walls?
I live in Oakley CA, the SF Bay Area. We have not had much rain in the last couple of years, until the first of this year. Now, we are making up for it.— Peter
A: Based on your description, it’s hard to say where the water is entering.
Are you sure it is poly sheeting on the exterior of your wall. Most builders use a vapor-permeable housewrap such as Tyvek or Typar, which allows some drying to the exterior. I’ve never seen poly used on the exterior of a building.
Most leaks at the top of windows are a result of window flashing mistakes at along the head flange or head flashing. If the top window flange or cap flashing is not properly tied into the housewrap, then any water that penetrates the outer wall above the window can enter your house.
However, since the water is on the back of the poly/housewrap, that suggests that the water is entering well above the window, probably in the roof, soffit, eaves, or rake.
You also mentioned that the problems occur only during heavy, wind-driven rain. During wind-driven rain can enter very small gaps and even move uphill – both by wind pressure and capillary action. So it’s possible that the wind is driving rain in or around the head flashing and it is drawn upward by capillary action. If so, the water should be localized above and around the window and not farther up the wall. Most leaks should be on the windward side of the house.
A third possibility is that the wind is driving the rain up through the laps in the siding and through the nail holes, putting some water behind the poly/housewrap. Lap siding is not a waterproof system, as discussed in the article above. If the siding is the source of the leakage, you should see evidence of water leakage throughout the windward side of the house – not just around the windows.
Can you provide some additional details about the type of siding, roofing, gutters, window flashing, and visible areas of leakage on the interior or exterior. Also are you sure that the weather barrier is poly sheeting rather than a housewrap such as Tyvek or Typar. Photos would also be helpful. — Steve Bliss, BuildingAdvisor.com
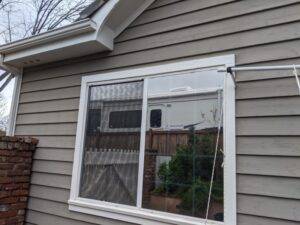
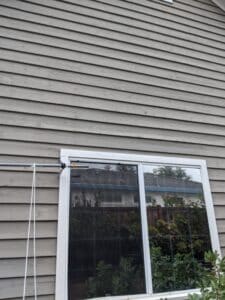
Peter Responds: The siding is lapped cedar plank and the window moldings are also cedar (see photo). The windows are aluminum as are common in our area, with a 1-in. mounting flange under the top trim piece.
Some of the windows have gutters and 1-ft. overhangs above. When I first moved in, the Living Room window (sz) was the first to leak. I found the downspout at that location was plugged and water from the valley above was overflowing the gutter and getting behind the siding. The roofing is concrete tile.


The leakage is appearing inside the house at the top of the window very close to the glass. There is no flashing I can see except for the mounting flange on the window frame. The trim pieces above the windows are very well caulked. The house was painted in late 2018. The paint and caulking are in good shape.
We have leaking windows on two sides of the house – mostly in areas with overhangs, except for the dining room window.

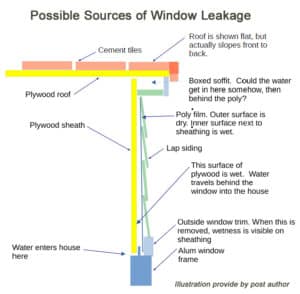
I have included some photos and a sketch (ab0ve) of what I see as to construction. When I took the top window trim off the bathroom window, I could see a little behind the siding. I could also lift up a bit of the poly. It is black polyethylene, not Tyvek, etc.
Steve Bliss, of BuildingAdvisor.com responds: Thanks for the pics and diagram. Window flashing leakage is one of the most common problems in modern home construction. It started with the introduction of flange-type windows and sheathing wraps. There are several different approaches, to flashing and sealing flange-type windows, but not a 100% consensus on the best practices.
While your window flashing is not up to current standards, and depends mainly on caulking around the windows, it’s unlikely that that the windows are the main cause of the problem. In that case, you would be finding water collecting below the windows as well.
The fact that you are only finding water behind the poly sheeting strongly suggests that water is entering well above the windows. If that’s the case, the windows are just an obstacle to the water flowing down the sheathing, creating a water buildup.
The source of water leakage can take a lot of detective work to pinpoint. It’s often the small details – like how the gutter attaches to the eaves – that makes the difference. I’d suggest getting up on a ladder, block your downspout, and flooding your gutter to see where the water backs up and where it appears below. (In some cases, I have added red dye to the test water to see where it comes out lower in the building.)
Also try spraying water horizontally at the edge of the roofing, simulating horizontal rain. This is a vulnerable spot, especially if the roofing it tile.
A few thoughts:
I have never heard of anyone using polyethylene on the outside of the sheathing as a weather barrier. Any water that gets trapped behind the poly is going to sit there a long time and could lead to wood decay. Some slow drying might occur towards the interior, depending on the type of insulation and interior vapor retarder. If you ever redo the siding, by all means use a modern draining-type sheathing wrap.
As a short-term fix, remove the top window casing, tape the top window flange to the plywood with bituminous flashing tape (after drying and cleaning the plywood). Lap the poly/sheathing wrap over the flashing tape, taping any cuts and holes in poly with construction tape – but don’t seal the bottom edge of the poly. Leave it open for drainage.
Next, reinstall the top piece of window trim with a metal drip cap over the top. Seal the top leg to the poly (or sheathing wrap) with a second piece of flashing tape. Then make sure you leave a drainage gap between the bottom edge of the cedar window trim and the window frame. Also, at the bottom of the window, leave a horizontal gap between the window trim and the siding. Given your problems, I would also leave a 1/4-inch drainage gap behind the window head flashing – using vertical ¼-inch spacers every few inches.
In general, horizontal gaps at windows and other exterior details should never be sealed or caulked – they must remain open to drain to the exterior.
Ideally, the windows have pan flashing under their sills that drains out to the exterior of the house, but this step is often skipped by builders. Pan flashing catches any water flowing down the sides of the window frame, or through gaps in the sill, and directs the water to the exterior below the window.
If you can’t identify a likely entry point for water from above the windows, and don’t find evidence of water penetration at the roof or eaves, my best guess is that water is entering the siding at lap joints and nails from wind pressure/capillary action. Lapped wood siding is NOT a water-tight cladding. Not sure how so much water is getting behind the poly, but there could be gaps or reverse laps in the poly – or water could be following the nails through the poly.
If that’s the case, you should be seeing water draining down to the bottom of walls around the house – not only at windows. If water is appearing only at windows, then scratch this theory.
As you put things back together, remember to always install upper layers of material over lower layers, shingle-style, directing water to the building exterior. And provide the water with an outlet to the exterior – either a drainage gap or weep holes.
Peter Responds:
I am leaning towards the gutters as the cause of leakage, but the dining room window is nowhere near a gutter. The outer side of the poly is dry and dusty. The inner side, and the plywood sheathing is wet.
We are expecting another atmospheric river to his us in the next few days. I will then get on a ladder and look at water coming down the valley and see how the gutters are handling it.
I also will check to see if any water is present behind the sheathing where it overlaps the foundation. There are no wet spots or water stains anywhere in the attic.
The house was built in 1992. The roof is made of cement tiles and rather steep. I have avoided doing anything on the roof. I installed my solar system on a trellis behind the house to avoid that potential for damage. Again, thank you so much for your time.
John Mason says
Cost to Fix Rot, Mold & Termite Damage from Window Leak
I have a Home with stucco on the outside of the house and have a leak coming in from the upper two-story window. The home was built in 1989 and someone has sealed around the outside of the windows which I think is fine, and unfortunately plugged up the weep holes accidentally. ..which caused a leak into the home on the windowsill inside the home. I cleaned out the weep holes, and that water leak is no longer occurring, The windowsill is no longer is getting water on it and the water weeps out the outside of the bottom of the windowsill as it’s designed to do. I believe if I seal around the outside of the window where it meets the stucco upstairs, that will stop all possible leaks downstairs into the family room, where it has invited in moisture & termites.
I have discovered termites in the beam downstairs and moisture where this has been occurring for years and it may be that Beam needs replacing now due to the moisture & not to mention the subterranean termites that have come in from under the deck outside where the sliding glass door is, below the upstairs window, downstairs. There is also a patio cover that is bolted to the outside of the wall downstairs where the sliding glass door stucco is bolted onto it. It also has leaks so we suspect we will have to take that patio cover off and repair the stucco where it was bolted on to the home because it leaked also onto that beam through the bolt holes and through the bad stucco where it meets the top of the sliding door.
Do you know anyone who specializes in taking off the sheet rock inside the home downstairs, replacing rotted wood and overhead beams with termites in it and can protect us from possible mold while he’s doing the work? The reasonable cost part is the scary part because a termite company that specializes in mold wants to charge close to $100,000 to fix this problem and I don’t think it’s $100,000 job. I live in the Fairfield area and it’s difficult to find, not to mention I do not know the right person to call, to find the right person to fix these issues.
Thank you John.
buildingadvisor says
The job you describe has a lot of pieces and a lot of unknowns. You say the beam “may” need replacing and you “suspect” that the patio cover may need to be removed and the stucco repaired. You also speculate that you can stop the window leakage with exterior caulk. You could test this approach and monitor for leakage. If it works, you may be able to avoid re-flashing the window – as long as you monitor and maintain the sealant (use only the very best).
Given the unknowns, it would be difficult for any contractor to give a fixed-price bid and guarantee the work. If they do, they are going to assumed the worst-case scenario and pad the bid to cover any problems they discover once the work is underway. The bid may still include allowances and contingency costs for changed or hidden conditions, allowing the contractor to charge extra for additional work.
The other approach is cost-plus, where the contractor bills for time and materials, plus a mark-up percentage. On cost-plus bids, owners are given an estimate, but it is non-binding. A reputable contractor will give a detailed good-faith estimate of actual costs, but some cost-plus estimates are less detailed and less accurate. All costs are passed on the customer unless the contract includes a maximum price.
The work, as described, includes interior carpentry (drywall, trim, painting, etc.), demolition, structural repairs, termite control, and mold remediation. It may also include stucco removal and repair, as well as repair of stucco flashing around the window and patio cover attachment.
One of the biggest unknowns is the extent of wood decay and termite damage that needs removal and repair. I don’t know the type of beam that is damaged, but if it is a main carrying beam that supports floor joists and other loads, it is a big job to remove and replace it. Also some the floor/ceiling joists may need repair or replacement.
Not sure what the mold/termite company included in their $100K “estimate.” Was this a detailed estimate or an off-the-cuff number tossed out to see if they wanted to invest the time needed to prepare a detailed estimate. Would they function as a general contractor to complete all the necessary work?
Because so many trades are involved, you would need a general contractor to coordinate the work and hire the necessary subs – including carpentry, stucco, structural repair, and mold and termite remediation. You may also need an engineer at some point to specify the structural repairs needed.
Given the cost and complexity, you might want to start with an engineer or other independent party to inspect the property and specify the necessary repairs. This will probably involved removing some finish materials to inspect the underlying structure. Once you have a detailed repair plan you can put it out to bid to two or three remodeling/repair contractors. Look for a structural engineer with extensive experience with residential renovations.
I agree that $100K sounds too high for the scope of work described. However, if you are in a high-cost area, and the repairs are extensive, your final cost will be in the tens of thousands of dollars. I still get sticker shock every time I hire a contractor.