Q: I’m currently dealing with insulating a cathedral ceiling, which has become a major issue. I’ve been researching solutions but feel stuck in figuring out what’s the best way to go about dealing with the problem.
I have a shed roof with 2:12 pitch, built with 2×8 roof joists. It’s a mobile home that’s 14×76, so the roof is just one continuous slope. I live in northern Oregon with lots of rain in my area and occasional freezes.
The issues began when I discovered that my newly installed asphalt shingles never got sealed by sun exposure, creating a massive roof leak. I ended up gluing them with Henry’s Wet Patch adhesive, which seems to have solved that problem.
The second issue is that I’m one of those people who was after the highest R-value in the ceiling. So I used R-30 faced fiberglass insulation which didn’t leave any vent space beneath the roof sheathing. I pulled the insulation out and used plastic vent channels beneath the sheathing, then stuffed R-30 back in there, compressing it a little.
A few days later I checked, and saw that there was lots of moisture accumulation on the bottom of those plastic spacers. I’m talking about visible large droplets along the entire bottom surface of the spacers!
I want to mention that I do have vent holes in both bottom and top eaves. After reading your comments on a previous cathedral ceiling question, I’m wondering if I should thin out the R-30 batts to where it is closer to R-15, take those plastic spacers out, and then screw foil-faced foam board beneath the roof joists.
Or should I just take the fiberglass out and use only foam boards. Another thing I’m considering is whether the moisture that I’m seeing is from roof sheathing drying after that roof leak…
I’m about to re-do the ceiling for the third time and really want It to be finally done right. Please advise if you can. Thank you – I appreciate your time! — Ilya
A: Let’s start at the top. Most asphalt roofing manufacturers recommend a minimum slope of 4:12. For roofs between 2:12 and 4:12, they typically recommend double-coverage underlayment (that is, lapped 19 in. for a 36 in. roll) or peel-and-stick membrane, which would be my preference, especially in a wet climate like yours. So the water you are seeing on your plastic spacers could be from roof leakage.
Moisture Sources
Most likely, however, the water droplets are condensation of moisture from inside the house. Warm interior air is always moving upward in cold weather due to the stack effect. The plastic vent baffles are the first cold surface reached by moist interior air that leaks into the roof structure in cold weather.
So the plastic vent baffles become the “plane of condensation”. Whenever a cold surface is below the dew point of the surrounding air, condensation will occur. Think cold beer can on a hot, humid day.
In a small house like yours, the indoor humidity is often high when the house is closed up in cold weather. Spot ventilation can help, especially in the kitchen and bathrooms. If you have condensation running down the inside face of double-pane windows, that’s an indication that indoor humidity is too high. If spot ventilation is not enough, whole-house ventilation may be needed. A timer on a bath fan is the simplest, cheapest approach.
Airtight Air Barrier
The other key to keeping moist air out of your roof structure is an airtight air barrier at the ceiling level, below the insulated rafter cavities. This can be achieved in a number of ways. The most common are
- Foamboard that is carefully taped at the seams and sealed around the perimeter with canned foam
- Drywall that is carefully sealed to the framing with high-quality gaskets and sealants at all junctions wit exterior walls and interior partitions
- A continuous vapor retarder such as Certainteed MemBrain that is taped at seams and sealed around the perimeter of the ceiling.
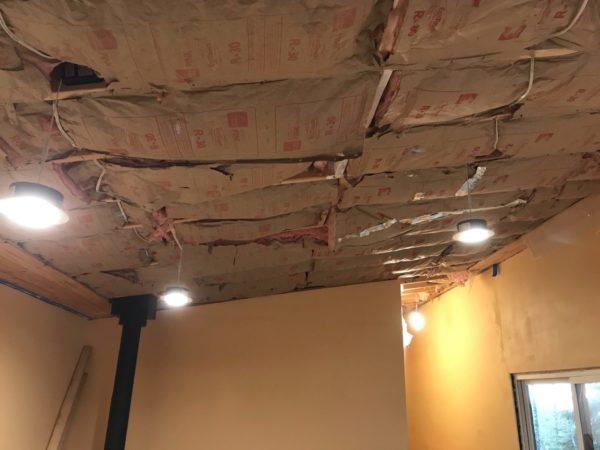
With all of these approaches the the ceiling air barrier should be continuous with the exterior wall air barrier, with no gaps. It it also important to seal any holes in top plates of walls and partitions that might bypass the ceiling air barrier, allowing a path for moisture into the the roof cavities. Finally, don’t installed recessed lights or other ceiling fixtures unless they are special air-sealed units. Don’t make any other holes in the ceiling air barrier (pic below).
Roof Ventilation
Roof ventilation also helps, but it should not be the main defense against condensation under the sheathing. Its main purpose is to reduce ice dams in winter and reduce overheating of the roof in summer. Roof ventilation may also increase the lifespan of roofing shingles. You should definitely keep the roof ventilation unless you are using a “hot roof” design with closed-cell spray foam – a workable, but expensive approach.
With moderate indoor humidity and a tight ceiling air barrier, you can use whatever type of insulation you want. If you have the headroom to place 1-2 in. foam boards below the joists, that’s a good way to go. If you use 1 in. foil-faced foam (R-6-7) plus a 6-in. R-19 batt, you’re getting close to the R-30 minimum for roof insulation required by many codes. It also greatly reduces thermal bridging though the joists. Any type of foam board will work.
The R-19 batts leave 2 in. for the recommended vent space under the roof sheathing. High-density 6-in. batts provide R-21. If you can add an air space below the foil facing by furring down the drywall, you get an extra R-3 approximately.
There’s nothing magical about the R-30 number, which is built into the codes based on the lower cost of attic insulation vs. wall insulation, but does not account for the higher cost of cathedral ceiling insulation. The higher insulation requirement in roofs has nothing to with the fact that “heat rises” as many people believe. But it is the rule in most energy codes. — Steve Bliss, BuildingAdvisor.com
Read more on Cathedral Ceilings:
Combining Spray Foam & Fiber Insulation
Insulating with Spray Foam
Insulating with Foam Board
How to Seal Unvented Cathedral Ceilings
See also Sealing an Unvented Cathedral Ceiling Insulating Cathedral Ceiling With Foamboard
J.P. says
Found Water In Cathedral Ceiling When Installing Can Lights
Had a question about insulated cathedral ceiling I have a insulated cathedral ceiling and just got done sheetrocking mudding texturing painting went to put the can lights in by the way I have 12 can lights in this lid and I noticed that there was some water between the baffles and the insulation now I can understand there might be some residual moisture from the texturing painting and mudding we did use electric heaters during the whole process to heat the room but the holes were cut prior to all that so I’m imagining that air went through those holes gathered on top of the insulation in the bottom of the baffles .
right now I have all the lights out and insulation open a little bit so air will move through there to dry it out is there any other path forward I should be looking at?
buildingadvisor says
Recessed lights are one of the leading causes of moisture problems in cathedral ceilings (and attics). Most can lights leak large amounts of air, which carry water vapor into the roof cavities. So it’s best to avoid recessed lights in cathedral ceilings. However, if you are determined to have can lights, some are better than others.
You can use ICAT (insulation-contact-air-tight) which are able to safely touch the insulation and designed to not leak air. However, some are air-sealed better than others, so it would be wise to conduct a blower door test to see if any additional sealing is necessary around or within the can lights.
Some canless LED recessed lights can also be installed in an airtight manner — if the holes are cut precisely and the units have strong clips and good quality gaskets. As with ICAT fixtures, some canless lights seal better than others. Also, when they burn out, the whole LED unit needs to be removed and replaced. While they claim to last 20 years or so, that has not been my experience with LED fixtures. Some last for years, while other fail in short order.
Read more about Sealing Cathedral Ceilings
JP says
How To Install Recessed Lights in Cathedral Ceiling?
Had a question about insulated cathedral ceiling I have a insulated cathedral ceiling and just got done sheetrocking mudding texturing painting went to put the can lights in by the way I have 12 can lights in this lid and I noticed that there was some water between the baffles and the insulation now I can understand there might be some residual moisture from the texturing painting and mudding we did use electric heaters during the whole process to heat the room but the holes were cut prior to all that so I’m imagining that air went through those holes gathered on top of the insulation in the bottom of the baffles .
right now I have all the lights out and insulation open a little bit so air will move through there to dry it out is there any other path forward I should be looking at
buildingadvisor says
Recessed lights are one of the leading causes of moisture problems in cathedral ceilings (and attics). Most recessed lights leak like a sieve and the leaking air carries large amounts of water vapor into the roof cavities.
You can use ICAT (insulation-contact-air-tight) can lights, which are designed not to leak air and can safely touch the insulation. However, ICAT lights seal better than others, so it would be wise to conduct a blower door test after installing the light to see if any additional sealing is necessary. In addition to the lights, you may identify other leaks the cathedral ceiling that should be air-sealed.
Some canless LED recessed lights can also be installed in an airtight manner — if the holes are cut precisely in the drywall and the units have strong clips and high-quality gaskets. As with ICAT fixtures, some canless lights seal better than others. Also, when they burn out, the whole LED unit needs to be removed and replaced. While manufacturers claim that LED units last 20 years or so, that has not been my experience. Some last for years, while other fail in short order.
Ray Armstrong says
Can We Insulate Attic Floor With A Foamed Roof?
We have open-cell foam sprayed between our rafters and our attic is unvented. We also have open cell sprayed in the exterior walls, Can we also have fiberglass insulation put in the ceiling , without causing a problem. Will the added fiberglass help ?
buildingadvisor says
Not sure what climate zone you are in or what you have for vapor retarders, moisture levels, and ventilation systems.
However, in general, it’s not a great idea to insulation both your rafters and your ceiling. When you insulate your rafters, your attic becomes part of the “conditioned” portion of your home — that is, it is heated and cooled along with the rest of your home — whether or not you do this intentionally or not.
Assuming that that the attic is not heated or cooled, you will make the attic hotter in summer and cooling in winter when you insulate the ceiling. The more insulation you use, the greater the effect.
In cold weather, you could cool the attic enough that condensation on your roof framing or sheathing could become a risk — depending on the moisture levels in the house and outdoor temperature.
So if you want to add more insulation to the attic, put it between the rafters or on the underside of the rafters. A good approach is to add a 1-2 inch layer of rigid foam board to the underside of the rafters — taped or foamed at joints and edges to block any air leakage. This reduces thermal bridging through the rafters, boosting the overall R-value significantly.
Rob Armstrong says
We are building a 600 sq ft master bedroom addition. Vaulted ceiling with an 8/12 pitch using pre-built trusses for half of that, traditional ceiling in the rest (bathroom and closet.) I hadn’t planned on using any vapor barrier but seems like I should after reading some of the answers here. I think I will use the Certainteed MemBrain product for both the walls and the ceiling. For the vaulted ceiling I was planning on running the premade baffles from the soffit up to the ridge vent but am wondering if that is adequate or if I need to cut rigid foam panels to fit between the trusses? Eastern Iowa location – hot humid summers in the 80’s/90’s, cold winters, often below zero.
buildingadvisor says
There are many ways to insulate cathedral ceilings — each with pros and cons. If there was one perfect solution, everyone would be using it.
You are building in a pretty moderate climate, which is more forgiving than a very cold climate. That gives you more options.
In answer to your questions:
– A vented assembly is more forgiving than unvented. If water gets into the roof assembly either from below (via leakage of household air) or above from a roof leak, then the roof can dry out. With more than about two inches of closed-cell foam applied to the underside of the sheathing, you will have very little drying toward the interior. And with a “ice guard” membrane on the entire roof, you will have virtually no drying to the exterior.
– As for interior and exterior caulking to keep moisture out of a roof — even if that were possible, caulk joints do not last forever. The more complex the structure, the harder it is to block every conceivable air leakage path into the roof structure. Remember, in cold weather, warm moist air is moving upward (like a hot air balloon) looking for every possible leakage path. A building system that depends on perfect workmanship is asking for trouble.
– As for open-cell vs. closed-cell foam, closed cell is a lot more expensive and much less permeable to water vapor transmission. However, both open- and closed-cell foam are effective sealants against air leakage if applied skillfully.
— Closed-cell foam is usually sprayed against the underside of the sheathing with no ventilation. It provides high levels of insulation, an effective air barrier, and a vapor barrier all in one material. However, with impermeable roofing (or underlayment), you are taking a risk that the roof framing or sheathing could get wet and stay wet for a long time and cause significant damage.
— Open cell foam provides moderate insulation levels, an effective air barrier, and a vapor retarder — which may be adequate for your climate.
With your roofing membrane, I would recommend either vent channels, as you suggest, or a system that can dry to the interior. The could be open-cell foam or 2 inches of closed-cell foam and filling the rest of the cavity with fluffy insulation.
Another option, if you are using vent baffles, is to use batts or blown insulation with a good vapor retarder and air barrier at the ceiling level. This could be a smart vapor retarder such as MemBrain, or the airtight -drywall-approach. If you go this route, have the air barrier tested with a blower door.
Finally, with dimensional lumber rafters, you would also need to think about thermal bridging, but this should be minimal with 16-inch TJIs.
Kin Lowe says
How To Insulate Cathedral Ceiling With Scissor Trusses?
I live in the Dallas Texas area—Hot summers and some freezing winter weather. I will have 1/2″ OSB decking and a metal roof over the cathedral ceiling. The trusses are factory made all 2×6 and on 24″ centers. The roof pitch is 8/12 and the cathedral ceiling (inside pitch is 5/12.) My question is: Can I treat the cathedral ceiling just like a normal 5/12 pitch house with a 8′ ceiling, no insulation on the decking and R30 between the ceiling joists? There is dead air space between the 8/12 roof decking and the 5/12 ceiling, some 18 inches at the ridge peek and as little as 6 inches a the tail of the rafter, If I cobbled the foam board between the ceiling joists and put a vent ln place so the insulation would not get into the soffit, then why could I not put R30 insulation between the 2×6 ceiling joists since there would be nothing to press down on the top of the insulation. There will also be a gable vent to work with air flow from the soffit,
buildingadvisor says
The short answer is yes. You can insulate with R-30 batts at the bottom of the trussses. With an attic-like air space above the insulation, your roof should act like an ordinary, insulated attic. These tend to be more forgiving than cathedral ceilings as long as you have adequate ventilation. A continuous ridge vent would be better than gable vents, but in a mild climate like yours, generous sized ridge vents might suffice.
You want to make sure that you have enough insulation at the eaves, as well as 1-2 inch ventilation channels near the eaves where the vertical space for insulation is limited. Your trusses can be designed with raise heels to provide more space for insulation at the eaves.
To create vent channels near the eaves, you can buy off-the-shelf baffles such as Durovent, or build your own with rigid insulation, OSB, or just about any thin, rigid material.
It sounds like you may be using foam board near the eaves, for this purpose, One advantage of foam is that you will be able to improve the R-value near the eaves where you may not have the space for R-30 batts.
The other point that is crucial here, and for all cathedral ceilings in cold or mixed climates, is to create an airtight air barrier at the ceiling level — using either a barrier material such a “smart” vapor barrier or installing the drywall ceiling in an airtight manner, called the “airtight drywall approach.” Avoid the use of recessed lights or making other holes the ceiling that are difficult to air seal.
The goal is to keep moist household air out of the roof cavity, where it can condense on the bottom of the sheathing in cold weather.
You can read more at these links:
Cathedral Ceilings, Combining Spray Foam & Fiber Insulation
Cathedral Ceilings, Insulating with Spray Foam
Cathedral Ceilings, Insulating with Foam Board
Cathedral Ceilings, Unvented, How to Seal
Mark says
What’s Wrong With Poly Vapor Barrier?
On all the information above it’s not clear on why a air tight vapor barrier would not also collect moisture on the plastic causing the sheet rock to get wet where it touches the plastic barrier when you screw onto the rafters – the plastic is the same it has two sides – on will be exposed to colder temps for the vented ceiling and the other the heat will hit from inside the house producing moisture
As the heat crosses through the sheetrock or heats the sheetrock
So my concern is – I have a vented ceiling with baffles cathedral – and some say no plastic barrier 6 mil as recommended and others say your doomed without it – so will the plastic barrier itself get condensation causing wet sheetrock?
Common sense would say yes. Correct?
buildingadvisor says
The vapor barrier/retarder goes on the winter-warm side of the roof assembly — that is, just under the drywall (or it could be the paint on the drywall).
Condensation does not form on the vapor barrier because it is nearly the same temperature as the indoor air. So it is well above the “dew point” of the interior air. You will not get condensation there unless the space is as humid as a small bathroom after a long hot shower, where condensation will form everywhere.
Condensation forms when warm, moist air hits a cold surface — like the outside of a cold beer can on a hot, humid day.
Poly vapor barriers have largely fallen out of favor as they are unforgiving. If you do get condensation on the roof sheathing (or a roof leak) and it drips down, it hits the poly and is trapped. Kraft paper, smart vapor barriers, and painted drywall allow some drying to occur towards the interior.
Also, it’s important to distinguish between a vapor barrier/retarder and an air barrier. As it turns out, most of the moisture that finds its way into a roof cavity is caused by air leaks. Air can leak into the rafter cavities around recessed lights, the tops of walls and partitions, and openings in the ceiling for chimneys and mechanical systems. Because of the stack effect, warm interior air is moving upward continuously throughout the winter months. (See the illustration “Typical Ceiling Air Leaks” in this article).
Much less moisture moves by diffusion through building materials. That is controlled by the vapor retarder (or “barrier” is the case of impervious materials like 6-mil poly).
Bottom line: Pay a lot of attention to sealing air leaks into the roof cavities. Don’t worry so much about the vapor retarder. It does not need to be airtight like an air barrier. Unless you have very high indoor humidity levels, Kraft paper or a primer and two topcoats of paint will do the job. If you are concerned and want to spend the money, install one of the smart vapor retarders under the drywall.
Mark says
Here is what I have so far
Baffles all sealed stapled and caulked batts is in vented out the top – so now I’m going to staple on the 6 mil plastic to the rafters tight and tape all seams keep it flush tight and no folds – then sheetrock over. Correct?
See photo.
Thanks
buildingadvisor says
Baffles look good. With the insulation, the kraft-paper facing will work as you vapor retarder. It’s a little better to staple the paper flanges over the studs (face-stapling) rather than to the sides of the studs (inset-stapling). This prevents compression of the batts along the edges and pockets of air – but I wouldn’t lose sleep over it as the effects are modest.
For the air barrier, you could use poly as you suggest – taped at all seams and sealed to framing around the perimeter. As I mentioned earlier, not many builders in the U.S. use poly anymore due to potential to trap moisture from roof leaks or condensation under the roof sheathing.
Alternative are smart vapor barriers such as Membrain or using the drywall itself as the air barrier – called the Airtight Drywall Approach. This requires a good taping and mudding of all joints in the drywall and sealing the drywall to the framing around the perimeter of the ceiling. This can be done with high-quality gasketing material or high-quality sealant – such as polyurethane caulk.
Peter says
First of all, thank you for this article and lively discussion. It has been a huge help in my research.
Cathedral Ceiling Retrofit With Fiberglass and Foam
I live in Southern California within 5 miles of the Coast (Climate Zone 3B). I have an UNVENTED cathedral ceiling, and am about to replace the existing cedar shake roof with an asphalt shingle roof. The rafters are 2×6, and there are 1×4″ strips of skip sheathing attached to the outside of the rafters, spaced every 4 inches from the edge to the ridge of the roof. The inside face of the rafter assembly is two layers of drywall and one layer of plaster at about 1.25″-1.5″ thick.
Here is my planned rafter assembly working from the inside to outside. Interior drywall and plaster to remain as is. Fill the cavity between the interior drywall and skip sheathing with unfaced fiberglass insulation. Leave the 1×4″ skip sheathing in place and attach 1.5″ of EPS rigid foam on top of the skip sheathing. Then 1/2″ OSB sheathing, roof paper, and then finally the asphalt shingles.
My main concern is preventing condensation and allowing any moisture (from leaks) to dry out. I’m less concerned about insulation. To that end, I have a few concerns and questions:
1) The 1/2″ OSB sheathing will be sandwiched in between two relatively vapor impermeable layers (i.e. the ESP on the inside, and the roof paper/shingles on the outside). If any leaks occur, there is no where for this layer to breath or dry. Is this a valid concern?
2) Because of the skip sheathing, there are air gaps in between the fiberglass insulation and the EPS layer. Do I need to be worried about this?
3) Would it be better to vent the cathedral ceiling with ridge and soffit vents? In that case, we would only insulate the cavity enough to maintain a 1-2″ ventilation space at the top of the rafter cavity.
Appreciate any input of advice you have! Thanks.
buildingadvisor says
You live in a mild climate where condensation in cathedral ceilings is not a big concern.
If you look at Table 1 in this article on combining foam and fiberglass, you find that in your climate the exterior foam should comprise at least 17% of the total insulation R-value. With 5-1/2 inches of fiberglass (R-19) plus 1-1/2 inches of EPS (R-5.4), your total R-value is R-24.4, so the foam portion should be at least R-4. More is better, but these numbers are fairly conservative, so you shouldn’t need to worry about interior air condensing on the underside of the foam. To increase the R-value, you could consider upgrading to extruded foam.
The answers to your other questions are a little more tricky:
1) With a cathedral ceiling, water from roof leakage is always a concern. Even with a vented system, a persistent roof leak is likely to damage the sheathing. But with an unvented system, the damage is likely to be more rapid and more severe. And with any cathedral ceiling the damage will be difficult to locate, inspect, and repair. To keep any water out of the rafter cavities where water damage would be more severe (rotted rafters vs. degraded OSB), I’d recommend taping the EPS joints with high-quality construction tape. Preventing any roof leaks with a peel-and-stick underlayment would also be worth considering. Also I’d suggest upgrading to 5/8-inch OSB for a sturdier assembly.
2) No, ¾-inch air gaps here are not a problem.
3) Yes, a ventilated roofing assembly gives wet sheathing or rafters a chance to dry out before damage occurs (a downside of your climate is that it’s warm enough for wood decay fungi to grow year-round). You would want to use insulation baffles to keep the vent space open. Of course, there’s no reason to put foam insulation above the vent channels as it no longer provides any insulation value. So you end up with only a few inches of fiberglass. Another option would be to fill the 2×6 cavities with fiberglass and create a vent channel above the skip sheathing by adding 2x4s above each rafter. Then nail the roof sheathing to the 2x4s. If you want more than R-19, you could still use the foam and ventilate above the foam – not a common detail, but should be workable.
One thing I don’t understand is how you plan to insulate the roof cavities without removing the skip sheathing or the finished ceiling?
Gayle Wilson says
Can I Use Foamboard Instead of Spray Foam On Gambrel Roof?
Howdy from Northern CA. I’m turning a shed into a livable space for adult child who may need to return home for a bit. I’ve successfully added on a bathroom and am using a professional plumber and electrician. Problem in this gambrel roof is moisture on the paper faced batting. There are no eaves and I’m trying to avoid cutting a line along the roof edges and installing shingle over edge vents and then getting a pro to do a ridge vent (I’m too old to get up there), add baffles and then reinsulate. We don’t have any closed cell foam installers here. From all the reading I’ve done, it appears the following is doable but I need to know for sure (FYI the ceiling finished material will be reclaimed redwood fencing I’ve been collecting).
Put a combo of closed cell foam board between each 2×4 rafter (maybe 1 1/2″ cheaper styrofoam board + 2″ pink foam board) and then use canned foam to fill any gaps. Does this sound okay (I’m okay w/ the labour)? Would I want a vapour barrier covering all of that before nailing up the redwood (which will not be gap free)?
Finally, would it be okay to do all this just on the upper portion of the gambrel roof, i.e., not both sections on each side?
Thank you so much!
buildingadvisor says
What you’re describing is sometimes called “cut-and-cobble,” where you cut many strips of foam board and cobble them together to form a more-or-less continuous layer of foam insulation.
You get some of the benefits (and downsides) of spray foam, but it is very difficult to achieve the same level of air sealing using foam board sealed with canned foam, tape, and caulk. So, yes, you should use canned foam to fill the gaps as best you can, but unless you can test with a blower door, don’t assume that you have an airtight assembly.
To be on the safe side, you definitely want an airtight air barrier between the foamboard insulation and the redwood ceiling. The best product to use (and most expensive) is one of the “smart” vapor retarders, such as Certainteed MemBrain, installed in an airtight fashion with taped seams and sealed around the perimeter. This will allow drying to the interior in the event that moisture collects in the ceiling cavity, either from condensation or a roof leak.
Not sure why you would want to use this approach only on the upper sections of the gambrel roof, but it would be possible to use another approach on the lower gambrel sections, as long as you have proper control of air and moisture.
buildingadvisor says
The vapor barrier/retarder goes on the winter-warm side of the roof assembly — that is, just under the drywall (or it could be the paint on the drywall).
Condensation does not form on the vapor barrier because it is nearly the same temperature as the indoor air. So it is well above the “dew point” of the interior air. You will not get condensation there unless the space is as humid as a small bathroom after a long hot shower, where condensation will form everywhere.
Condensation forms when warm, moist air hits a cold surface — like the outside of a cold beer can on a hot, humid day.
Poly vapor barriers have largely fallen out of favor as they are unforgiving. If you do get condensation on the roof sheathing (or a roof leak) and it drips down, it hits the poly and is trapped. Kraft paper, smart vapor barriers, and painted drywall allow some drying to occur towards the interior.
Also, it’s important to distinguish between a vapor barrier/retarder and an air barrier. As it turns out, most of the moisture that finds its way into a roof cavity is caused by air leaks. Air can leak into the rafter cavities around recessed lights, the tops of walls and partitions, and openings in the ceiling for chimneys and mechanical systems. Because of the stack effect, warm interior air is moving upward continuously throughout the winter months. (See the illustration “Typical Ceiling Air Leaks” in this article).
Much less moisture moves by diffusion through building materials. That is controlled by the vapor retarder (or “barrier” is the case of impervious materials like 6-mil poly).
Bottom line: Pay a lot of attention to sealing air leaks into the roof cavities. Don’t worry so much about the vapor retarder. It does not need to be airtight like an air barrier. Unless you have very high indoor humidity levels, Kraft paper or a primer and two topcoats of paint will do the job. If you are concerned and want to spend the money, install one of the smart vapor retarders under the drywall.
Gayle Wilson says
Howdy from Crescent City, CA. I’m turning a shed into a livable space for adult child who may need to return home for a bit. I’ve successfully added on a bathroom and am using a professional plumber and electrician. Problem in this gambrel roof is moisture on the paper faced batting. There are no eaves and I’m trying to avoid cutting a line along the roof edges and installing shingle over edge vents and then getting a pro to do a ridge vent (I’m too old to get up there), add baffles and then reinsulate. We don’t have any closed cell foam installers here. From all the reading I’ve done, it appears the following is doable but I need to know for sure (FYI the ceiling finished material will be reclaimed redwood fencing I’ve been collecting).
Put a combo of closed cell foam board between each 2×4 rafter (maybe 1 1/2″ cheaper styrofoam board + 2″ pink foam board) and then use canned foam to fill any gaps. Does this sound okay (I’m okay w/ the labour)? Would I want a vapour barrier covering all of that before nailing up the redwood (which will not be gap free)?
Finally, would it be okay to do all this just on the upper portion of the gambrel roof, i.e., not both sections on each side?
Thank you so much!
John says
Can I Use Drywall As Air Barrier in Cathedral Ceiling?
Hi. I’ve been pouring through a bunch of your articles and comments on the topic of insulating/air-sealing a cathedral ceiling and have learned a ton…but still not clear on a couple points before I start work on an unfinished space. The building is two stories and roughly 30’x30′ and is currently unfinished (bare studs). It has a metal roof with 3:12 pitch (property is in the western part of South Carolina). The first floor will be a workshop and the second will be a finished space (office/guest space/kitchenette etc.) with cathedral ceiling. I plan to connect the large soffit vents to the ridge vent with baffles and then add fiber insulation followed by drywall.
The info on your site caused me to pause my plans to make sure I’ve accounted for possible moisture movement through the finished ceiling. Do I need to add another “layer” of some sort between the insulation batts (bare or craft faced?) and the drywall? Or just ensure that the drywall is taped well and any cutouts are sealed as well as possible? There will be ceiling fixtures installed (fans, LED wafer lights), which I know are not ideal for moisture movement but hard to avoid.
Also, when I install the rafter baffles (I’m using Durovent baffles) do I need to orient the overlap from one to the next (going up the rafter bay) in a particular way? For airflow up to the ridge vent, it would make sense to have the next higher baffle start under the lower one…but I also read somewhere that if any moisture does get into that space, you would want it to flow down to the soffit and so the baffles joints should lay like shingles. Not sure if I’m overthinking all of this but appreciate any guidance you can provide. Thanks!
buildingadvisor says
You are in a pretty mild climate, so ceiling moisture problems are less likely than in the frigid north where I live. Still, moisture problems have been reported in cathedral ceilings in the Mid-Atlantic states, so you still need to pay attention to details.
Couple of points: Most moisture movement into attics and cathedral ceilings is by air leakage, not by diffusion through materials. So the air barrier is much more important than the vapor retarder.
For a vapor retarder, you can use Kraft-faced batts or a vapor-retarding paint, such as shellac-based BIN or a vapor-barrier sealer/primer.
For the air barrier, it sounds like you are using the “airtight-drywall approach” or ADA, where the drywall is installed carefully to block nearly all airflow into the walls and ceilings. Builders have used this approach successfully though a combination of gaskets and sealants at critical joints, along with close attention to penetrations for electrical and mechanical systems.
Other than penetrations for wiring and mechanicals, the biggest problems occur where outside walls or interior partitions meet the ceiling plane. Here you need solid blocking along the top of the wall, usually provided by the top plate. Seal the drywall to the framing here with durable foam gaskets or high-quality sealants that will stand the test of time. Also, seal any holes drilled in the top plates to block airflow into the ceiling.
It’s also important to seal holes in the walls and partitions, since these can provide leakage paths into the ceiling. In particular, seal the drywall along the bottom plate and seal around electrical boxes and other cutouts or use special airtight electrical boxes.
Drywall joints with mud and paper tape are considered airtight. Standard electrical boxes and ceiling fixtures are not. Special ceiling fixtures that are rated for both insulation-contact (IC) and airtightness are pretty widely available nowadays, but they will still require sealant between the drywall and the housing.
When complete, how tight is the assembly? You won’t really know without a blower-door test, but in a simple structure, you will probably be OK with careful detailing as described. Also, it sounds like you have good roof ventilation providing a belt-and-suspenders approach, always a good idea with cathedral ceilings.
According to a number of studies, cathedral ceiling ventilation does not prevent moisture problems. That’s the job of the air barrier. But ventilation does provide better drying if moisture does accumulate and also helps prevent ice dams and prolong shingle life.
Finally, how to lap vent baffles. It makes sense to lap the baffles so they will drain to the soffit as you suggest. Airflow in these spaces is very slow, so I wouldn’t worry about the air resistance at the overlaps.
buildingadvisor says
Picking up on an earlier thread from March when you were traveling. I think I’ve sorted through most of my initial concerns and am about to tackle the insulation and prep for drywall. To recap, I’m finishing out a detached 30×30 two story garage-type building that will have a workshop on the first floor and a finished bonus room/office area upstairs. The structure was built 10-15 years ago but was still just a “shell” when we bought the property in 2020. The finished space upstairs will have a cathedral ceiling and I’m trying to minimize any issues where I can.
Before I launch into more questions, let me say that your website and emails have been a great source of information as I’ve tried to learn the “right way” to tackle this project. Here are a few of the items that I am currently angsting over:
1. For the cathedral ceiling in the finished upstairs area, I’ve installed all of the rafter baffles from soffit to ridge vent and added a foam board partition to allow the top plates to be insulated and protect against washover. With the baffles in place, that leaves about 8″ for insulation without compressing it. With just 8″ it seems like Rockwool is the only (and very expensive!) option that will provide R30…the fiberglass options are all 10″+. We are in Zone 3 (western South Carolina) so we don’t have to deal with long, harsh winters and I’m wondering if I go with R25 kraft faced fiberglass (significantly cheaper) would that be sufficient, from a practical standpoint?
– If I end up having to stick with mineral wool, is any additional vapor barrier needed? I’m hoping to get a good air seal with the drywall and my thought is that a vapor barrier is not necessary.
Steve Bliss, BuildingAdvisor: You can compress a 10” fiberglass batt down to 8 inches and get an R-value somewhere in between an 8” batt and a 10” batt. The drywall can serve as air barrier (if airtight) and vapor retarders (with vapor barrier paint for Class II or standard primer/paint for Class III). Mineral wood same as fiberglass regarding vapor control.
2. I will likely use kraft faced fiberglass (R-13) for all the exterior walls. For any interior walls where I want to insulate for sound (bathroom wall and office walls), should that be unfaced or does it matter?
Steve Bliss, BuildingAdvisor: Doesn’t matter. Also consider doubling the drywall on one side of the wall with the second layer glued. Seal all air leaks between rooms for soundproofing.
3. I plan to use the drywall gasket approach for exterior walls and ceiling. For this, do I just need to seal the full perimeter of each exterior wall and ceiling plane (top/bottom plate and sides…plus any doors/windows and other penetrations)? Or does it need to be on the perimeter of each sheet of drywall where it hits a stud?
Steve Bliss, BuildingAdvisor: In general, you should use high quality gaskets or sealant along the bottom and top plates of exterior walls and any walls that terminate in the cathedral ceiling. Also use caulk or gaskets around the perimeter of windows, doors, and other penetrations in walls and partitions.
4. The electrical rough-in was done with standard junction boxes (not the ones you can seal) but I plan to try the Box Shell product with spray latex foam to seal my wall and ceiling penetrations. (https://www.jboxshell.com/) Do you have any experience with this product? May be a little labor intensive but might be the best option at this point. From what I have read, the foam gaskets you can put behind an outlet cover have minimal value in stopping air movement.
Steve Bliss, BuildingAdvisor: No, haven’t seen these, but look like they should work well.
5. The workshop area downstairs will also be a conditioned space and since it is technically a garage, I will install fire-rated sheetrock on the shop ceiling. I plan to use R-19 or higher between the ceiling I-joists to help with noise (and temps)…should that be unfaced? Does it matter whether the insulation is in contact with the subfloor above or just anywhere in the void?
Steve Bliss, BuildingAdvisor: If you are insulating between two conditioned spaces, mainly for sound control, you can use faced or unfaced batts. For thermal control at least one face of the batts need to be in contact with a surface, which could be the paper facing. Otherwise you will have a lot of convection through the batt.
6. For the exterior walls in the shop, I plan to insulate (R-13 fiberglass) and cover the walls with either plywood or OSB. I will seal all ceiling and top plate penetrations before insulating the walls/ceiling but wondering if the OSB or plywood will create issues as it won’t be sealed as well as a finished drywall surface. Again, I’m in Zone 3 and trying to be practical about this. When I put up the OSB on the walls I will leave a 1/8″ gap around the perimeter (as recommended)…should I then seal that gap with a silicone caulk? I will likely paint the walls white…is this an area where waterproof paint or some other vapor barrier paint should be used, or is it not necessary? I wasn’t sure if the drywall gasket seal would be beneficial for this area as well or is it overkill?
Steve Bliss, BuildingAdvisor: Getting very speculative here as deviating from standard building practices. For the purposes of a vapor retarder painted OSB should be as good or better than painted drywall. As for sealing between the OSB panels, a urethane caulk is probably a better choice than silicone, which doesn’t bond well to wood and is not paintable. Is gasketing overkill here? Depends on the humidity levels in the shop and the detail of the insulated ceiling above. If you are relying on the seal here to keep moisture out of a cathedral ceiling above, then I wouldn’t consider it overkill – just erring on the side of caution without spending a lot of time or money.
MC Edwards says
How to Prevent Condensation in Cathedral Ceiling of New Home
I’m building a brand new house in the Hudson Valley of NY. Due to COVID-19 and tight finances I had to move into the house way before it is finished. I’m now dealing with condensation in the insulation in the ceilings. I pulled out some batts to see and yup, rafter vents covered with droplets, insulation pretty wet. I am writing this end of Jan 2022.
I have two shed roofs, top one with 5:12 pitch, facing north, lower roof is 4:12, faces south. Lower roof is connected to end wall of second story. Was planning on vented roofs using continuous vents in the soffits and end wall vents cut in lower roof, using vent profile mess at end wall. Structure is 2×12 16 o.c. Zip roof sheathing, underlayment, metal roof.
I used styrofoam rafter vents between the 2×12 roof rafters, stapled in place. They don’t go inside edge to inside edge of the rafters. They are probably two inches narrower on each side. (Should I have used wider rafter vents?)
Then I used Roxol ComfortBat mineral wool insulation. I used two R23 batts. That’s where I am now. I was planning on using ridgid foam under the rafters to get to the required R49 for my area then drywall.
(I am using Cetainteed’s Smart Membrane for the walls. Was planning on using a ridgid foam under the rafters and taping seams well — was the air barrier plan for the vaulted ceilings.
I was planning one working on the ridgid foam on the ceiling evenings and weekends, but just discovered the condensation. Now I have to pull out all the insulation so the underside of the roof deck and insulation can dry! It is just me and two dogs. I barely cook, no firewood drying inside, one unfinished bathroom with tub only so far, no shower, so no excessive moisture sources. I’m just shocked by how much water is in the insulation so quickly!
Do I buy wider rafter vents so they do go inside edge to inside edge? Do I even need rafter vents on the north facing roof?
I don’t have the funds to be able to hire a crew to do it all at once so it has to be done a bit at a time. I’m also now living here and the idea of pulling all the ceiling/roof insulation down at once isn’t practical. I can pull out a couple of rafters at a time from soffit to soffit, let it dry out, then reinstall insulation, then install strips of a ridgid foam…I would end up with a lot of seams, but it could be doable that way.
Thoughts? Thanks for any feedback
buildingadvisor says
It sounds pretty clear that indoor moist indoor air is reaching the cold underside of the rafter vents (and probably the exposed portion of the roof sheathing). The moisture is condensing and then dripping down into the insulation.
Can’t say what the source of the moisture is, but in a new build you have a lot of extra indoor moisture the first year coming from materials such as lumber, drywall compound, concrete, paints, and other materials that are drying out until they reach their stable moisture level, called the equilibrium moisture content.
It sounds like you have reasonable plan to use a layer of rigid foam under the rafters with all tapes seams. Also remember to seal the perimeter and any penetrations with canned foam or a similar durable sealant. Avoid punching holes in the foam for ceiling fixtures or other mechanical systems.
As for doing this piecemeal, one rafter bay at a time, it sounds painful, but doable. I would use canned foam wherever there are gaps at the joints and tape the joints as well with a professional construction tape compatible with the type of foamboard you are using. Also make sure you have an airtight joint at the top of the walls where the wall air barrier meets the ceiling air barrier. The devil is in the details!
I would recommend running the vents the full width of the rafter bay, mainly to get the best ventilation you can. Vent gaps of 1-2 inches have been shown be more effective than the more common 1 inch gap. Also some of the cheaper vent spacers are easily bend by the insulation, leaving a minimal gap.
The vent space is mainly to help reduce ice dams and keep the roof a little cooler, but it also provides some drying potential for any moisture buildup either due to condensation or roofing leakage. Research shows that there’s not a lot of air movement through cathedral ceiling vents, but it’s better than nothing.
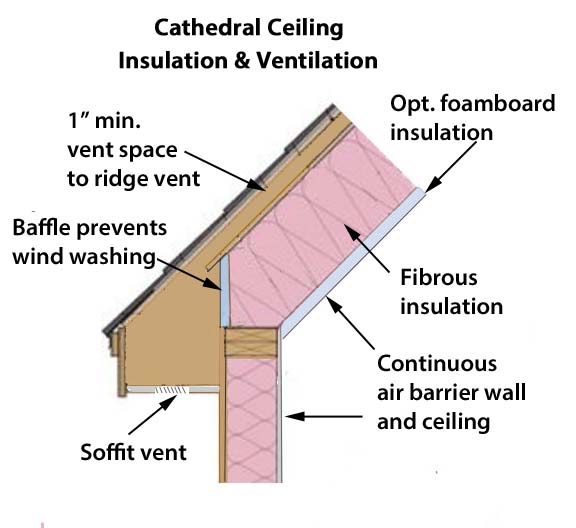
Also make sure that the insulation extends over the top plate and is kept in place by blocking. This keeps insulation out of the eaves and reduces “wind-washing”. (See illustration in the article above)
You need both soffit and ridge vents for these to function properly. Not sure why you would want to omit this on the north facing roof.
Finally, it would help if you could get a handle on the moisture level indoors, which is probably high given the amount of condensation you are getting. A good quality humidity meter would help. Other than the drying out of materials, I would focus on the basement. Do you have an uncovered crawlspace, wet basement, high water table, or other moisture source in the basement?
Until your project is completed, and you get the moisture problem under control, you may want to run a dehumidifier in the winter months as needed. You many need to do some testing to find a suitable indoor humidity level. Most experts recommend a level from 30-50 RH in winter in cold climates. The lower the better for condensation problems, but too low and you may end up with dry skin and minor respiratory discomfort.
chris says
Vaulted Ceiling In Addition Dripping Water!
I recently added an addition to our house. It is a master bedrooom with a vaulted ceiling (see framing detail below). Several months ago we noticed the peak sweating. One night it was so bad it was actually dropping water on to our floors! Since then we have had a fan go pretty much non stop and we run a dehumidifier certain days as well. The ceiling has drywall but at the pitch it is open and has the lam beams exposed there with a faux beam over it. I don’t believe the beams were ever sealed or anything.
Believe the ceiling insulation got dropped from R-38 to R-19. I live in St Louis MO. On sunny hot days, there is a dreadful smell in the addition. I have measured the humidity in there and it is 5 percentages higher than the rest of house.
Can you think of a way to stop the condensation from happening? I know if nothing is done mold will happen and the whole structure will have to be redone. Thanks
buildingadvisor says
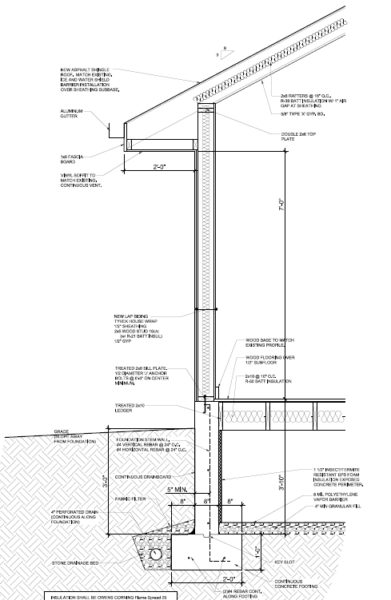
The one framing section shows 2×8 rafters with R-38 batts and a 1 inch vent space above. It indicates that there is a soffit vent, but does not show or mention a ridge vent.
can’t see anything about the exposed lam beam or faux beams. Are the lam beams purlins running at right angles to the rafters? How many? Is there an exposed ridge beam? A photo or two of the ceiling would help.
I can only speculate based on the limited information provided . Given the moisture problems in the vaulted (cathedral) ceiling, the smell is probably mold in the cathedral ceiling. This usually starts on the underside of the roof sheathing, which is the coldest surface in the roof framing cavities. My guess is that lots of moist air is leaking into the ceiling cavity and condensing on the underside of the roof sheathing.
Some drips down. Some stays in the wood and when temperatures rise, mold and eventually decay fungi will flourish. Roof ventilation helps allow some slow drying to take place, but it does not prevent moisture problems. A one-inch ventilation space above the insulation is the minimum. Two inches is better. And both soffit and ridge vents are required with no blockages near the eaves – a common place where contractors accidentally block the air space with insulation. I don’t see any vent baffles indicated on the drawing.
The only sure-fire way to prevent problems is to keep moist air from leaking into the roof structure. That requires careful air sealing of the ceiling drywall – or the use of a “smart” membrane above it. In your case, high-performance sealant may be your best bet. Do not use painter’s caulk or siliconized acrylic. Use urethane or another high-performance sealant that will last for many years and remain flexible. Any ceiling fixtures can also be a source of leakage. Recessed lights are especially bad unless designed as sealed units.
To identify the leakage areas, you will probably need a weatherization contractor with a blower door and smoke stick (or similar device to make the airflow visible). You may be able to pick out the most obvious leaks visually, but you can’t be confident that you’ve sealed them all without a blower door.
It also sounds like your house is unusually humid indoors. Is there standing water in the crawl space? A high water table? I would suggest beefing up the crawl space ground cover with reinforced poly (such as Tu-Tuf) or a heavier 15 or 20 mil ground cover with the seams overlapped and sealed and the edges turned up and sealed to the walls. Since the crawlspace is mostly below grade, it would be best to run the ground cover up the foundation walls to grade to limit moisture movement into the crawlspace. Measuring the humidity in the crawl space and house before and after adding the ground cover will help you determine the effectiveness. It’s also unclear whether this is a vented or unvented crawlspace. Either can work if done right, but an unvented crawlspace needs to be properly tied into the home’s Hvac system.
Another source of moisture can the building itself during the first year after construction. The concrete, drywall, framing lumber, and other materials can give up a lot of moisture the first year, adding to the moisture already in the house. Other possible sources of moisture are lots of house plants, indoor stacking of firewood, a disconnected vent pipe from the heating system (also a source of deadly CO), and unvented kitchens and baths.
At this point, I would wait until summer to try to dry out the roof cavities before sealing up the space. I would suggest cutting an observation hold somewhere near the peak of the roof where the problem is worst – this makes sense because warm, moist air rises in winter due to the stack effect. It make take a month of summer weather to dry out. Once dry, the mold and any minor wood decay will go dormant and not bother anyone unless they are saturated again in the future.
Daniel says
I have the same problem in my living room, humidity get trapped, moisture will condensate at time and mold will grow. The ceiling is a high cathedral style, creating a stratospheric moisture trap. I tried a multitude of solutions, none worked. If you perhaps found out how to resolve this type of problem, then please let me know. Thank you!!
LR says
Best Insulation For 2×6 Rafters?
We bought a 450 sq ft cottage in Buffalo, NY, and are remodeling it. The walls have insulation, but not the roof. It is low-pitched with no ridge vent, and only 2×6 rafter spaces for insulation. We bought R-30 insulation and baffles, but the R-30 is too thick to fit. The plan to have a cathedral ceiling finished with drywall.
We think the structure was originally built as a garage and converted into a cottage. We don’t plan to live there year-round, but it will be using it as a getaway, mostly in the summer. It will have small gas wall heater for cold-weather use.
What’s the best type of insulation to use?
buildingadvisor says
If this was year-round living space and you wanted (or needed) to achieve the typical code minimum of R-30, then your best bet would be an unvented “hot roof” using closed-cell urethane spray foam. This provides about R-6 per inch and provides an effective air seal to keep household moisture out of the roof cavities. It is a one-step solution, but also the most expensive. It is probably overkill for a vacation cottage used mostly in fair weather.
The least expensive option is batt insulation, but that requires vent channels of 1-2 inches below the sheathing – 2 in. preferred. That leaves you with R-11 or R-13 (high density) batts. Also, you will need to retrofit a ridge vent, not a difficult job in warm weather.
The simplest way to beef this up, if you have the headroom, is to add a layer of foam board under the rafters. Adding foam board adds R-value and reduces the thermal bridging through the rafters. By taping the seams and used canned foam around the perimeter, the foam can also serve as your air barrier.
An airtight air barrier is needed to keep moist household air out of the roof structure. One inch of foam would add from R-4 to R-7 depending on the type of foam. With two inches of foil-face isocyanurate foam, you be just about at R-30. If you add a layer of ¾ strapping before installing the drywall, you will get an additional R-3 for the air space facing the foil.
One more option to consider, if you plan to do the work yourself, is called “cut and cobble”. That means cutting strips of foam board to fit tightly between the rafters. You could do this as either a vented or hot roof. You will need to very carefully tape and seal the bottom layer of foam board to create an airtight air seal – critical if this is a hot roof. For the best performance, you would want each layer to fit tightly, foaming any cracks around the perimeter and taping seams.
Cut and cobble is very labor intensive, but doable, once you work out a good method for accurately cutting the foam. I’ve tried table saws, saber saws, serrated knives, hand saws, long-blade razor knives, etc., with mixed success. None works as well as a professional foam cutting tool.